Intro to Schedules
Learn how to create, manage, and collaborate on specification schedules in Inspec.
Creating a new schedule from a template
Now that you have created your project, you can start creating specification schedules!
- Create a new schedule — Click on the + New Schedule button in the top right corner of your screen.
- Select From Template — Select the From Template option from the dropdown menu (if your company has no templates, you will need to create one first, or save an Inspec template to your library).
- Apply Template — Choose a template for your schedule and click Apply Template.
Creating a new schedule from scratch
Although we always recommend companies use templates for their schedules, it is possible to create a custom schedule from scratch.
- Create a new schedule — Click on the + New Schedule button in the top right corner of your screen.
- Select Blank Schedule — Select the Blank Schedule option from the dropdown menu.
Creating a new schedule with Excel Migration
Our new Beta Migration feature means you can import existing spreadsheets into Inspec and continue working where you left off. To learn more about our Excel Migration feature, click here.
- Click on the + New Schedule button — Click on the + New Schedule button in the top right corner of your screen.
- Select Migrate From Excel — Select the Migrate From Excel option from the dropdown menu.
- Upload your Excel file — Upload your Excel file and take note of the 'before you begin' tips for best results.
- Set schedule details — Set your Schedule Name and choose the starting Revision for the schedule, then click the Start Migration button (you can always turn off Revision Control in the schedule Settings once import is complete).
- Wait for migration to complete — Your Migration will take a few minutes depending on the file size. Inspec will send you a notification when the Migration is complete.
It is important to note that although Migration has been designed to be as accurate as possible, since every studio's spreadsheets & schedules are structured differently, we always recommend reviewing the generated Inspec schedule following import to ensure everything has transferred as expected. Any adjustments can be made directly within Inspec after import.
Navigating the schedule page
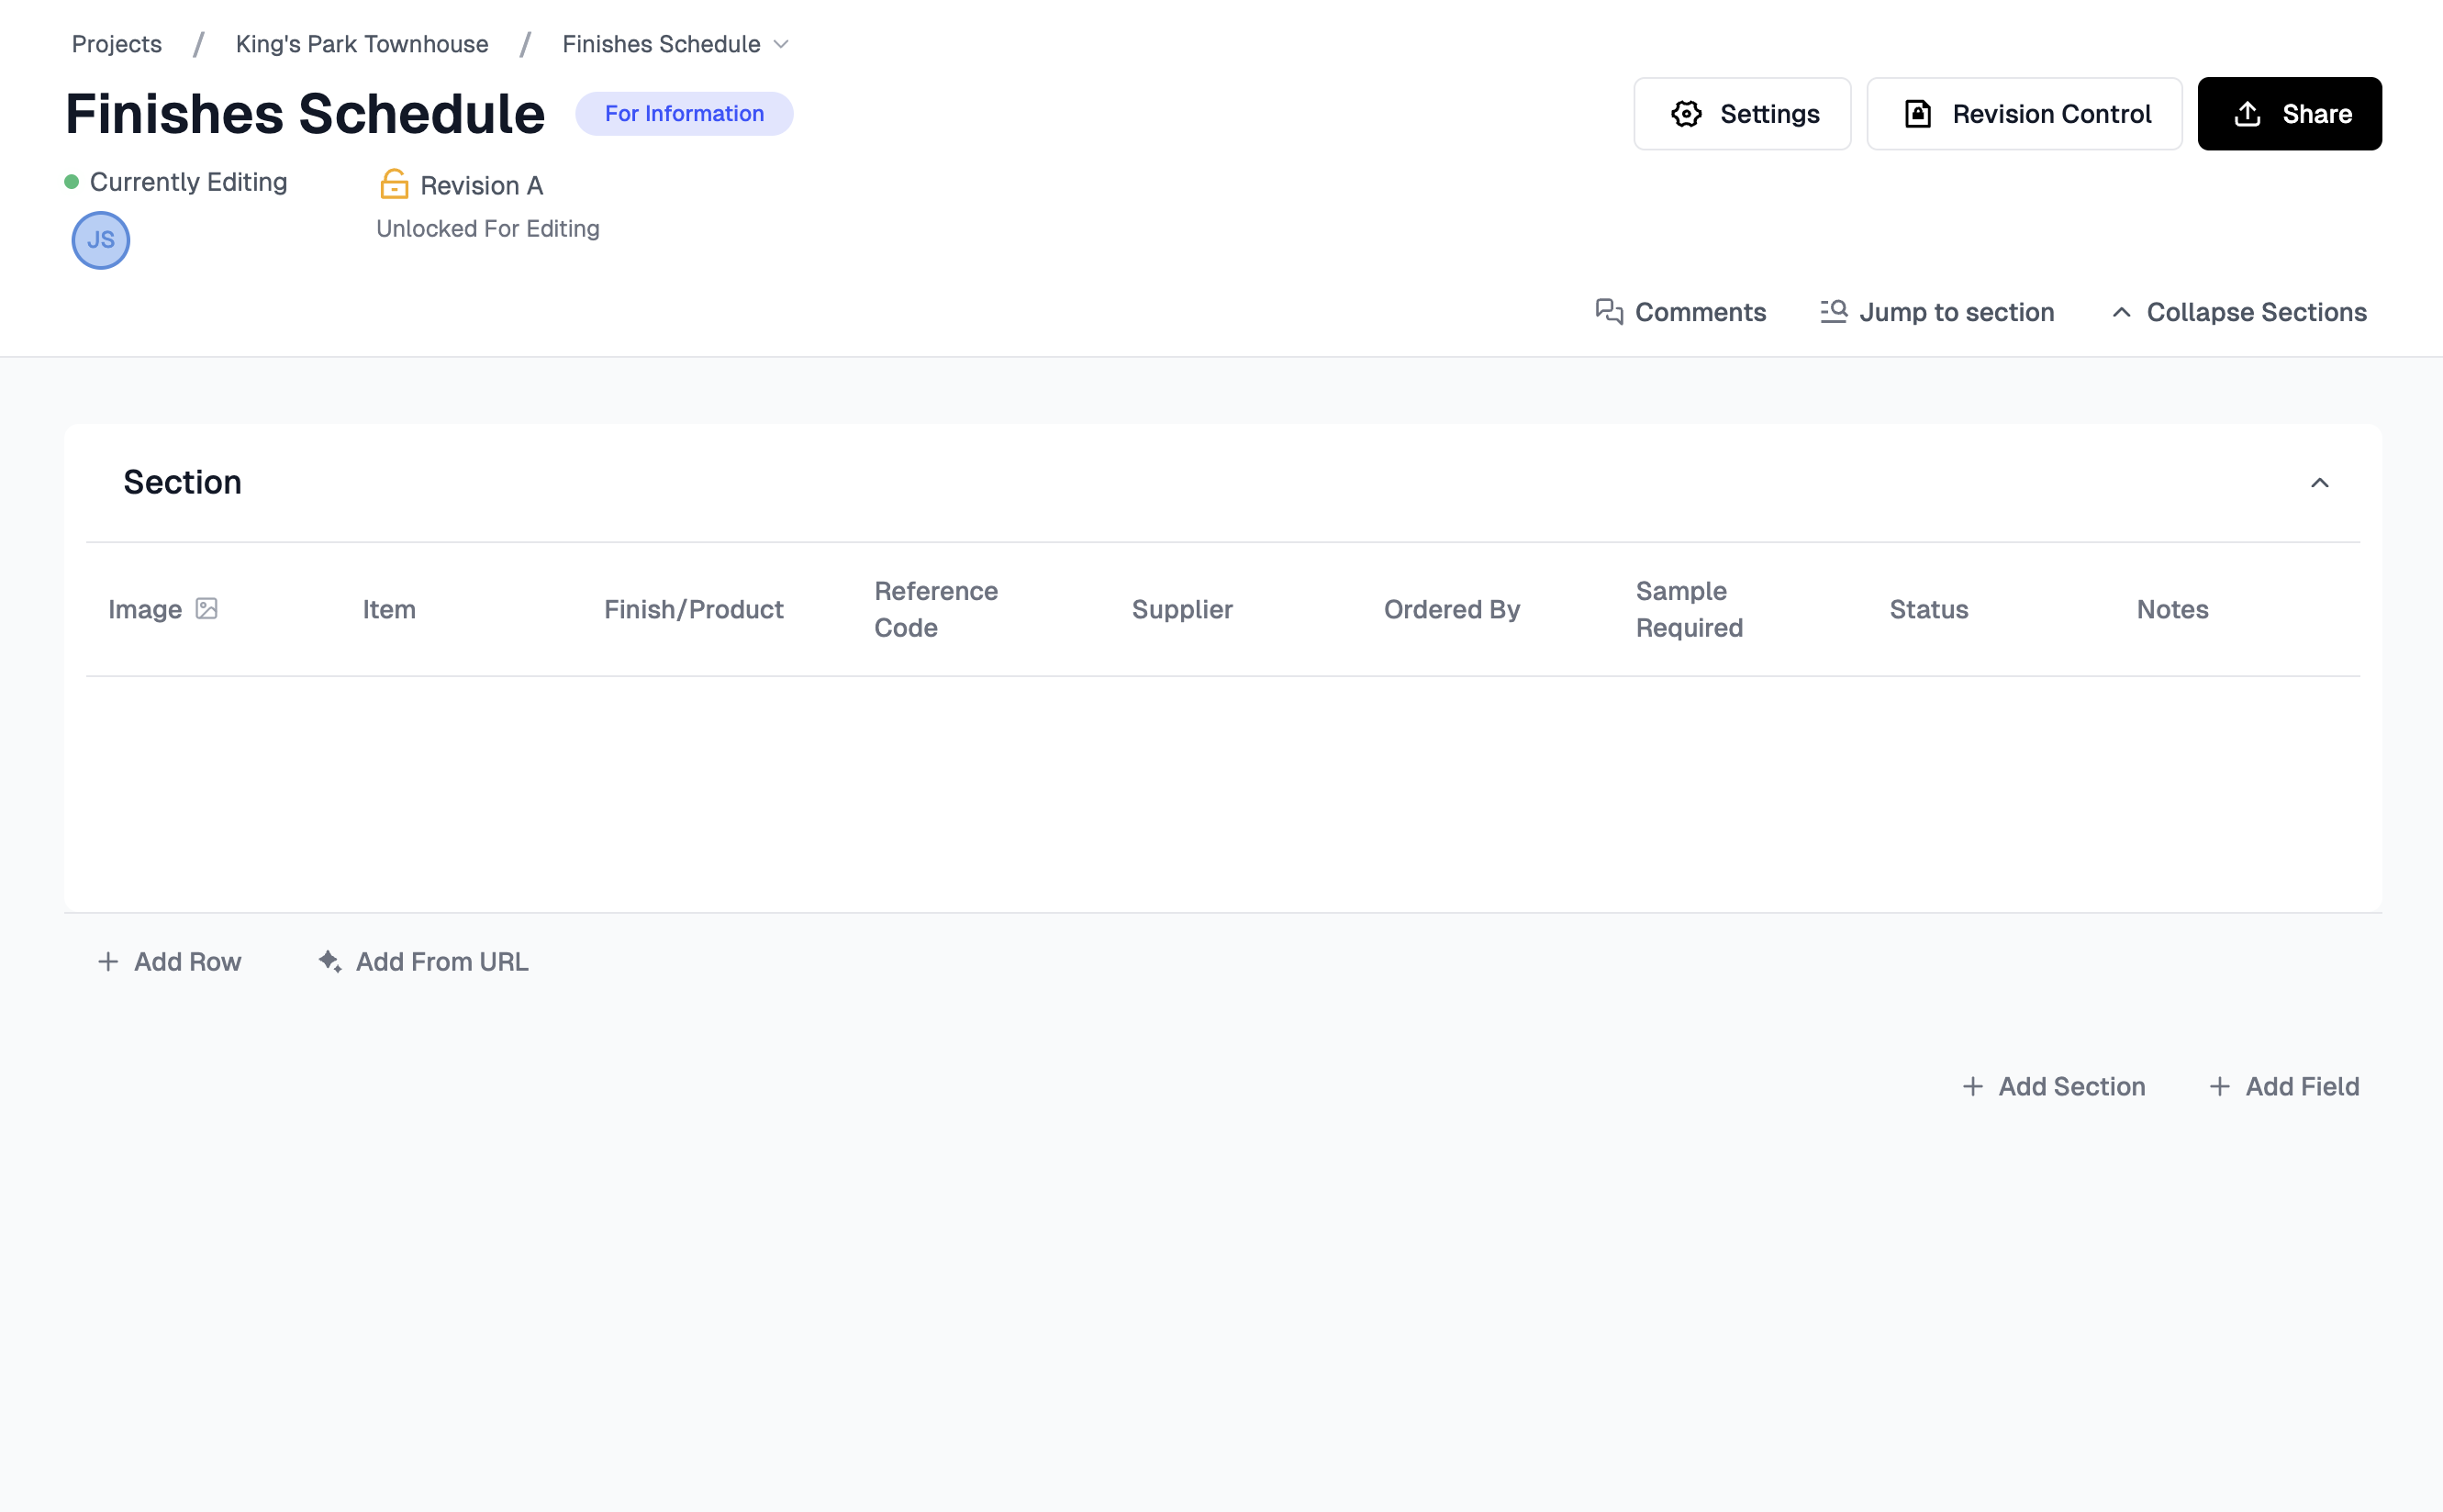
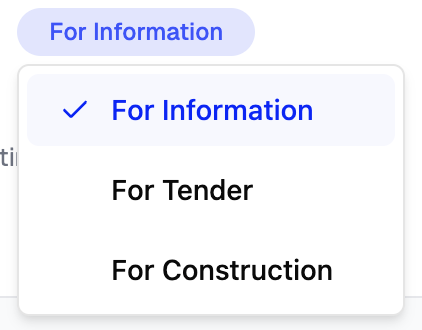
When you open a schedule from your project, you will see the name of the schedule in bold text at the top of your page. Beside the schedule name, you will see the schedule status button. All schedules default to "For Information" when first created. To change the status, click on the button to reveal a dropdown menu with other options and select the preferred. Learn more about the purpose of a Schedule Status.
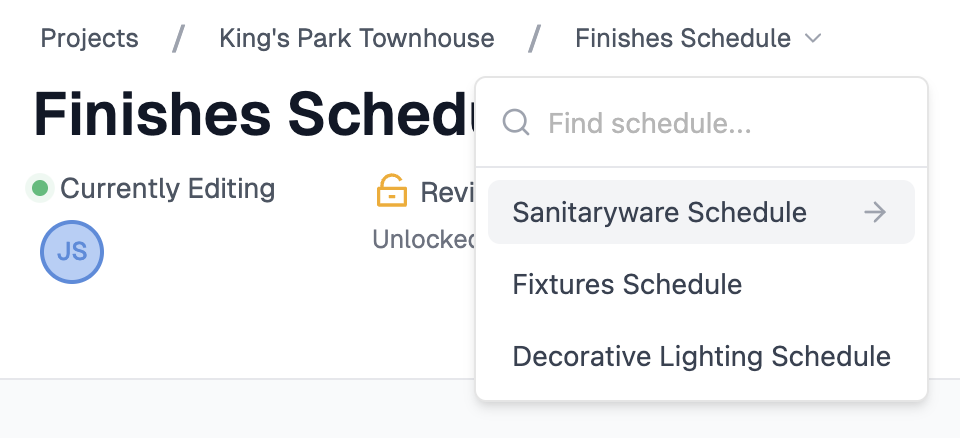
Above the schedule name, you will see the breadcrumb links, which if you click on the schedule crumb, you can quickly access any other schedule in that same project.
Below the schedule name, you can see who is currently editing the document. Inspec has a real-time collaboration feature which allows you and your team to all edit the documents simultaneously. If other members of your design team are editing the same schedule as you, their user icon will appear here.
Revision Control is always on by default when you create or import a new schedule, so you will be able to see the current revision and the state of that revision beneath unless this feature is disabled.

If you have enabled Revision Control on the schedule, you will be able to see the current revision and the state of that revision beneath.
There are three buttons in the top right corner of the screen, Settings, Revision Control & Share.
Settings — here you can change the name of your schedule, add a disclaimer if you don't already have one in your template or edit the disclaimer for that schedule, update your advanced settings regarding revisions and exports or delete the schedule permanently.
Revision Control — here you can lock/unlock revisions and view previous revisions.
Share — here you can export your draft or locked revision schedule as a PDF. You can also generate a shareable link and a printable QR code if the revision is currently locked. Unlocked revisions cannot be shared by link or QR code.
The "Collapse Sections"/"Expand Sections" tab is a quick way to collapse/expand each section in your schedule.
"Jump to Section" allows users to navigate quickly to a specific section in the schedule, particularly useful for long documents.
"Comments" allows users to quick view and respond to any comment threads that have been created on this schedule.
Any work made to a schedule will save automatically.
Managing & editing your schedule
Sections
Sections are used to break down your schedule into more manageable chunks. For example, you could section your schedule into buildings, floors, rooms etc.
Sections can be added to your templates in advance if you use the same sections across schedules regularly. To learn more about sections in templates, click here.
Empty sections will be hidden on PDF exports by default. To control the visibility of empty sections on your exports, click on the schedule Settings button in the top right corner of the screen and scroll to Export Settings.
Sections can be individually collapsed by clicking on the ^ button to the top right corner of the section tile. To collapse all sections in one click, there is a tab on the top right called Collapse Sections.
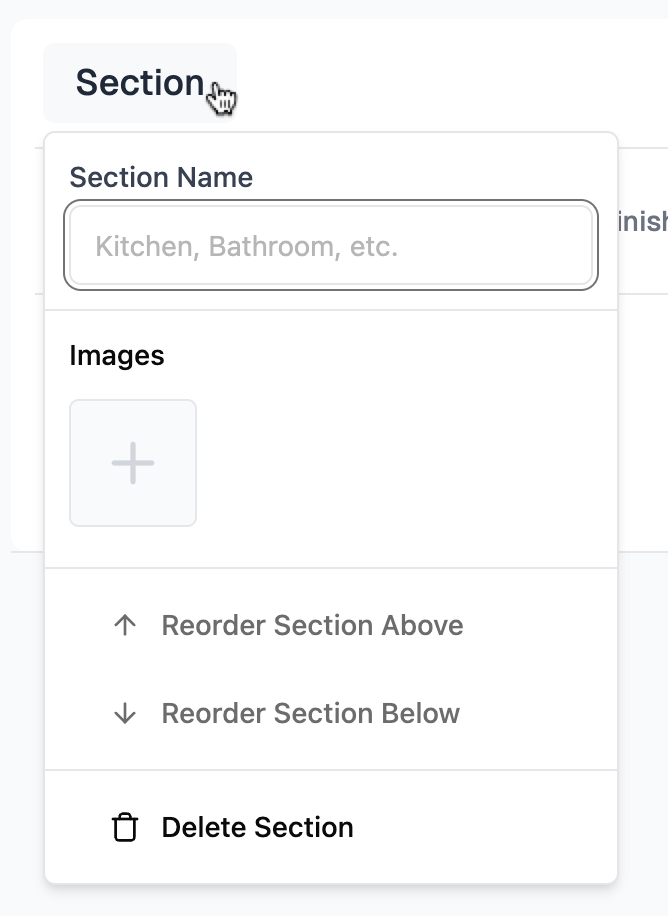
To edit or delete your section, add a photo or reorder the section in your schedule, click the section heading.
To control the size of images in your sections, click on the schedule Settings button in the top right corner of the screen and scroll to Export Settings.
If you hover above a section name, a checkbox will appear, which means you can select all rows within a section and either delete or duplicate to another section in the same schedule.
Section total bars are added automatically if your schedule contains a Price Field Type. To learn more about the different field types, click here.
Changes made manually to sections in a schedule will not translate over to the saved template.
Fields
If you have selected a template for your schedule, you will see each field appear in a column style format. Fields are also assigned a Field Type, which limits the style of information that can be added to any cell beneath it.
You cannot change the field type of a field once it has been created.
New Fields can be added manually to a schedule by clicking the + Add Field button. Here you can name the Field and select the Field Type.
Fields can be resized by click and dragging on the divider line that appears when hovering over the field. To learn more about field widths on exports, click here.
You can control the visibility of specific fields on your exports in Schedule Settings. To learn more about schedule export settings, click here.
Changes made manually to fields in a schedule will not translate over to the saved template.
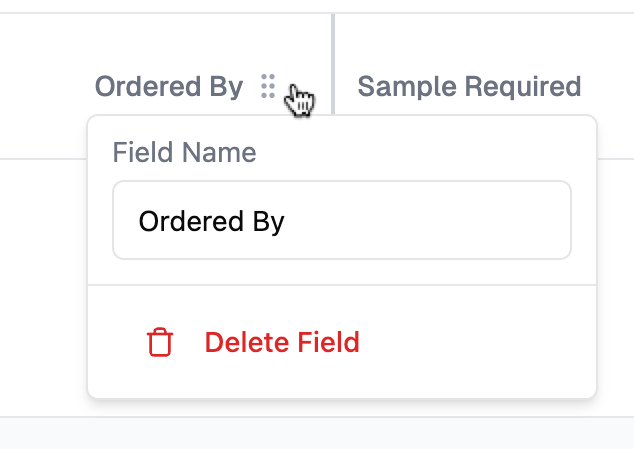
Field heading actions
Fields can be renamed or deleted by clicking on the field heading.
Fields can be reordered by click and dragging the grip icon beside the field heading to the desired location.
Certain Field Types will have Field Options. To view the Field Options, click on the field heading in your schedule. To learn more about Field Types, click here.
Rows
A row is where you will input the information for your specifications. For example, you may have a row related to the flooring specification in a bathroom. Each cell in that row will be populated based on the field types above. To learn more about Field Types, click here.
To add a new row, click the + Add Row button beneath the section tile on the left side.
To move around the cells in a row you can use the arrows and/or Enter key on your keyboard. Pressing Enter in the last cell at the end of a row will automatically create a new row. Using the ctrl/command Z keyboard shortcut will undo text within text field types.
If you hover above a row, you will see a checkbox icon, speech bubble icon and grip icon appear to the left of the section tile. Each row will have its own set of icons.
Checkbox Icon Features
The checkbox icon means you can select an entire row, or multiple rows at once, and either duplicate those rows to another section(s) or delete them. To learn more about duplicating rows, click here.
Speech Bubble Features
The speech bubble icon allows you to make comments against a specific row. To learn more about comments, click here.
Grip Icon Features
The grip icon has many functions.
Rows can be reordered within a section by click and dragging to the desired location.
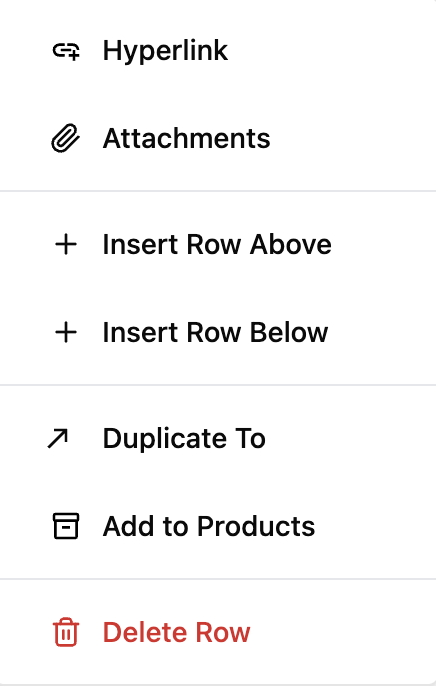
If you click on the icon, a dropdown menu appears with options to add a hyperlink, add attachments, add to products and the ability to rearrange your row or delete the row entirely.
There is more than one way to populate a row with information for your specification:
- Manually entering information
- Add From URL feature
- Web Clipper
- Adding from products
Read more about Add From URL and Web Clipper.
Rearranging rows in your schedule
Rows can be rearranged, duplicated or inserted into a specific position in your schedule.
To add a new row to the bottom of your section, click + Add Row beneath that section tile.
To add a row to a specific position in your section, hover over the row above/below and click the grip icon to the left side of the section tile and click on Add Row Above or Add Row Below. Alternatively, by dragging on the grip icon you can move a row to the desired position.
Duplicating rows
There are a few ways to duplicate rows within your schedules.
To duplicate a single row you have two options:
- Hover over the row and click the grip icon on the left side, then select Duplicate To. This lets you duplicate to one section at a time.
- Select the checkbox beside the row, then click Duplicate To in the action bar at the bottom centre of your screen. This lets you duplicate to multiple sections at once — useful when you're specifying the same product across several rooms.
To duplicate multiple rows at once:
- Select the checkbox beside each row you want to duplicate.
- An action bar will appear at the bottom centre of your screen.
- Click Duplicate To and select one or more sections where you want the rows to appear.
- The duplicated rows will appear at the bottom of each selected section.
Deleting rows
To delete a single row, hover over the row you wish to delete and click on the grip icon to the left side of the section tile, then click on Delete Row.
To delete multiple rows at once, select the checkbox beside each row you want to delete and click on the Delete button in the action bar at the bottom centre of your screen.
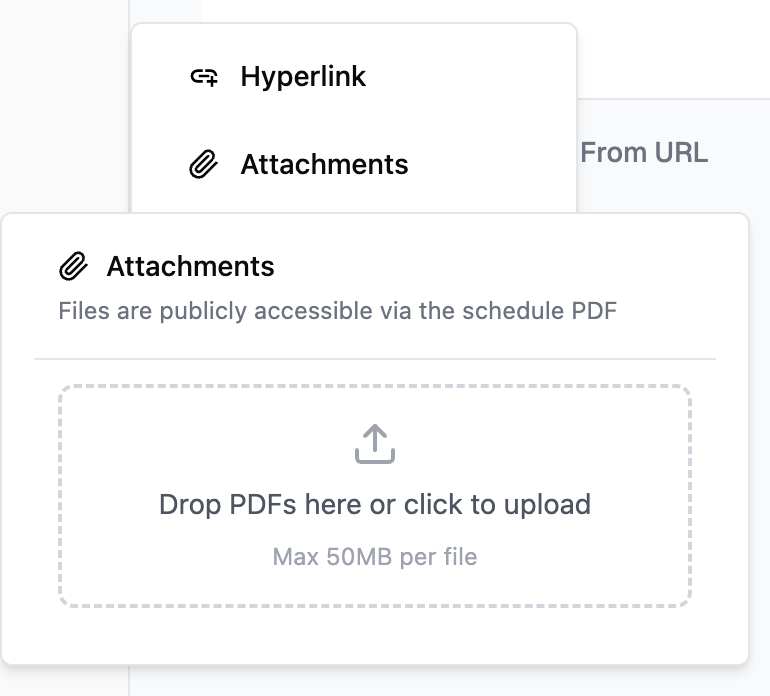
Adding attachments to your schedule
Adding attachments to a schedule is a convenient way to redirect your contractors & consultants to spec sheets, installation guides etc that are relevant to the product or item in a specific row. Your attachments are then easily downloadable from the exported PDF document by clicking on the document icon to the left of the row.
-
Access the row menu — Hover over the relevant row and click on the grip icon to the left of the row.
-
Open attachments — Click on the Attachments option from the dropdown menu.
-
Upload your files — Upload your PDF documents (up to a maximum of 3 files).
-
Preview attachments — To preview the attached file(s), repeat steps 1 & 2, (the number of attached documents will appear) then click on the highlighted link to the PDF to open in your browser.
Note: PDF exports
Attachments are visible on PDF exports by default, however you can hide them in schedule Settings. To learn more about schedule export settings, click here.
Adding hyperlinks to your schedule
Adding hyperlinks to your schedule can be a useful tool to reference the product on the supplier's website or to provide valuable information on the specification.
Hyperlinks can only be added to individual rows. Only one hyperlink per row can be added.
- Access the row menu — Hover over the relevant row and click on the grip icon to the left of the row.
- Open hyperlink option — Click on the Hyperlink option from the dropdown menu.
- Add your URL — Paste the website URL and click save.
Note: PDF exports
Hyperlinks are visible on PDF exports by default, however you can hide them in schedule Settings. To learn more about schedule export settings, click here.
Adding Products to your schedule
You can add any existing Product in your catalogue directly to your schedule.
- Click on Add From Products — When working in your schedule, click on the Add From Products button at the bottom left of the section.
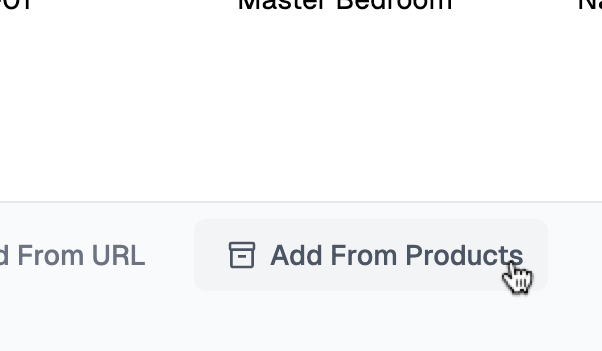
- Select your product — On the pop-up, you can search for your product, or select from your favourites. Click on the Product you want to add.
- Field Mapping — Review and adjust the Field Mapping on the pop-up, and click Add to Schedule. To learn more about Field Mapping, click here.
You can also add products to your schedule directly from the Products tab. To learn more about Products, click here.
Adding images to your schedule
You can add images to your schedule as a visual reference to your sections and/or specification proposals.
Adding images to your section header
To upload an image reference e.g. floor plan or sketch to your section heading, click on the section title and upload your JPEG or PNG file. Images in section headings will be visibly larger on your PDF export than those images in rows. To learn more about adjusting the size of the section image, click here.
Adding images within rows
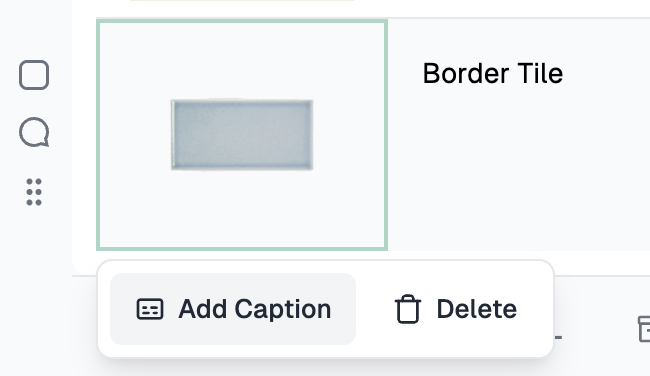
To upload an image reference e.g. product photo to your row, you must have one field type set as Image. Click on the cell you wish to upload a photo into, and an Upload Image button will appear.
You can also add a note to your image field by clicking on the cell and selecting Add Caption. This is just another way to communicate specific details about the image or specification to your project team.
It is possible to either drag and drop your image into the cell, or copy and paste an image into your cell using keyboard shortcuts.
- Click on the image cell.
- Use the paste shortcut on your keyboard (Control + V or Command + V).
All Inspec pre-built templates have an image field.
To learn more about Inspec templates, click here.
To learn more about Field types, click here.
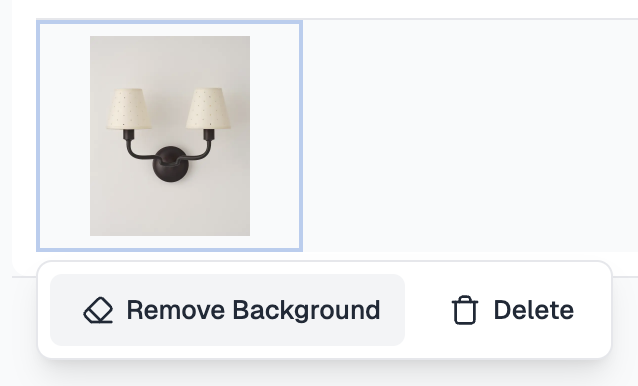
Removing the background from an image
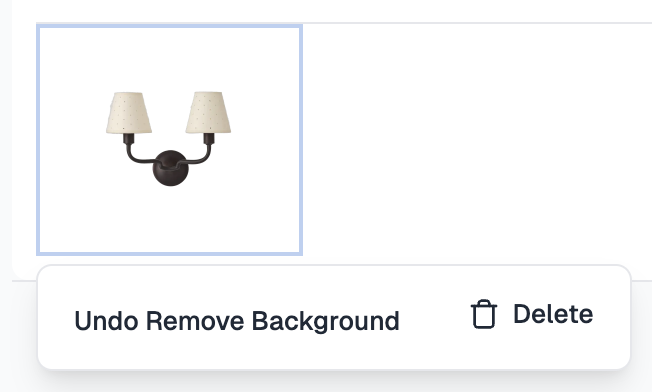
Our built-in AI generated background removal feature is available on image field cells that have a JPEG or PNG file uploaded. Click on the cell with the image, and select the Remove Background option from the dropdown.
Results are not always perfect. If the outcome is not as you like, you can click on the Undo Background Removal button to revert to the original image.
Creating new suppliers from Supplier fields
If you're specifying a product from a supplier that's not yet in your database, you can add them directly from your schedule without interrupting your workflow. There's no need to navigate away to the Supplier Database, everything can be done right where you're working.
- Type the name of the Supplier into the field.
- Click + Create if the Supplier does not already exist in your database.
- A pop-up will appear prompting you to enter the rest of the Supplier's details. This will save you having to navigate away from your schedule page, however you can skip this step and do this later on the Suppliers tab.
- Once you've filled in all the details required, click Add Supplier. This will automatically add the supplier to your database, whilst also populating the data into your schedule.
To learn more about Suppliers, click here.
Changing the name of your schedule
To change the name of your schedule, click on the schedule Settings button on the top right side of your screen. Once you have updated your schedule name, click Save Changes at the bottom of the settings pop-up.
Turning off/on Revision Control and Issue Report
To update the advanced controls of your schedule, click on the schedule Settings button on the top right side of your screen. Scroll until you see the toggles that enable Revision Control & Issue Report and update accordingly. Once you have updated your preferences, click Save Changes at the bottom of the settings pop-up.
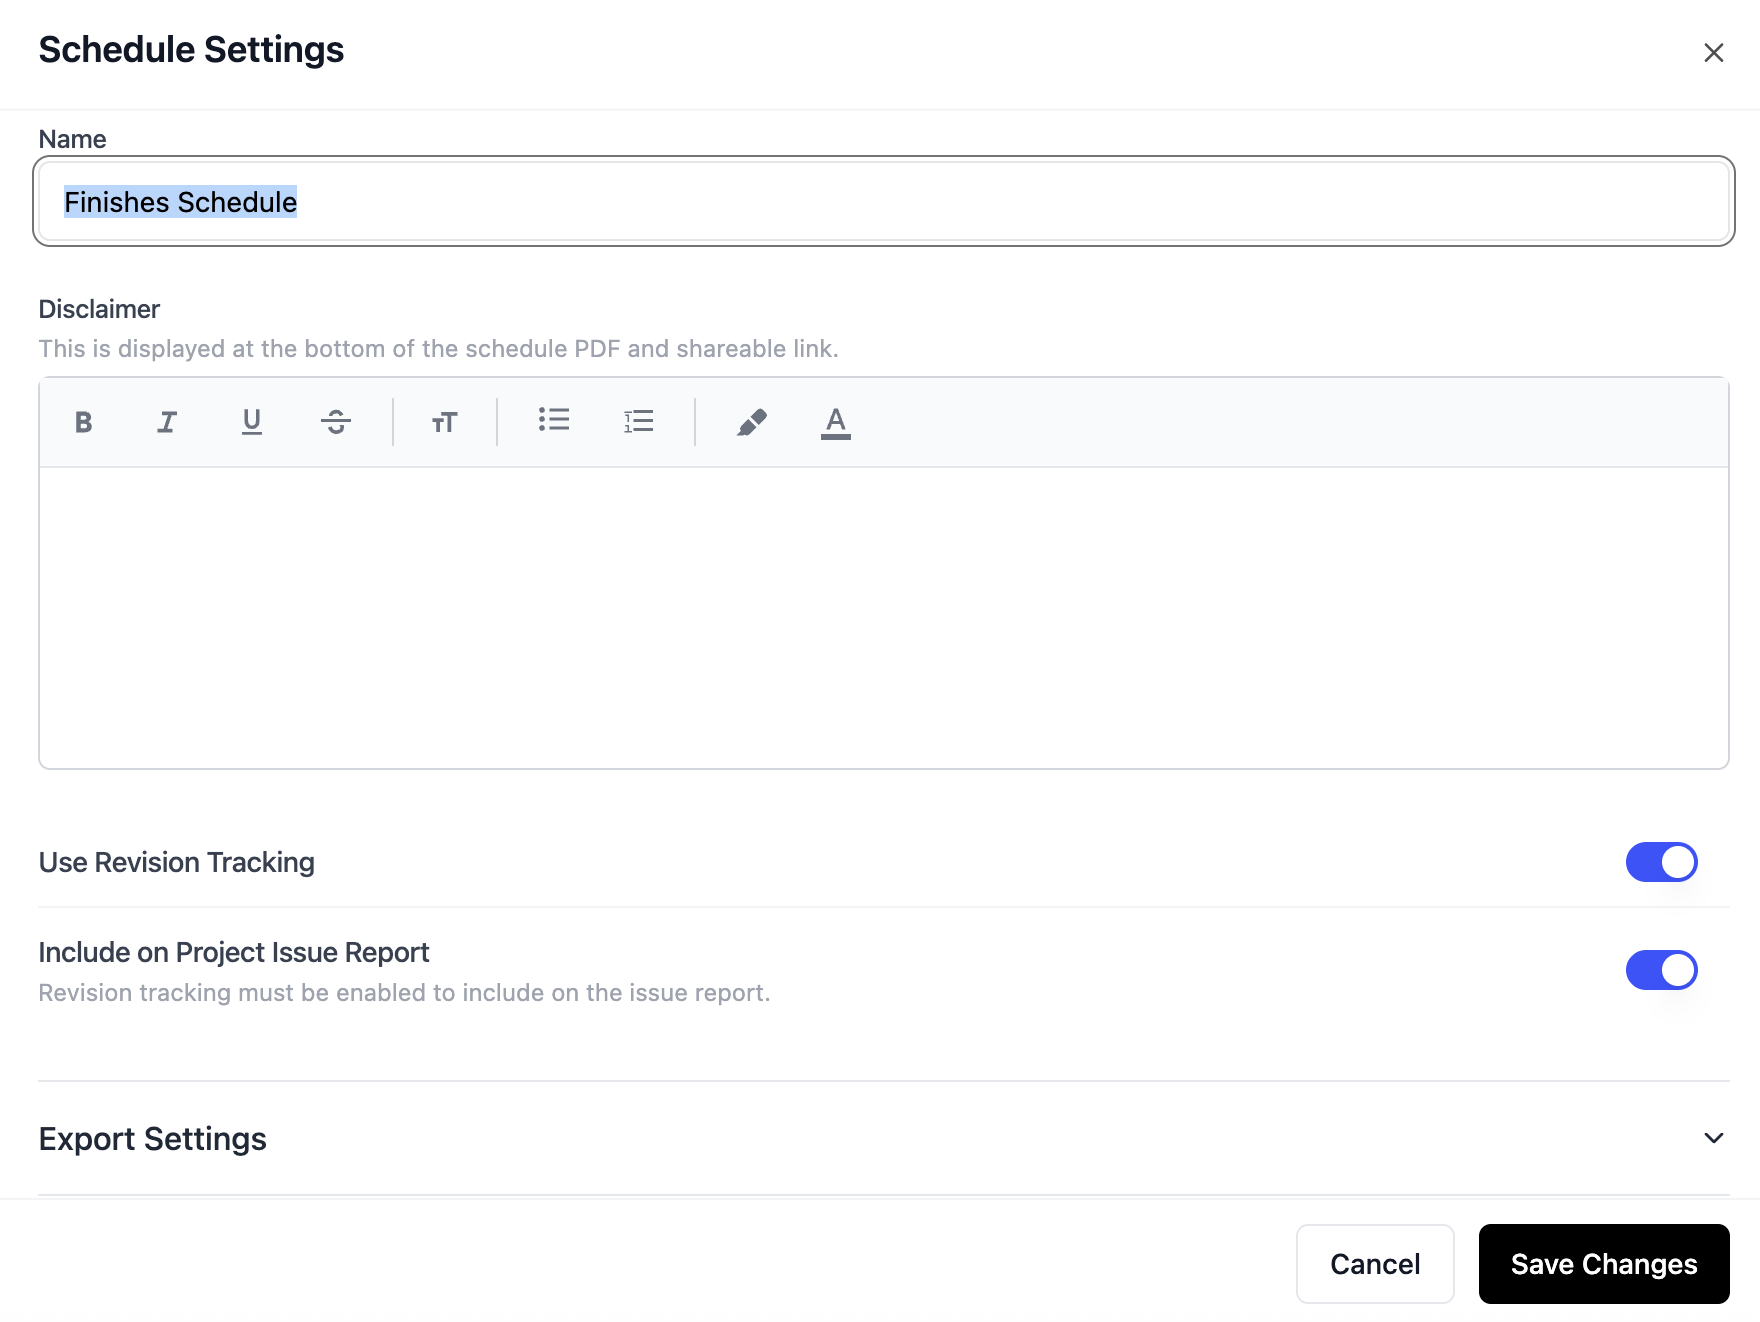
If you want to use Revision Control but don't want your schedule exports to have the orange highlight for modification visibility, then you can now turn this off in Export Settings. To learn more about Automatic Change Tracking, click here
Collaborative editing in schedules
Inspec is 100% cloud-based meaning that everything you do on the app is synchronised in real-time. As part of building a highly collaborative software, we've included a feature that allows all users in your company to work on the same schedule at the same time with any updates made appearing live on your screen.
All schedules have a Currently Editing element beneath the schedule name at the top of the page. It will ping green and your personal user icon will appear if the document is being edited. Here you will be able to see if any other user from your company is in that schedule and making edits at the same time as you.
When multiple people are working in the same document, you will see their user icon appear around the cell they are making edits to.
All company users have the ability to make comments against specific rows in a schedule by clicking on the speech bubble icon to the left side of the section tile. Users may use the comments feature to delegate tasks or record notes regarding that specification.
Purpose of a schedule status
Setting a schedule status can be useful for communication with the on-site team. When sharing your schedules with contractors & consultants, it's normally quite important to advise if the proposed specifications are For Information, For Tender or For Construction.
For Information — Specifications are shared for awareness and reference purposes only. These are not yet approved for pricing or construction and may still be subject to change. This status is typically used during early design stages to keep stakeholders informed of the project direction.
For Tender — Specifications that have been approved for contractors to use in preparing their bids or quotes. These represent the scope of work that pricing should be based on. While minor refinements may still occur, the design intent and major specifications are considered firm enough for accurate cost estimation.
For Construction — Final, approved specifications that contractors should use for actual construction work. These have been fully reviewed, coordinated, and authorized for implementation on site. This status indicates that the design is complete and any materials, products, or work methods specified should be procured and installed as documented.
Purpose of a disclaimer on your schedule
Disclaimers can be important in design to create clear professional boundaries and helps prevent misunderstandings that could lead to disputes, delays or legal issues down the line. It's generally a standard practice that helps protect the designer but also ensure the project runs smoothly.
Generally, we would recommend setting up a disclaimer when creating your schedule templates. To learn more about templates, click here.
You can add a disclaimer at any time in template edit mode or in schedule settings.
If you would like a different disclaimer on a specific schedule to what was set on your original template, it is possible to make adjustments in schedule Settings. Remember to Save Changes when you are finished editing.
Any changes you make to a disclaimer directly on that schedule, will not translate across to your saved template. If you want future schedules to have the same amendments, you must edit the disclaimer in template edit mode.
A disclaimer will always be shown at the bottom of your schedule PDF export.
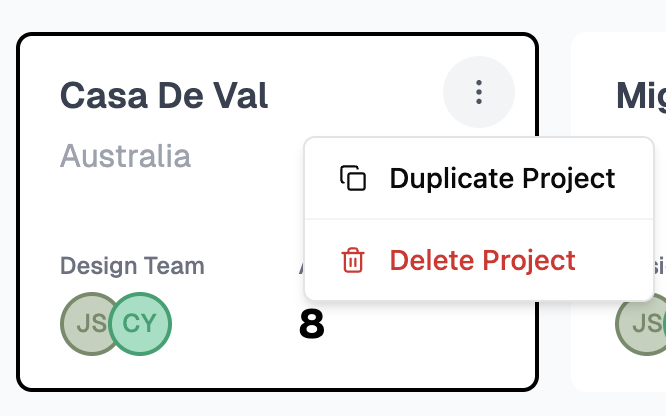
Duplicating/deleting a schedule
To delete a schedule, you can hover above the schedule tile and click the 3 dots icon, this will give you the option to either duplicate the schedule (including all its data) or delete the schedule entirely.
Managing your schedule export settings
We have introduced complete control over what information is shown in your schedule exports, as well as allowing you to customise the schedule cover page by adding custom fields alongside the defaults. To learn more about adjusting the schedule cover page, click here.
To control the image size in your sections, the visibility of hyperlinks, attachments or particular fields in your schedule:
- Click on the schedule Settings button in the top right corner of the screen and scroll to Export Settings.
- By default, section images are large & all fields (including hyperlinks and attachments) are enabled. Toggle on/off anything you wish to hide/show on your PDF exports.
- To change the image size in your sections, select from the dropdown menu. (This does not apply to images within a row which are fixed.)
- Changes made to the default export settings will only apply to that schedule. You will need to adjust any other schedules within that project to match.
To learn more about customising your schedule cover page, click here.