Intro to Templates
Learn how to create, edit, and manage templates in Inspec for your specification schedules.
Why do I need templates?
Having a selection of templates in your company library sets up the foundations for your future specification schedules. You can create customised templates from scratch to suit your preferences, or you can save and use any of Inspec's pre-built templates to save time. All templates in your library are available for any team member in your company to access.
Where to find templates
To access your company's templates, go to the side bar on the left side of your screen and click on the templates link. Here you can view, edit and create customised templates.

There are two sections on this page, Template Library & Inspec Templates.

Creating a new custom template
Creating your own customised template to suit your company's preferred style of schedule is possible and very simple to do. Templates will form the basis of your specification schedules and can be used across one or all of your projects. You can create as many different custom templates as you desire.
All changes to your new template will save automatically.
-
Create a new template — Click on the + New Template button in the top right corner of your screen.
-
Name your template — Create a name for your new template by clicking on the bolded "New Template" text at the top of the page and changing the text to your preference. For example you could call this Finishes Schedule.

-
Add your first field — Follow the prompt to add your first field for your schedule. Think of fields as columns in a table. For example, this first column could be where you upload an image of the spec you are proposing.
-
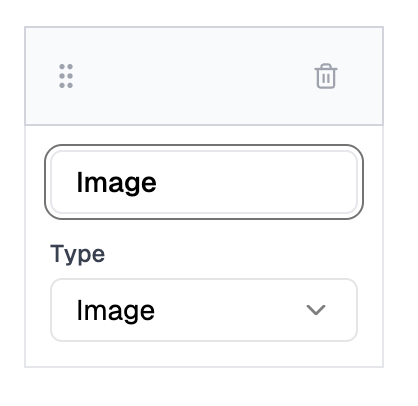
Name your field — Type the name of your new field where it says "Field 1". In this example we will call the field "Image".
-
Select the field type — Next, select from the dropdown menu the type of field you would like this column to be. In this case we will be selecting image, which will allow us to upload images to this column. Learn more about field types here.
-
Add more fields — Continue to add as many new fields as required.
-
Add sections — You can also add sections, which will appear in every schedule you create using this template, ready to populate with data. Learn more about adding sections in templates here.
-
Add a disclaimer (optional) — Below is the option to add a disclaimer to your schedule, which will be visible when exported at the bottom of the document. The disclaimer you add to this specific template will show across any schedule that you create using this template in the future.
-
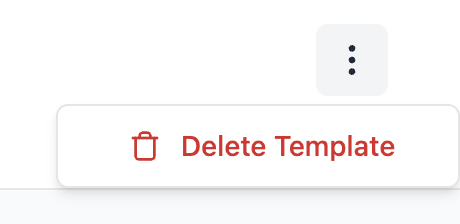
Deleting a template — To delete a template, go to the three dots in the top right corner and click delete template.
Editing a custom or pre-built template
If you want to make any changes to a template you have already created or a template that you have saved from the Inspec Template library, find the template you want to edit and click on the template tile to open edit mode.
In edit mode you can do the following and all updates will save automatically:
- Rename fields
- Add new or delete existing fields
- Reorder fields by clicking the six dots and dragging them left and right
- Change the type of field
- Add new or delete existing sections
- Update your disclaimer
- Change the name of the template
- Delete a template
Any changes that you make to an existing template will only take effect on any new schedules that you create using this template.
Existing schedules that you have created with this template will remain as per the original layout. It is possible to edit the fields and sections of an individual schedule while working in the schedule. Learn more here.
Saving Inspec Templates to your library
Inspec templates have been carefully considered and pre-built by designers to give you the ability to get straight to work creating professional specification schedules. Users are able to save any or all of these templates to their library for company use.
- Navigate to Inspec Templates — Click the Inspec Templates tab towards the top of your screen.
- Browse the library — You will see a library of our pre-built schedule templates and spec sheet templates appear with a short description of what you might use each of them for and how many columns each contains.
- Preview a template — You can preview any template by clicking the Preview button on the template tile.
- Add to your library — Click Add to Library if you find a template that seems like it would be useful to your company.
- Customise if needed — If you find a template that is almost perfect, but needs some tweaking to suit your preferences, click Add to Library so that this can be edited later. See Editing a custom or pre-built template to learn more.
Understanding the different field types
We've introduced a variety of field types to templating so that your schedules can be more informative, visually appealing and accurate.
- Text — cells will contain information in text format only
- Image — cells will support image uploading & image captions only
- Dimension — a structured data field that has numerical dimensions only, based on the company's default unit of measurement selected during sign up process. To learn about changing the unit of measurement for your schedule, click here.
- Select — cells offer a dropdown of selections which only one can be applied
- Multi-select — cells offer a dropdown of selections to which multiple can be applied
- Property — cells contain multiple key/value pairs. To learn more about how to use a property field type in your templates, click here.
- Supplier — cells contain supplier details and can be directly linked to your Supplier Database. To learn more about using a supplier field type in your templates, click here.
- Price - cells contain two inputs, quantity and unit cost. A total cost is then calculated from these inputs.
Using Select fields in your schedules
Selects are a great visual and informative feature in our schedules which gives designers the ability to indicate statuses, tags, labels etc.
You can create a select or multi-select field in your custom template. You can also see a few of our pre-built templates that include a select field in the Inspec Template library.
While working in your individual schedules, it is possible to also add new options to your select dropdown as you think of them, but know that these will not appear in your saved template unless the edits are made to the template itself.
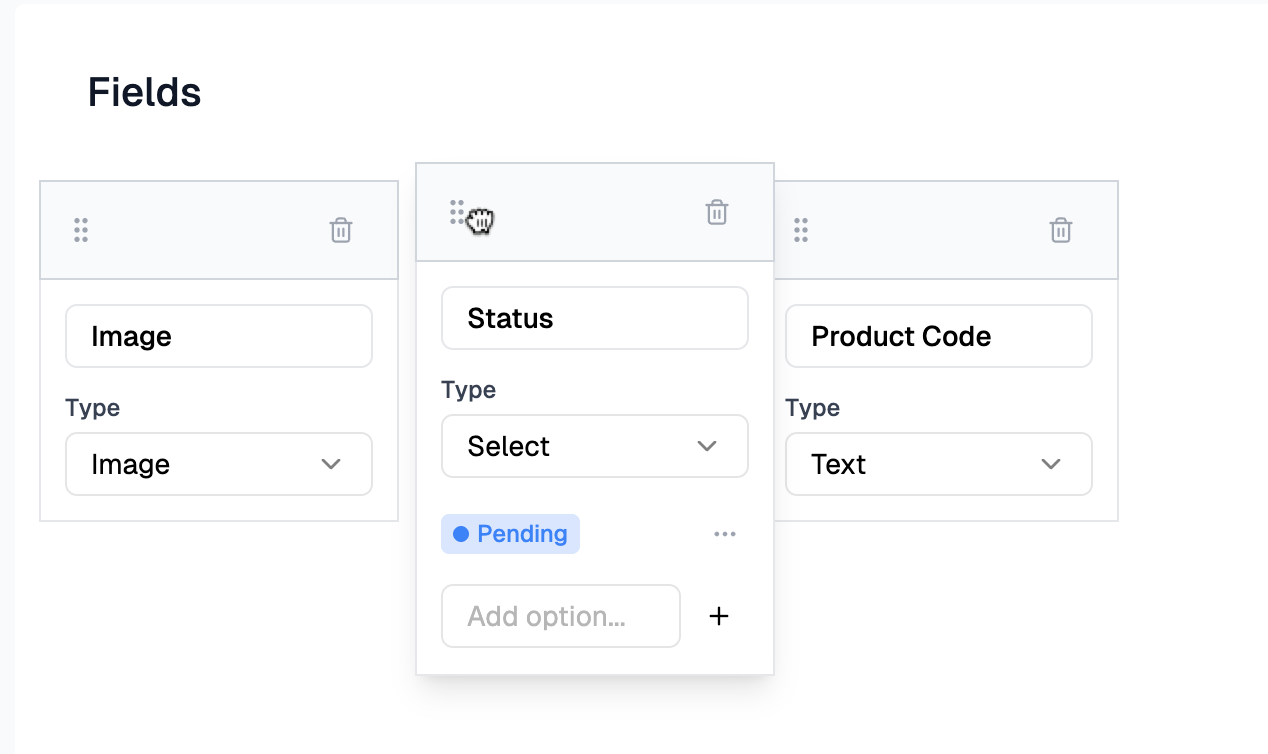
Editing Select and Multi-Select fields in templates
If you wish to use this field type in your schedule, you may have a list of options you want to be able to choose from. Creating a template with select options is simple. The below also applies if you wish to edit the select options on an Inspec Template.
-
Create a new field — Create a new field and name it. For example "Status".
-
Choose the field type — Click the field type dropdown and choose either Select or Multi-Select.
-
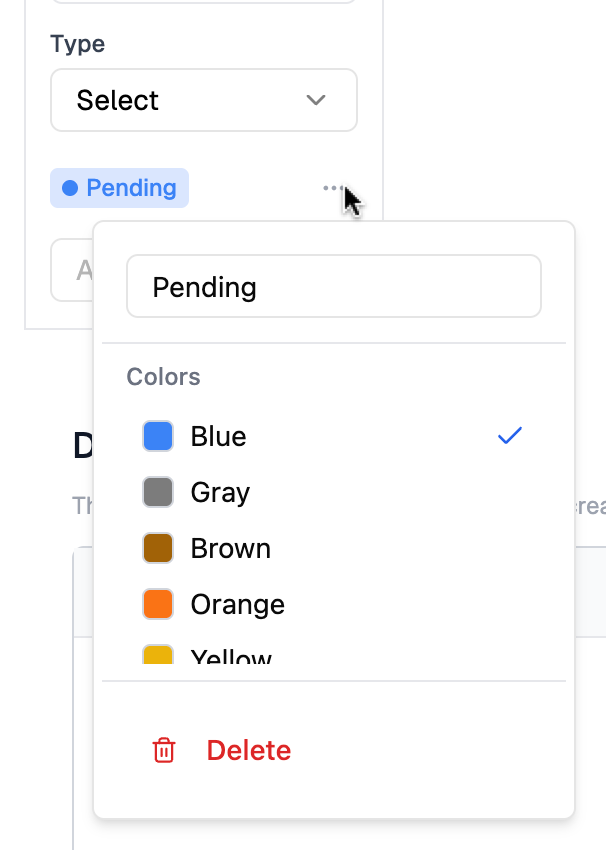
Add options — Add an option and click the + button to confirm. Inspec will automatically assign a colour to the option but this can be customised. Add as many options as you like.
-
Customise colours — To customise the colour for each select, click the three dots to the right of the confirmed option. Here you can choose a colour, no colour at all, or delete the option.
-
Continue or start scheduling — When you are finished adding your options, continue making changes to the template or get started on your next schedule in projects.
-
Edit anytime — You can return to the template edit mode to add more options or remove options at any time.
Using Property fields in your schedules
Property fields let you group related information together within a single cell using key-value pairs. Instead of creating separate columns for each piece of information, you can consolidate multiple details into one organised field.
Property fields are particularly useful when you have several related data points that belong together. For example, in a finishes schedule, instead of creating four separate text fields for Quantity, Finish, Brand, and Description — each taking up its own column — you can combine all of that information into a single Property field called "Product Details" as shown below.
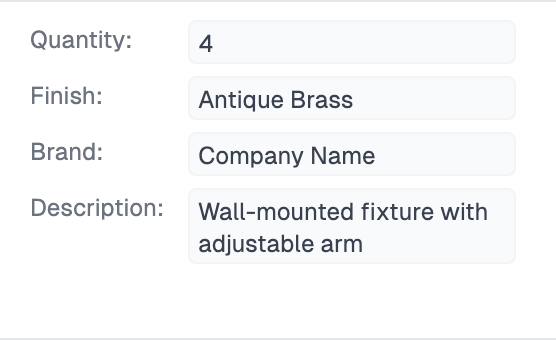
All of this information displays neatly within a single cell, keeping your schedule clean and easy to read while still capturing all the details you need.
Properties without values are automatically hidden in your schedule and won't appear on exports. You'll only see empty properties when you're editing that specific cell — otherwise, only populated properties are visible. This will help reduce noise in your schedules.
Setting up your Property field in templates
You can use as many Property fields in your schedule templates as you like.
- Click + Add Field when you are creating or editing a template in edit mode.
- Name your field and then select the Property option from the field type dropdown menu.
- Add as many properties as you like, for example you could add options such as Finish, Quantity, Price etc.
- To remove a property, click the x on the right side of the option.
- To reorder your properties, drag the grip icon to the left side of the option.
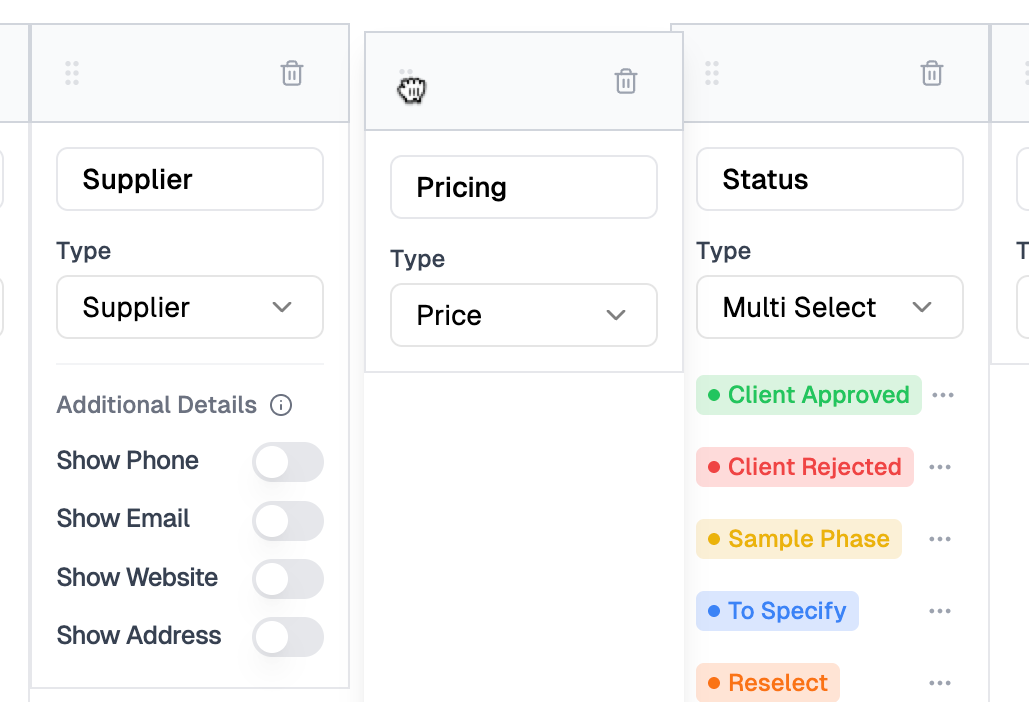
Using Supplier fields in your schedules
The Supplier field type ensures consistency across your schedules by pulling information directly from your centralised database, reducing errors from manual entry and keeping supplier details up to date across all your projects.
Setting up Supplier fields in your templates
When you create a Supplier field in your template, you control exactly what information displays in the schedule cell beyond the supplier name.
- Click + Add Field while creating or editing a template.
- Name your field (e.g. Supplier, Vendor, Manufacturer) and select Supplier from the field type dropdown menu.
- Toggle on the additional details you'd like to include in your schedules from the available options. Note that supplier name will always be shown.
You can change which details are shown at any time while working in an individual schedule. Simply click on the field heading and toggle the details on or off — the changes will apply to the entire column automatically.
Whatever details you toggle on for a Supplier field apply to the entire column — it's not possible to customise which details appear on a row-by-row basis.
If a supplier is missing certain information in your database, those fields will be left blank in your schedule and won't appear on exports. For example, if email is toggled on but the supplier in Row X doesn't have an email address saved, no email will display for that row.
To learn more about adding Suppliers to this field type within a schedule, click here.
Using Price fields in your schedules
When you apply a Price field to your template, it will automatically generate a Totals Bar at the bottom of each section within your schedule. The Totals Bar will give you the total cost of the rows within that section only. You will need to use the Estimate feature if you want a project total/if you want to place orders for items in your schedule.
Note: Price Fields in Schedules
We suggest moving your price field to the last column of your template. This will ensure that the prices in your rows sit directly above the total cost at the bottom of the section.
Within a Price Field cell on your schedule, you will see a text input for Quantity and Unit Cost. The total is automatically calculated from these two inputs. Remember to ensure the price you enter is either excluding or including tax (depending on your company wide preference) so that future calculations are accurate.
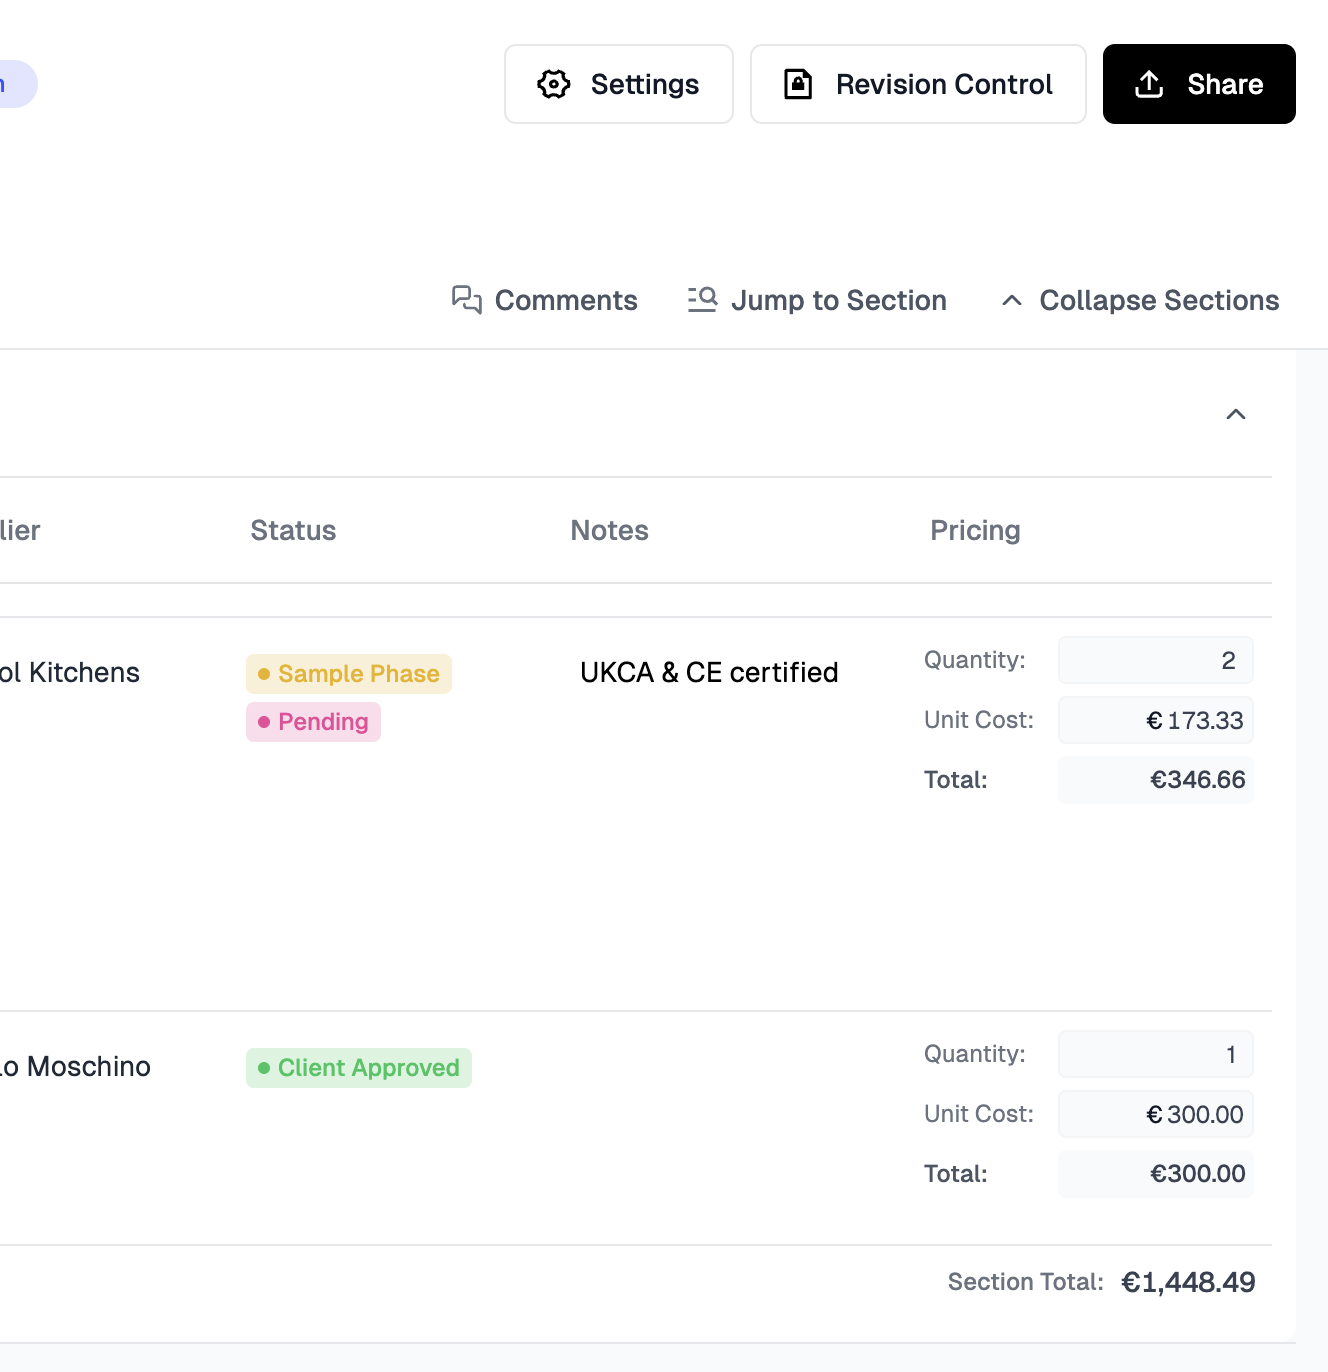
Total Section Cost is calculated at the bottom of each section - when a schedule includes a Price Field, a section totals bar is added automatically. To learn more about sections in schedules, click here.
Reordering fields in templates
To reorder the fields in your template, simply click and drag from the six dots in the top left corner of the field box.
Adding sections to your templates
Sections structure your schedules by room or area before you start specifying. Add them to your template once, and they'll appear automatically in every schedule you create from it. For example, you could create sections like "Living Room," "Kitchen," and "Bedroom".
This is especially useful for project types you work on repeatedly, where the room breakdown is often similar. Your schedules start organised and ready to populate, saving setup time on every project.
You can always adjust sections while working in an individual schedule, but having the standard structure in your template means less repetitive work and more consistency.
To learn more about schedules, click here.