Estimates
Learn how to create, manage, and collaborate on estimates in Inspec.
Getting started with estimates
Creating your first estimate takes just a few minutes of one-time setup. Before you begin, head to your Procurement & Financial Settings to configure your defaults:
- Set your currency and tax rate – Ensure you have chosen your preferred currency and set your default tax rate (GST, VAT, Sales Tax, etc.). These will apply to all future estimates automatically unless changed on a specific project. To learn more about tax in your estimates, click here.
- Customise your invoice and PO starting numbers (optional) – If you're migrating from another system, set your starting numbers now to maintain continuity. Note: Once you create your first invoice or purchase order, these starting numbers are locked and cannot be changed. To learn more about configuring these settings, click here.
- Add disclaimers - Estimates, purchase orders and invoices can all have custom disclaimers or terms & conditions for your clients & suppliers.
Once these defaults are saved, you're ready to create estimates - no need to configure settings again for future projects.
Note: Only company admin can set defaults
To reduce potential error, only company admin users are able to set and update procurement & financial settings. To learn more about user roles and responsibilities, click here.
Useful estimate tools

Tax Calculator - take the cost provided by your supplier and either remove/add tax (based on your project tax rate). Pop the resulting figure straight into your estimate
Filter - sort your estimate by supplier to quickly jump to certain line items
Comments - a place to record notes, client opinions, details for office, or assign tasks to other designers against specific line items. See the Speech Bubble Icon to the right of your line item row to make a comment against that product. To learn more about comments on Estimates, click here.
Jump to Segment - Navigate quickly to a segment further down your estimate without scrolling
Collapse All - Collapse/expand all segments at once
Procurement Quick Nav Buttons - To learn more about how to jump between related documents, click here.
How to create your first client estimate
An estimate is your central hub for managing all the items you'll be ordering and supplying to your client. From this single document, you can generate client invoices, create supplier purchase orders, produce budgets and track every product from quote to delivery. To create your first estimate:
- Navigate to the Estimates tab in your project
- Configure your estimate settings – Choose which fields to show or hide from clients, set default markup percentages if required, and confirm the project tax rate
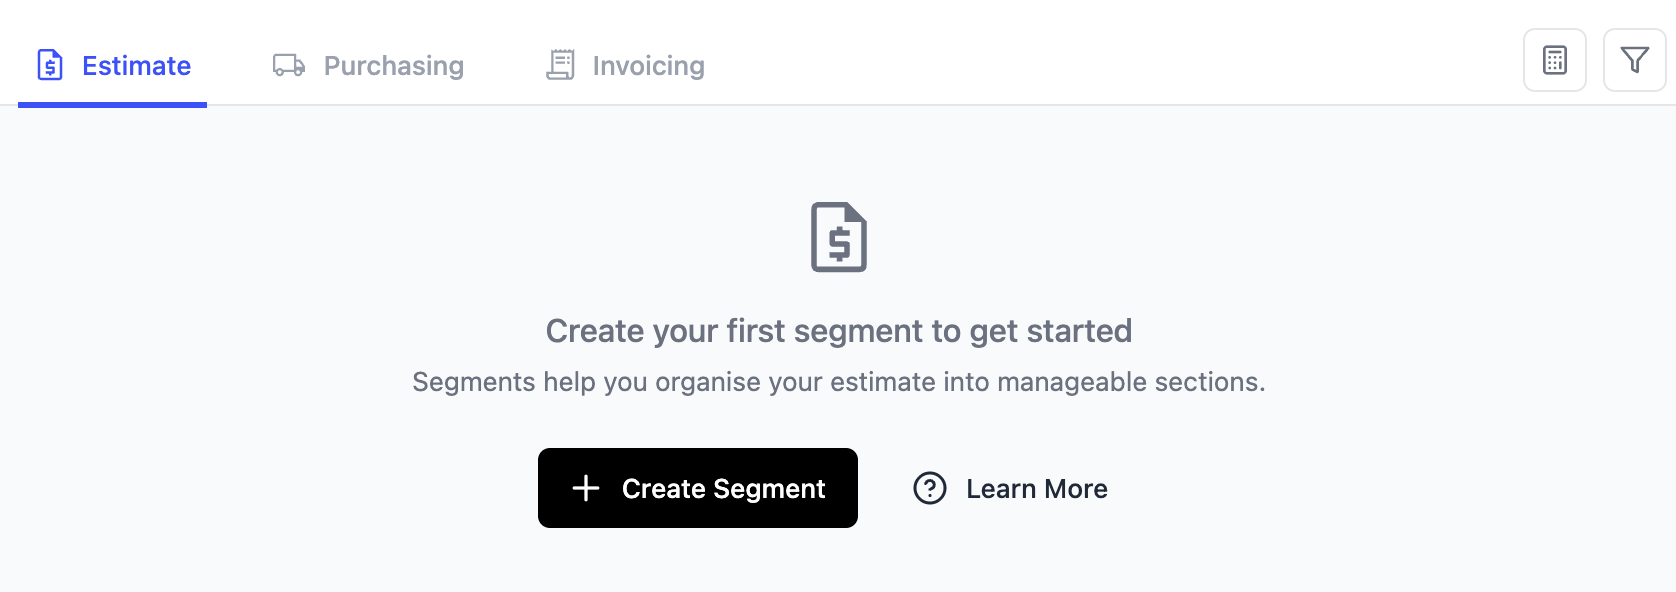
- Create your first estimate segment – Segments help you organise items by room, category, or phase. Learn more about Segments here
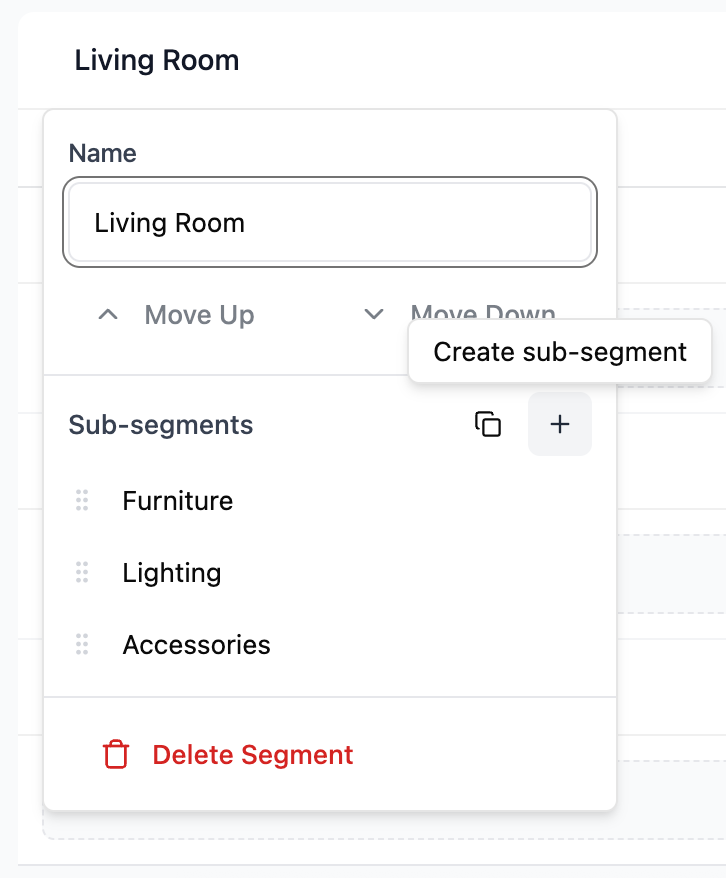
- Create sub-segments (optional) - Sub-segments help organise products within segments into further categories, for example you might split a room segment into furniture, lighting & accessories.
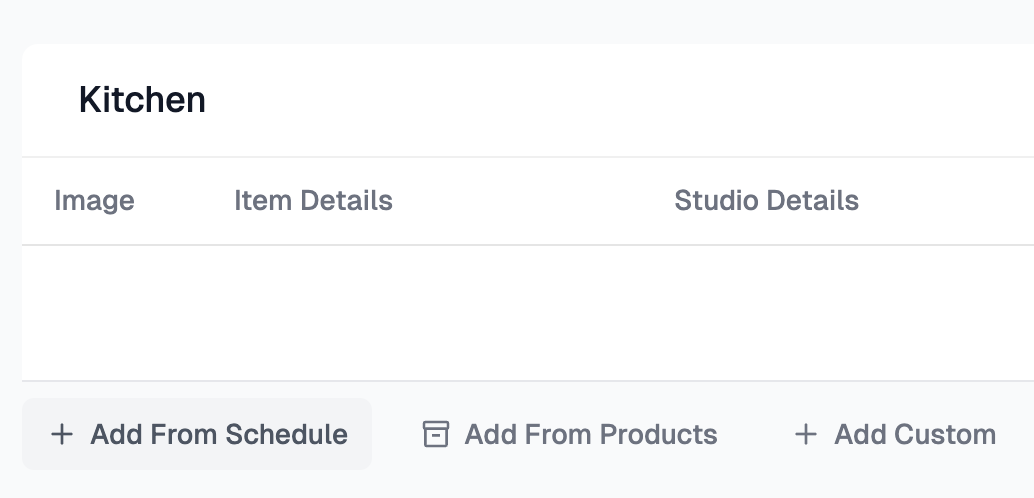
- Add your first line item – You can:
- Pull products from your Schedules
- Select items from your Product Catalogue
- Create a custom line item from scratch
Once your first item is added, you're ready to build out your estimate and start the procurement process.
Understanding the estimate template
Estimates in Inspec use a structured template designed to ensure seamless data flow between your Estimates, Purchase Orders, and Invoices. This consistency means you enter product information once, and it automatically populates across all related documents, eliminating duplicate data entry and reducing the risk of errors. Every estimate includes these core fields:

Image – Visual reference for you, your client and suppliers
Item Details – Product details and specifications
Supplier – Where the item will be ordered from
Pricing Details – Pricing, quantities, markups, and totals
Status – Track approval and ordering progress
Procurement – View related Purchase Orders and Invoices at a glance
Image field actions
The image field on your estimate is not only for your clients to see what you are purchasing, but also acts as a visual reference for your design team and on supplier purchase orders.
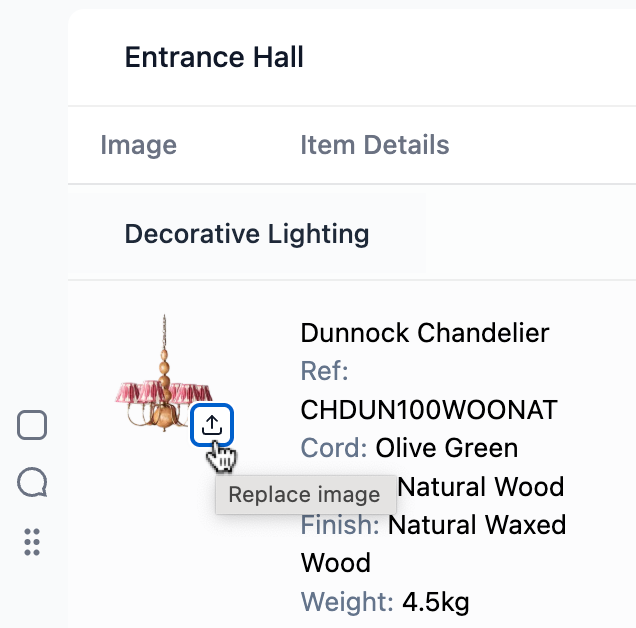
Click on the 3 dots icon when hovering over your line item image to either view full screen, remove the background, replace the image or delete.
You can hide images from your estimate if you would prefer that clients were not able to see these.
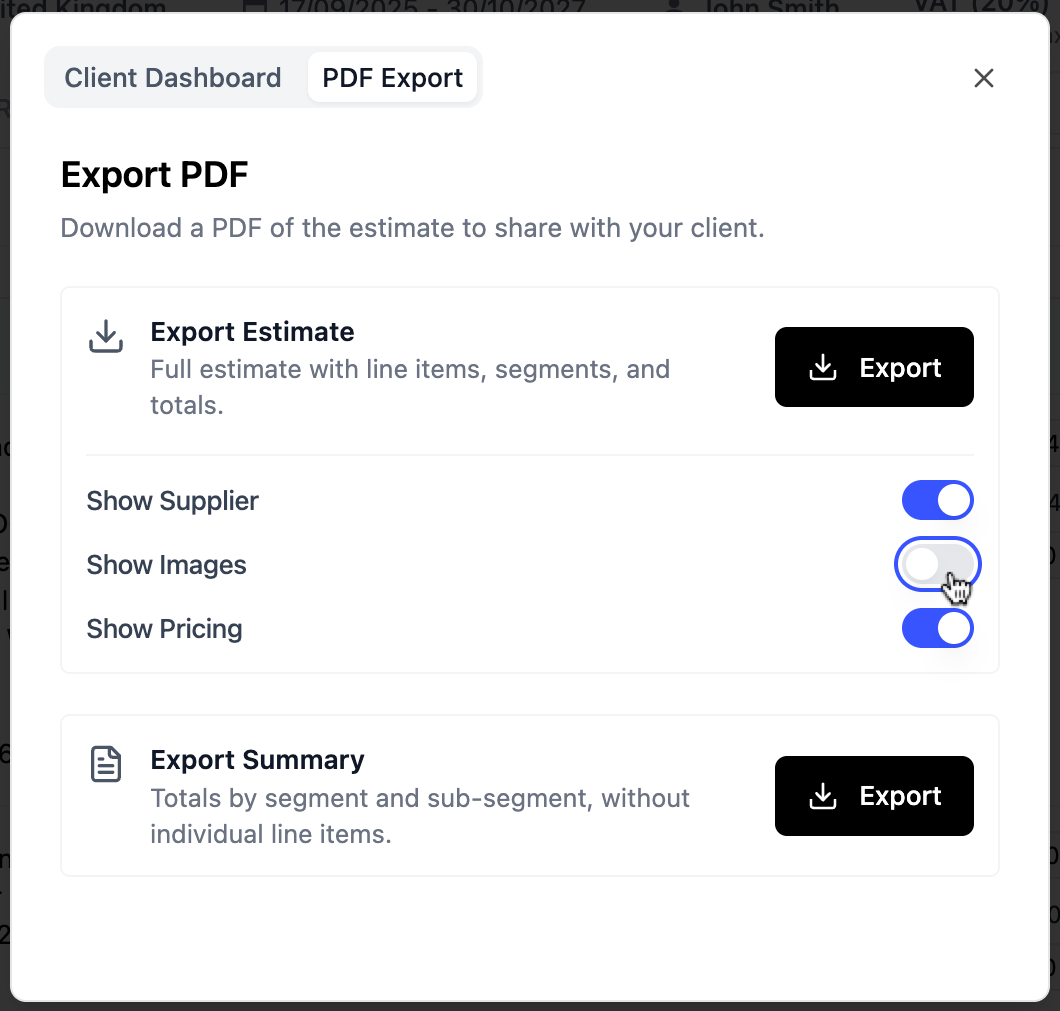
- Share Estimate - Click on the black Share Estimate button in the top right corner of your screen
- Portal or PDF - Select either the client portal or the export PDF tab depending on your preference.
- Hide Images - Use the toggle to turn off/on your images when sharing your estimate with your clients.
Additional estimate fields
You can add the following additional financial fields to your estimate if required, this can be done in Settings under the Procurement tab:
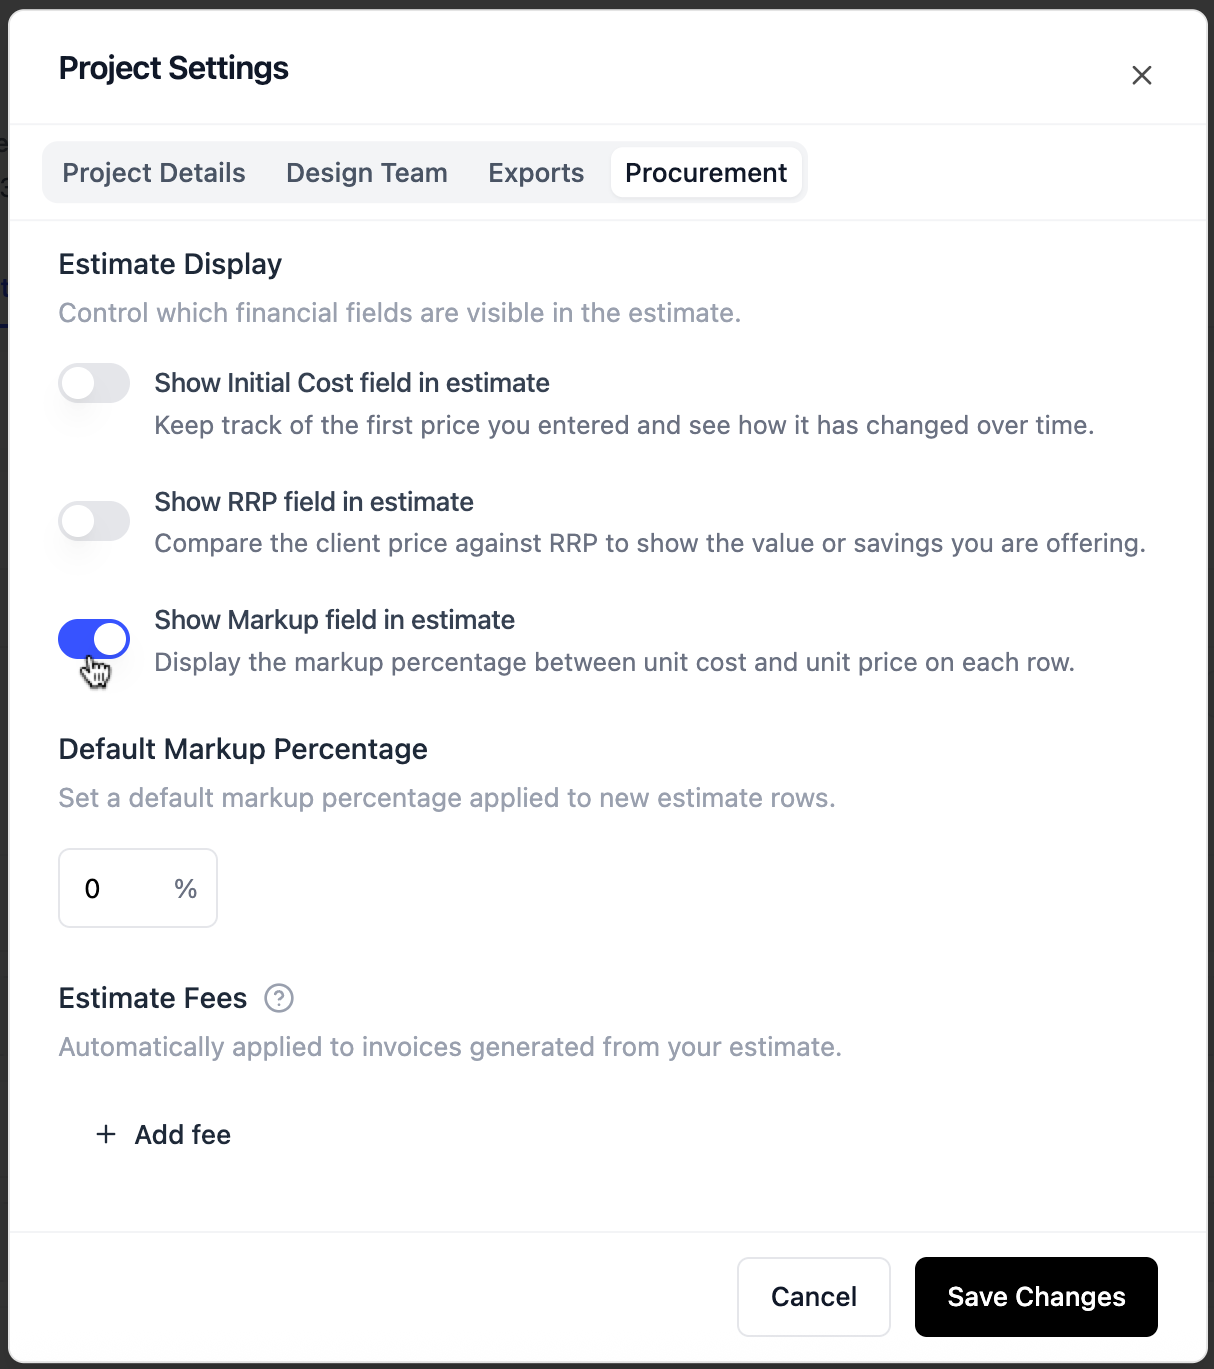
RRP Field - compares your client's price to the recommended retail price of that product
Markup Field - apply percentage markups to your unit costs. This field is always on by default when starting an estimate. To apply consistent markups across all products, set your Default Markup Percentage to the desired amount.
To learn more about setting a budget for your estimate, click here.
Sharing the client estimate
Your estimate can be shared with your clients either through the Client Portal or by exporting to PDF.
To learn more about the Client Portal, click here.

PDF export settings
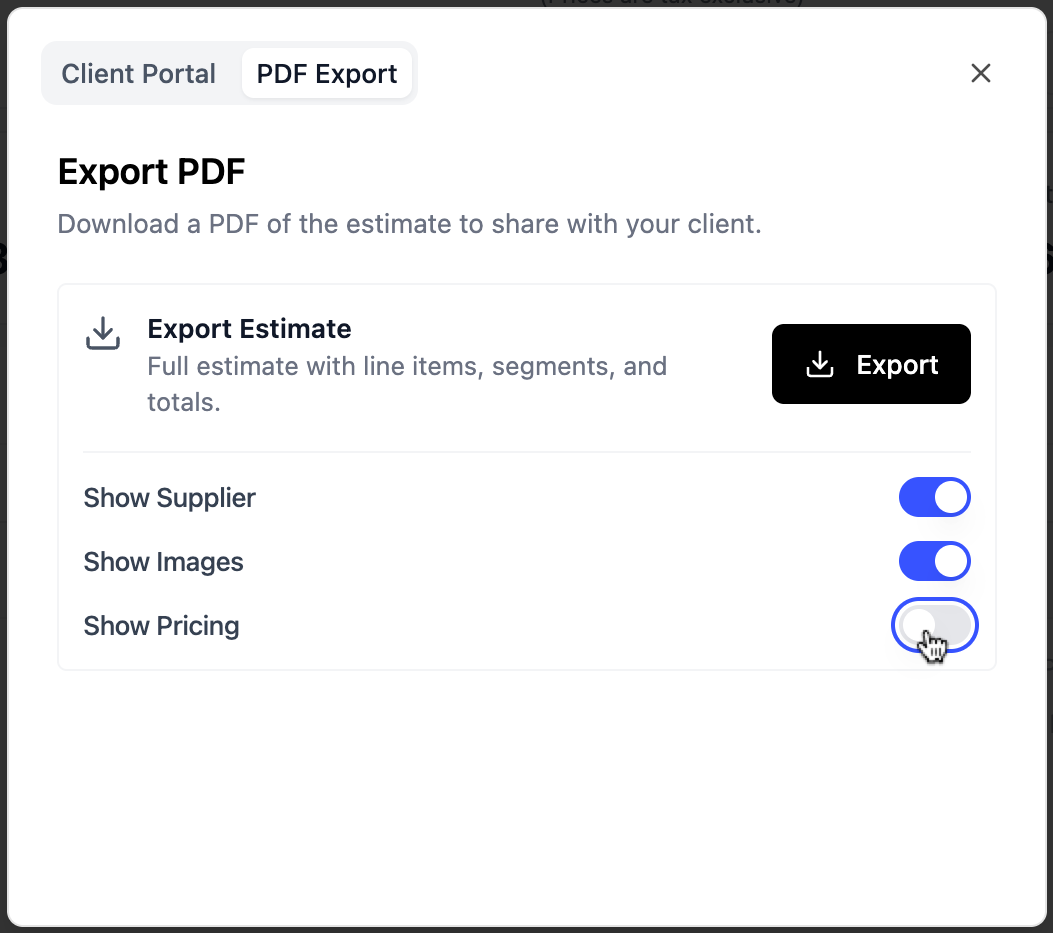
Inspec gives you full control over what information is visible on your estimate exports. A custom disclaimer can also be added by an admin user under Procurement & Financial settings.
Use the field toggles to show or hide information based on your preferred level of client transparency. Some studios share full supplier and pricing details with their clients, while others prefer to keep costs and product breakdowns private - the choice is entirely yours.
Note: Export Page Size
All procurement related documents will only export in A4 (Letter) page size, even if you have your default export settings set to A3 (Tabloid).
Export specific line items
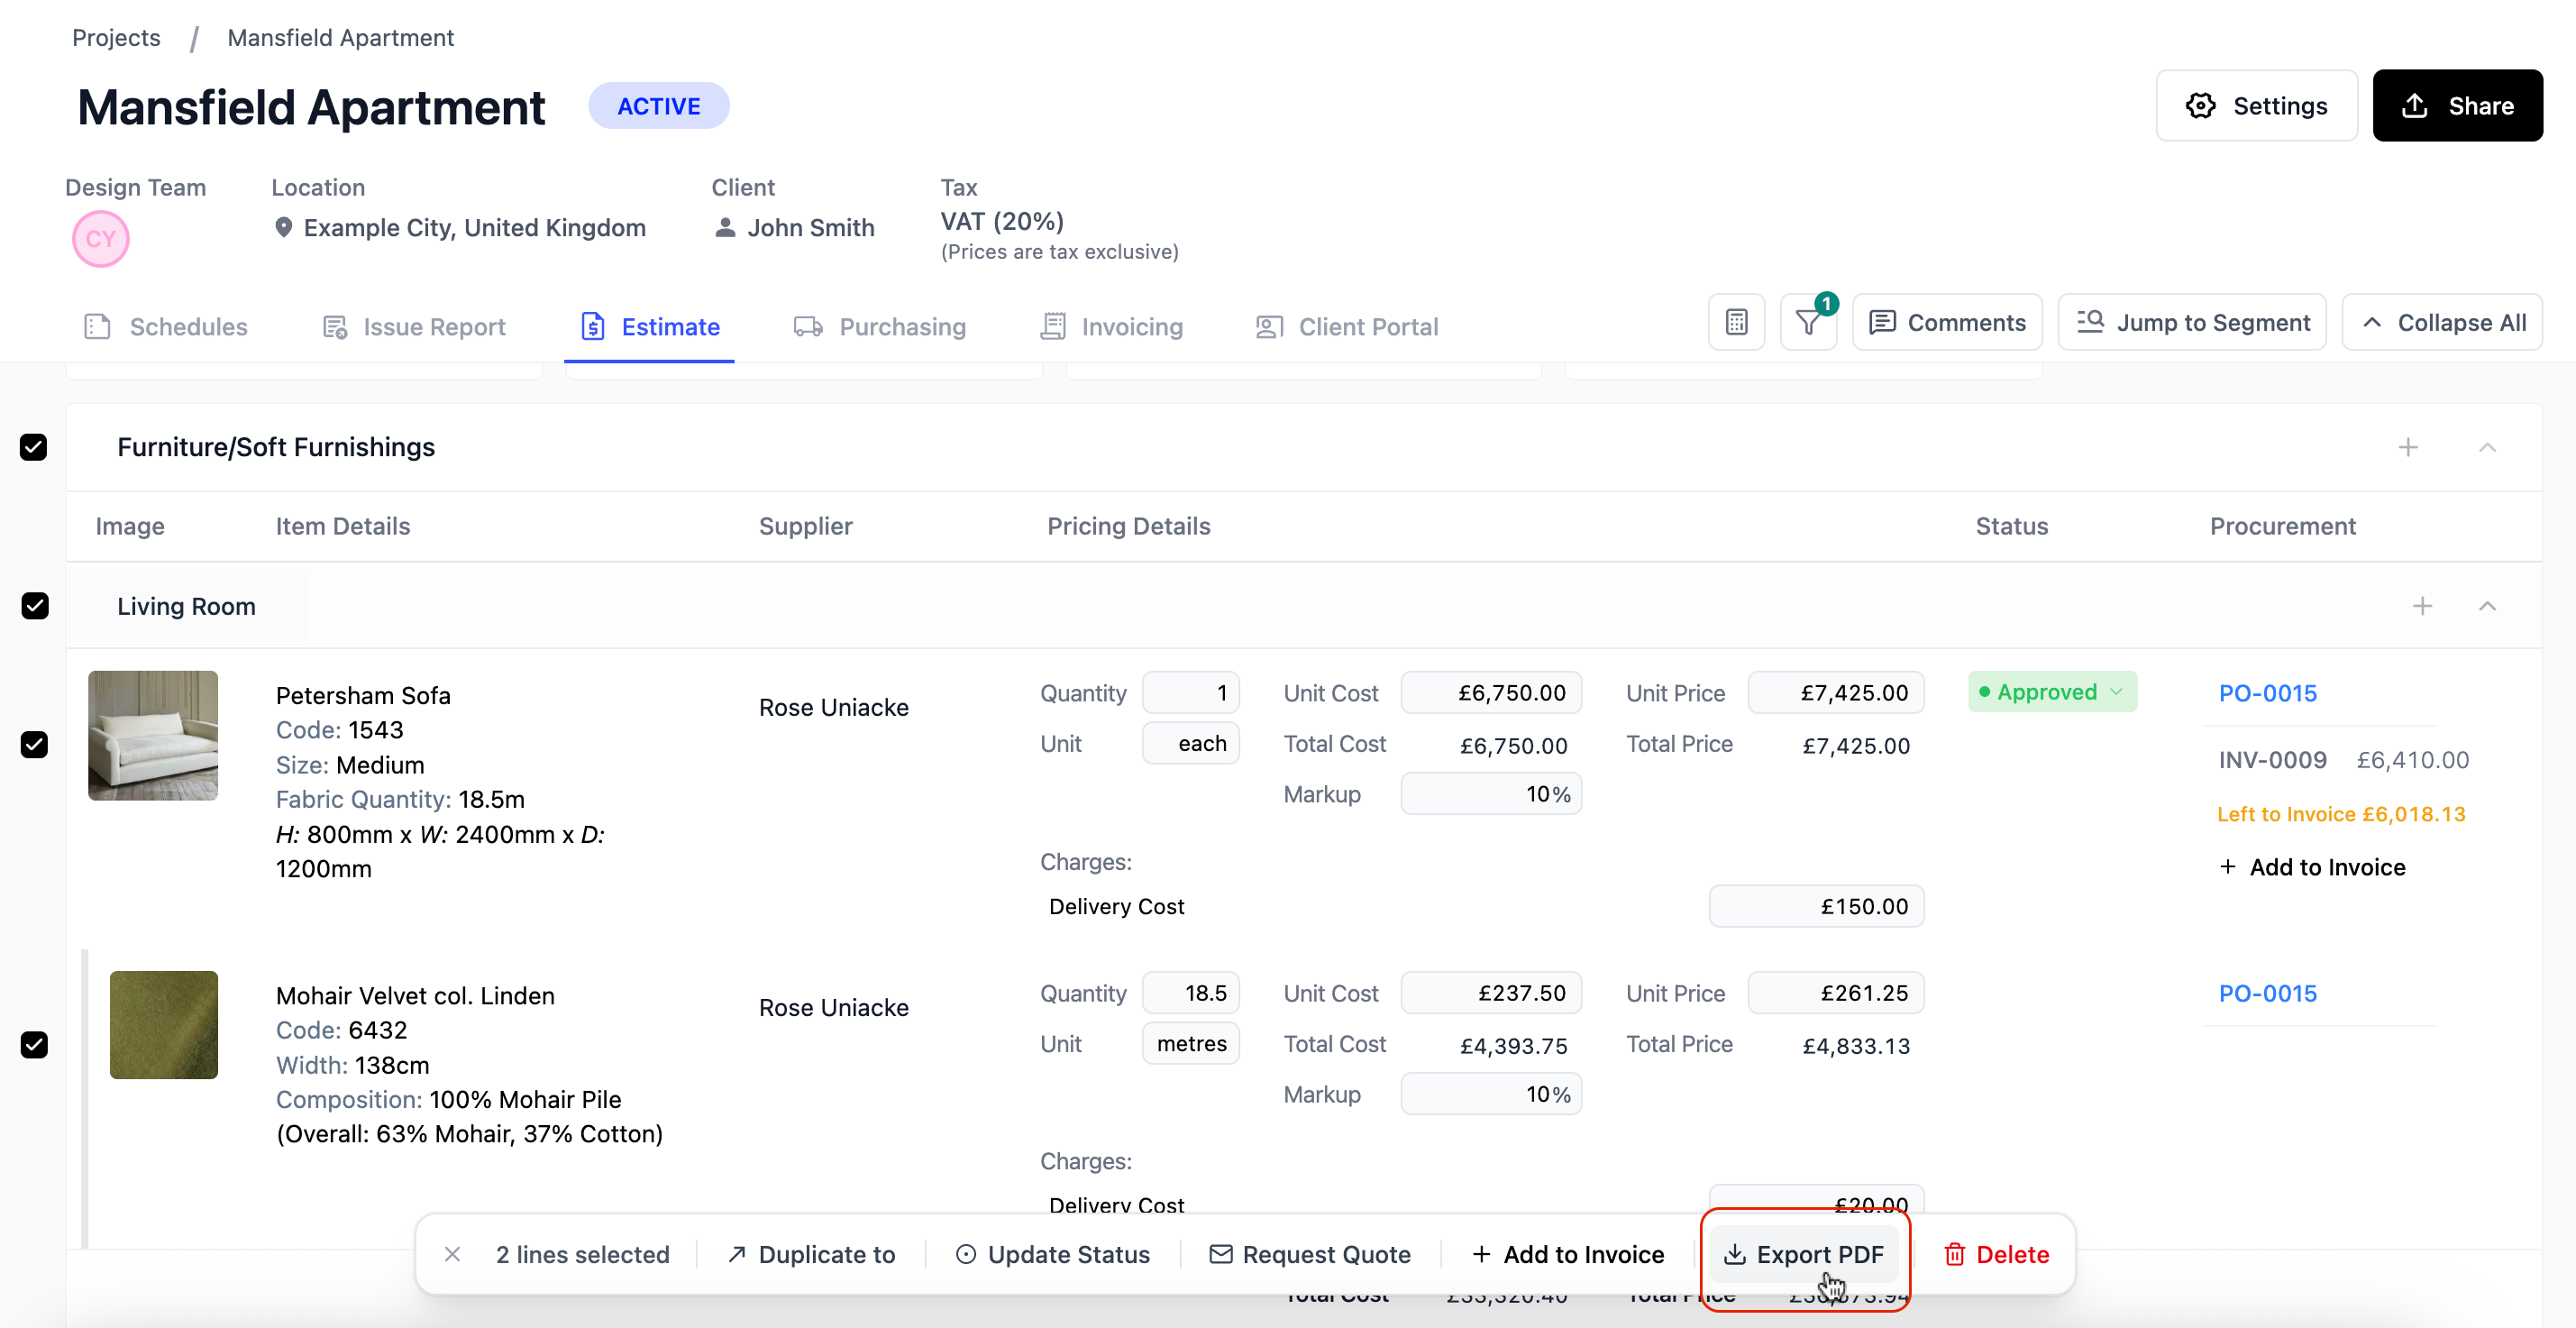
You can export specific line items from your estimate by selecting the line items you want to export using the checkbox icon and clicking on the Export PDF button on the action bar at the bottom of your screen.
Helpful Tip: Use the filter tool
You can use the filter tool to narrow down the line items you want to export by invoice status or supplier.
Segments
Segments organise your estimate into logical groupings - you can think of them like sections in your schedule. They break down large projects into manageable chunks, making it easier for you to stay organised and for clients to navigate their quote.
You have complete flexibility to structure segments however makes sense for your project:
- By room – Living Room, Master Bedroom, Kitchen
- By floor – Ground Floor, First Floor, Basement
- By category – Furniture, Lighting, Soft Furnishings
- By phase – Phase 1, Phase 2, FF&E Package
Creating a segment
To create a new segment:
- Click on the + Add Segment button in the bottom right corner of your estimate page
- Name your Segment - click on the segment heading to rename it, eg. Living Room
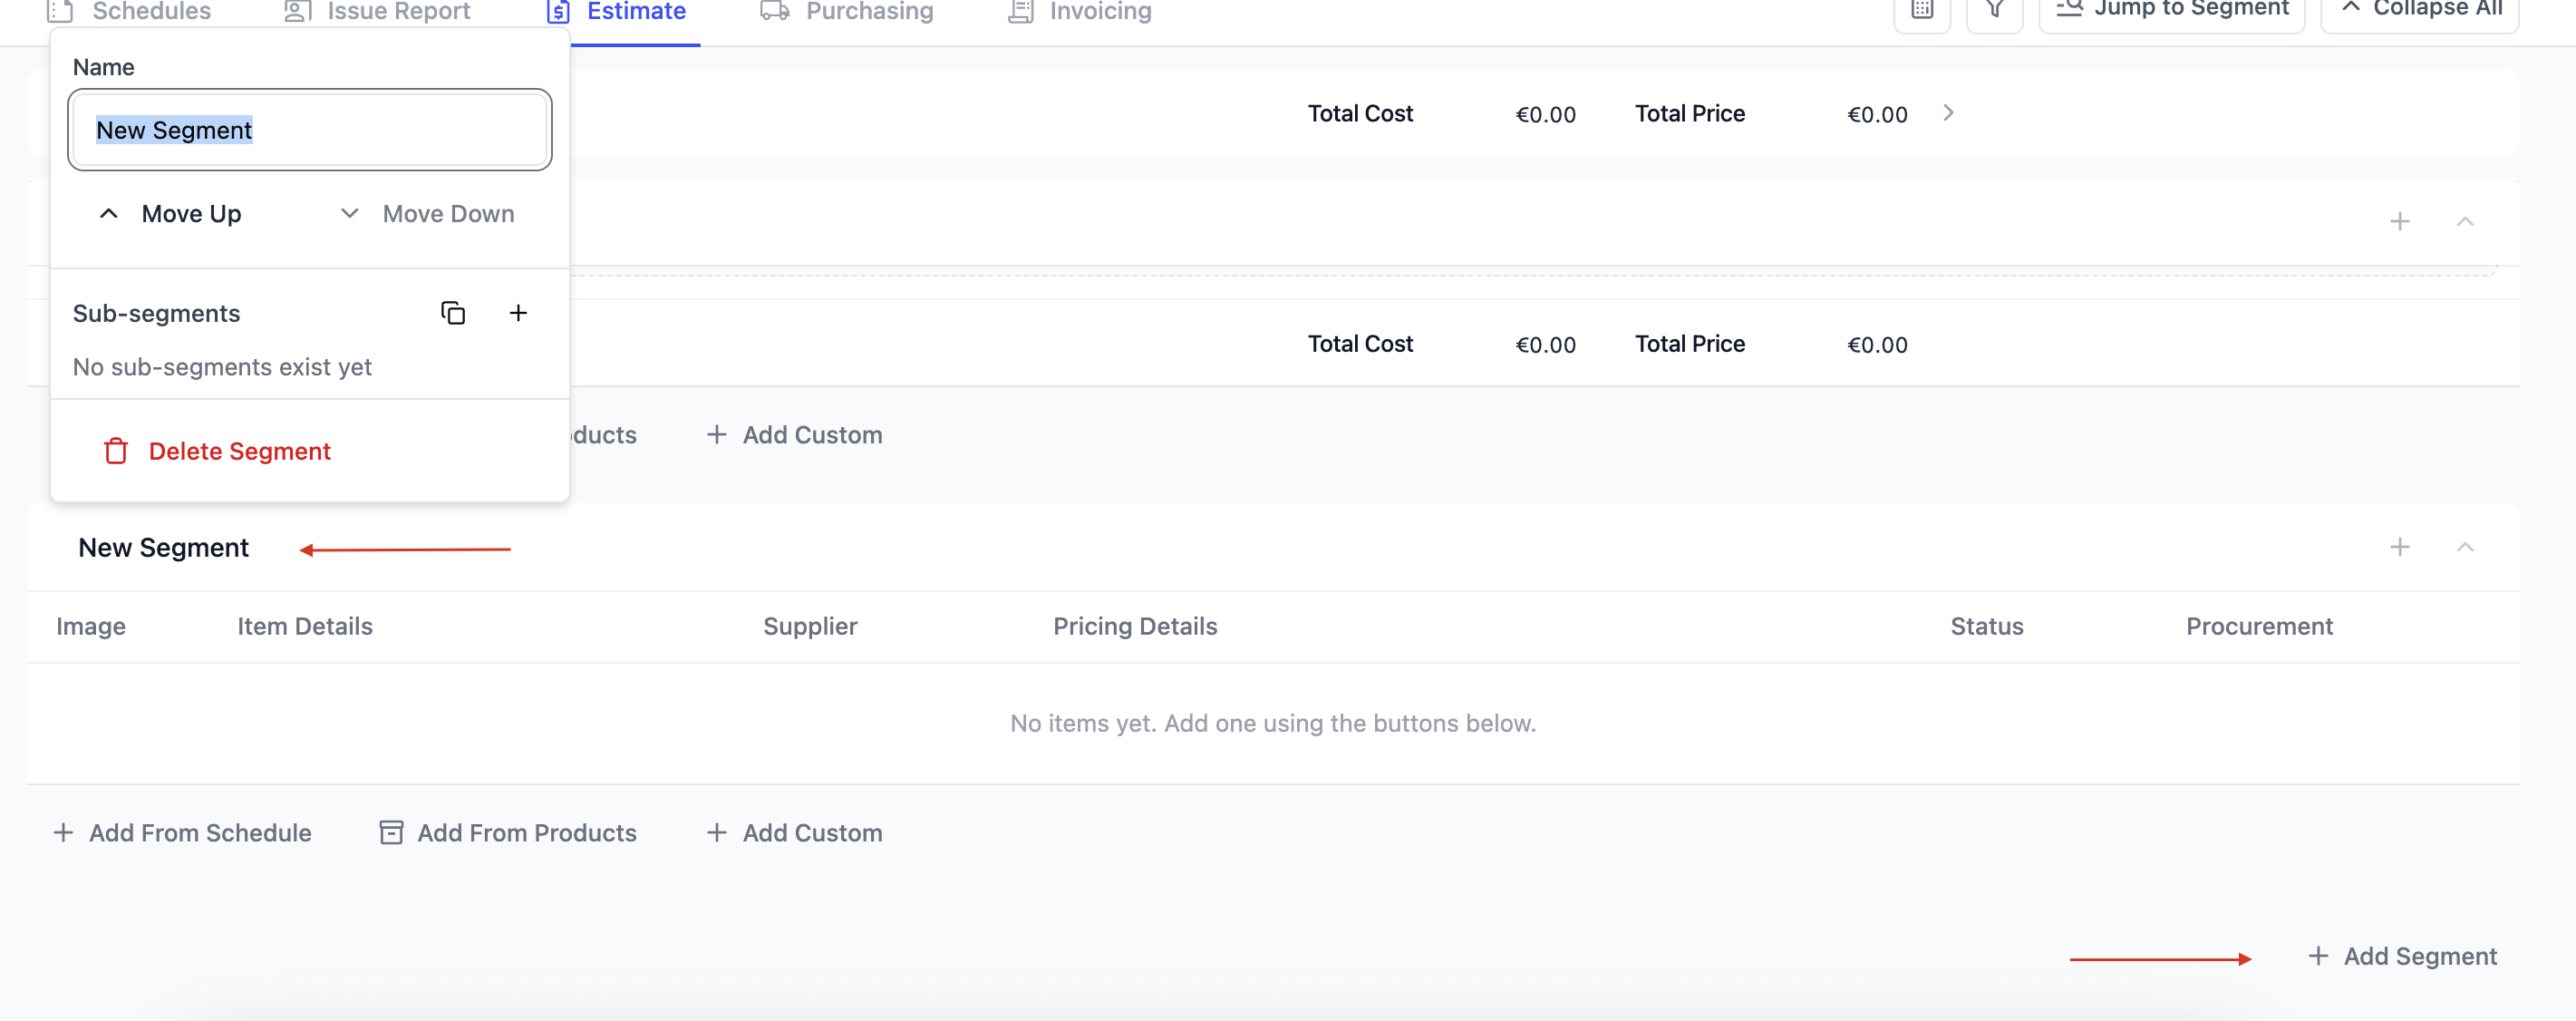
To rename, reorder or delete your segment, click the segment heading.
If you hover above a segment name, a checkbox will appear, which means you can select all line items within a segment and either delete or duplicate to another segment in the same estimate.
Adding content to your segments
Before you start adding items, it's worth deciding how you want your segment structured. For straightforward projects, a simple list of line items works well. For larger or more complex segments, you can break things down further using sub-segments. To learn more about Sub-Segments, click here.
Product data can be added to a segment by clicking on any of the buttons at the bottom of that segment tile. Adding from these buttons will insert your new line item beneath the previous line in that segment.
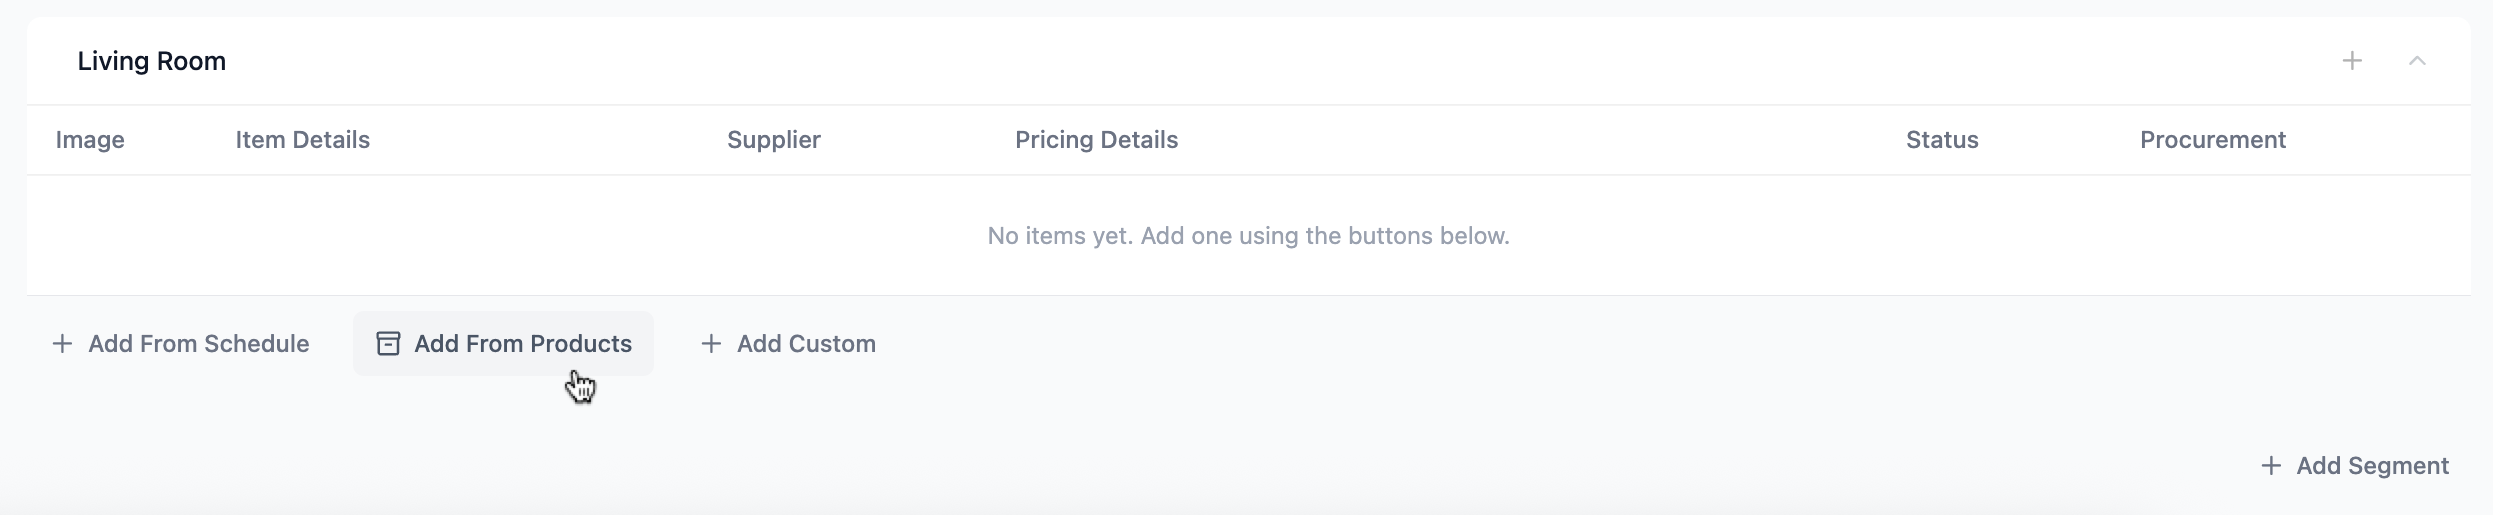
As your segments grow, two quick action buttons in the top right corner of each segment tile help you stay efficient without scrolling to the bottom each time:
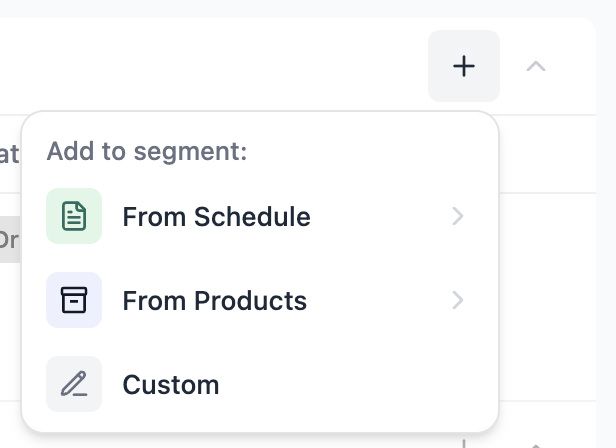
The + icon - quick add new line items to that segment
The ^ icon - collapse/expand that segment.
Note: Collapsing Segments
To collapse all segments in one click, there is a button in the top right of your screen called Collapse All.
Adding content to your sub-segments
Add new line items directly to your chosen sub-segment by clicking on the + icon to the far right of that sub-segment row. New line items will be added beneath the last row in that sub-segment.
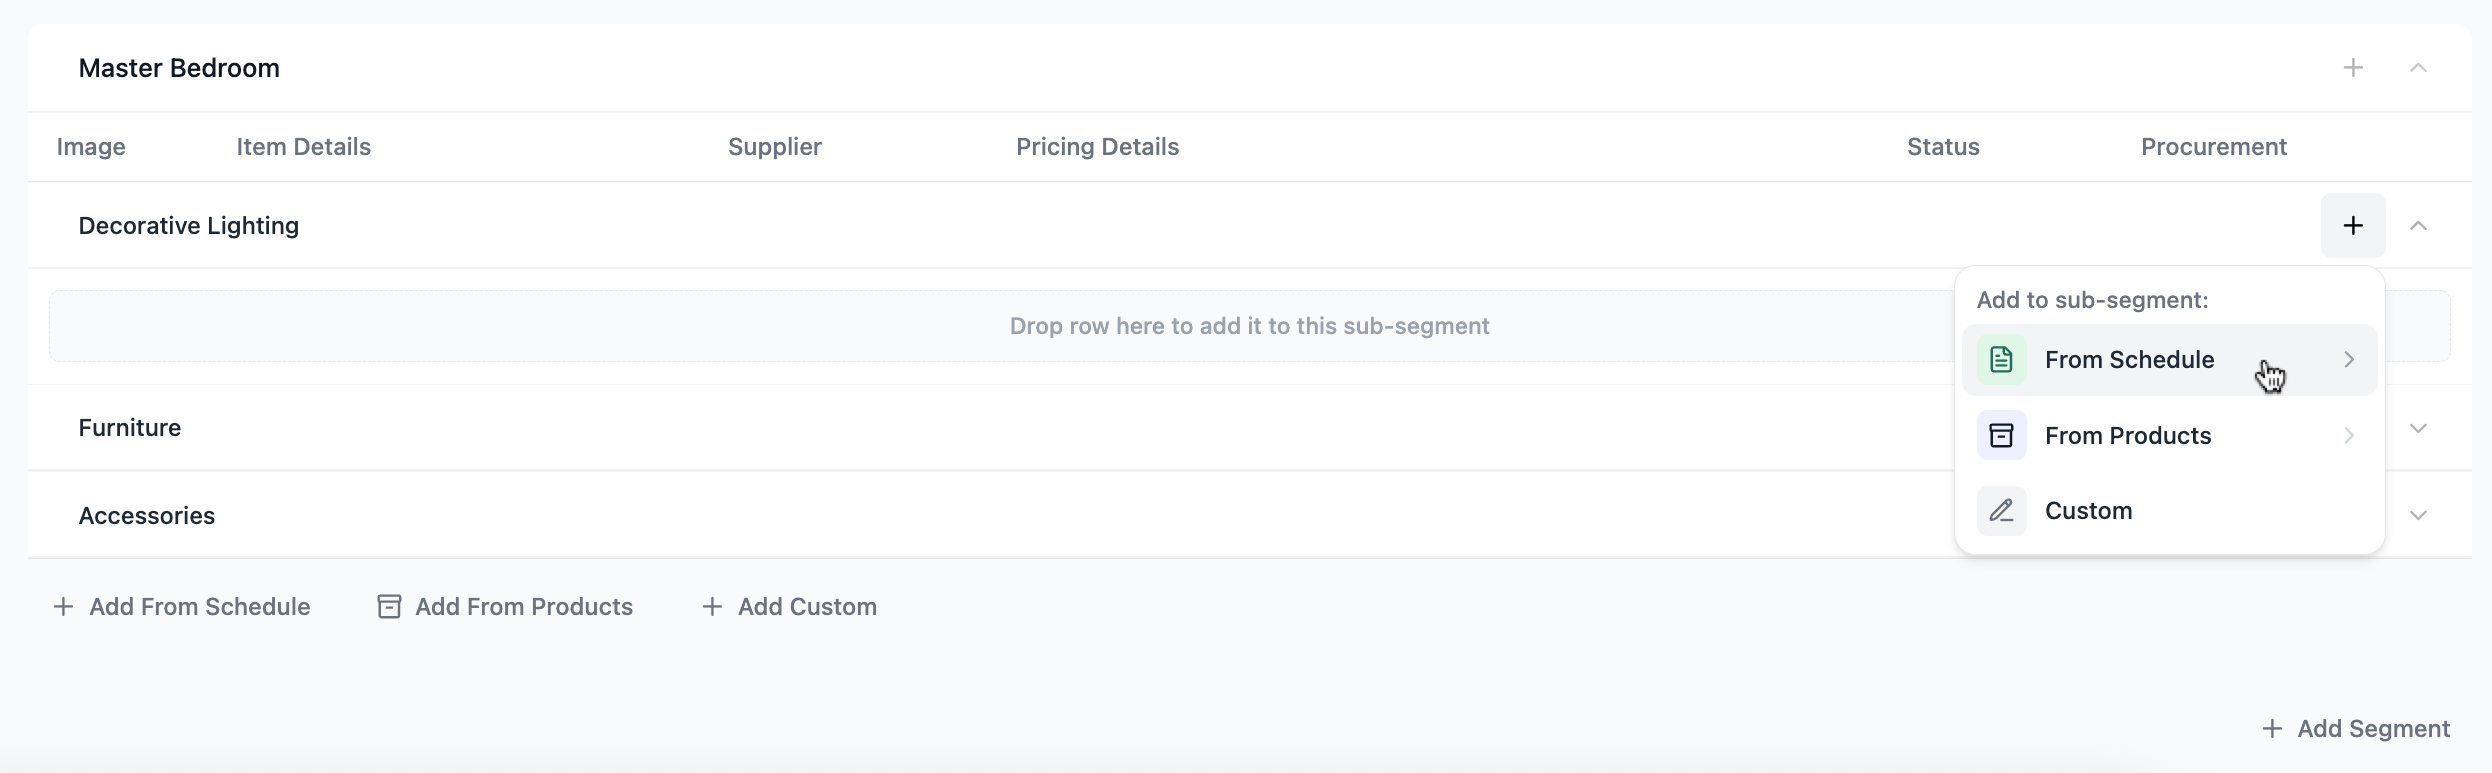
Adding from schedules
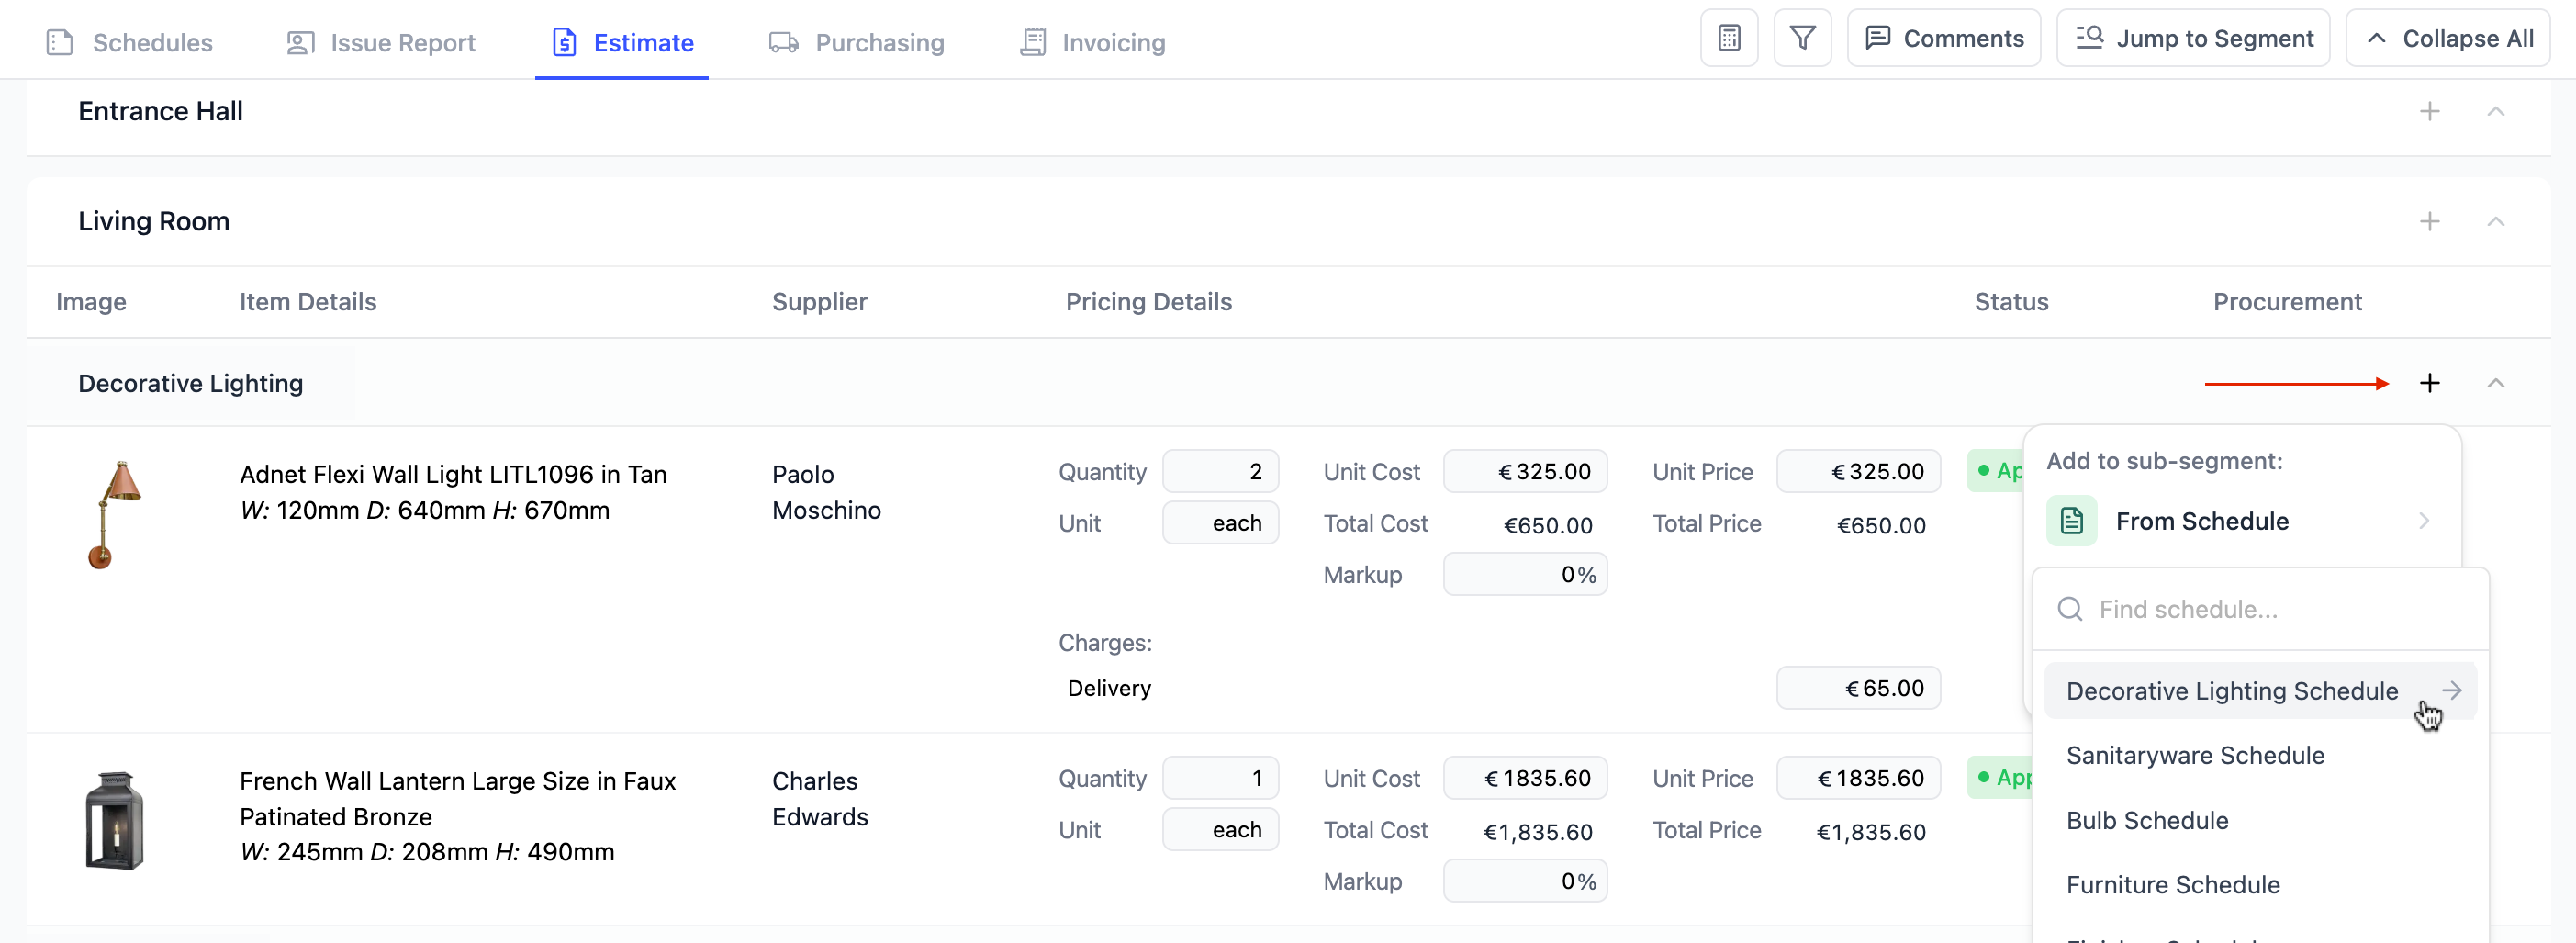
Whether you're adding to a segment or a sub-segment, you can pull specification data directly from your project's schedules using the Add from Schedules button.
- Add from Schedule - Select this option to create a new line item.
- Select a schedule - Choose the schedule you want to pull product information from - you can only pull from one schedule at a time.
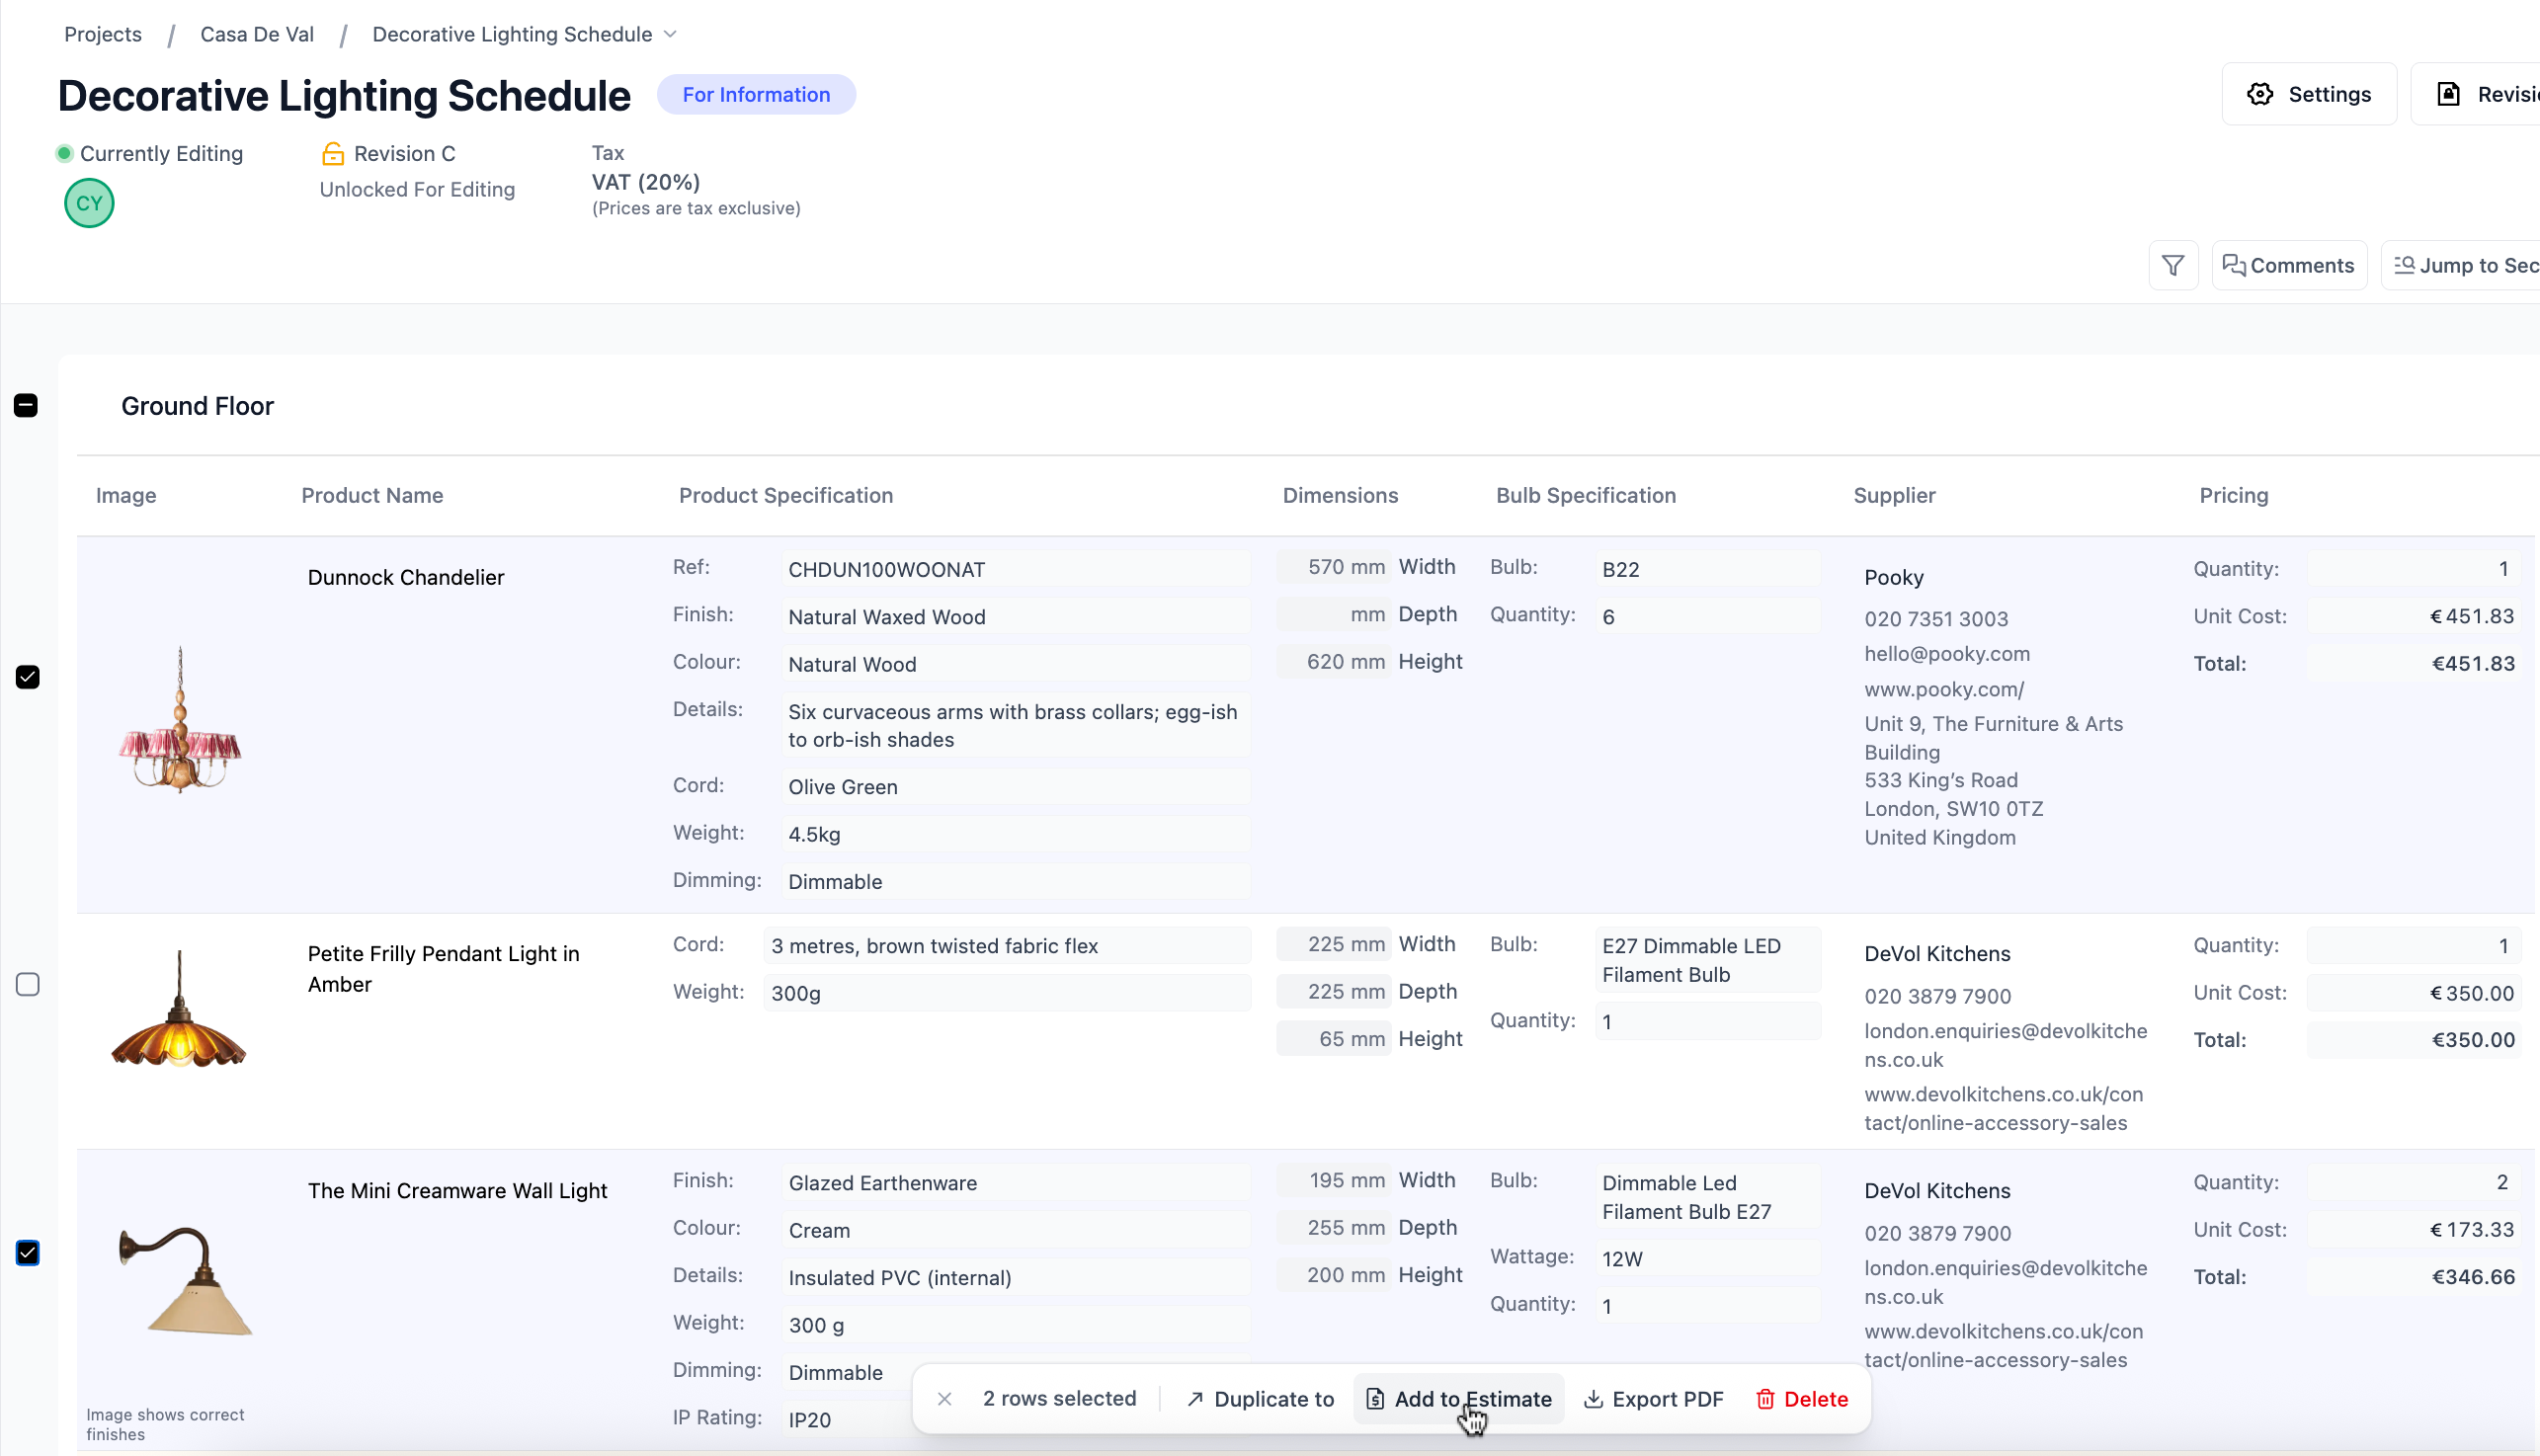
- Select rows - Once you've chosen a schedule, you will be automatically directed to that schedule to choose which rows you want to add to your estimate. You can add one or multiple by selecting rows using the checkbox or the grip icon. Click Add to Estimate when you are finished your selections.
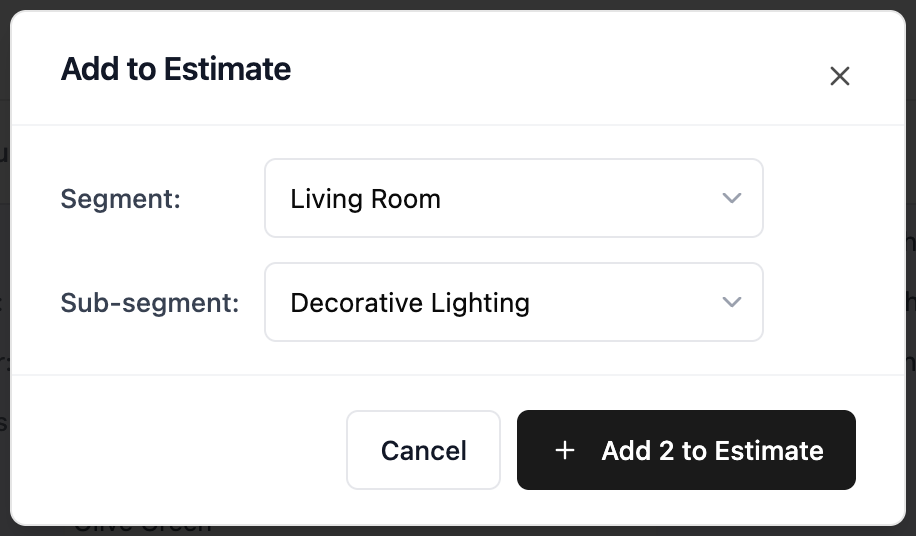
- Confirm destination - A pop-up will appear asking you to confirm which segment or sub-segment you'd like to add the product information to. This will default to the segment you were working in, but can be changed if needed.
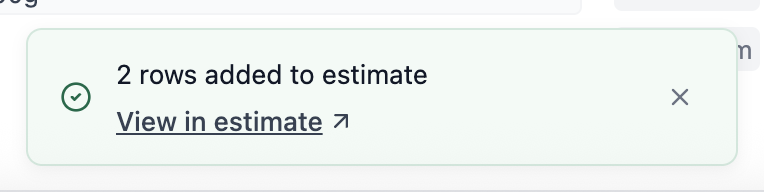
- Return to Estimate - A quick nav link will briefly appear at the bottom of your screen to direct you back to your estimate.
Dynamic status fields from schedules
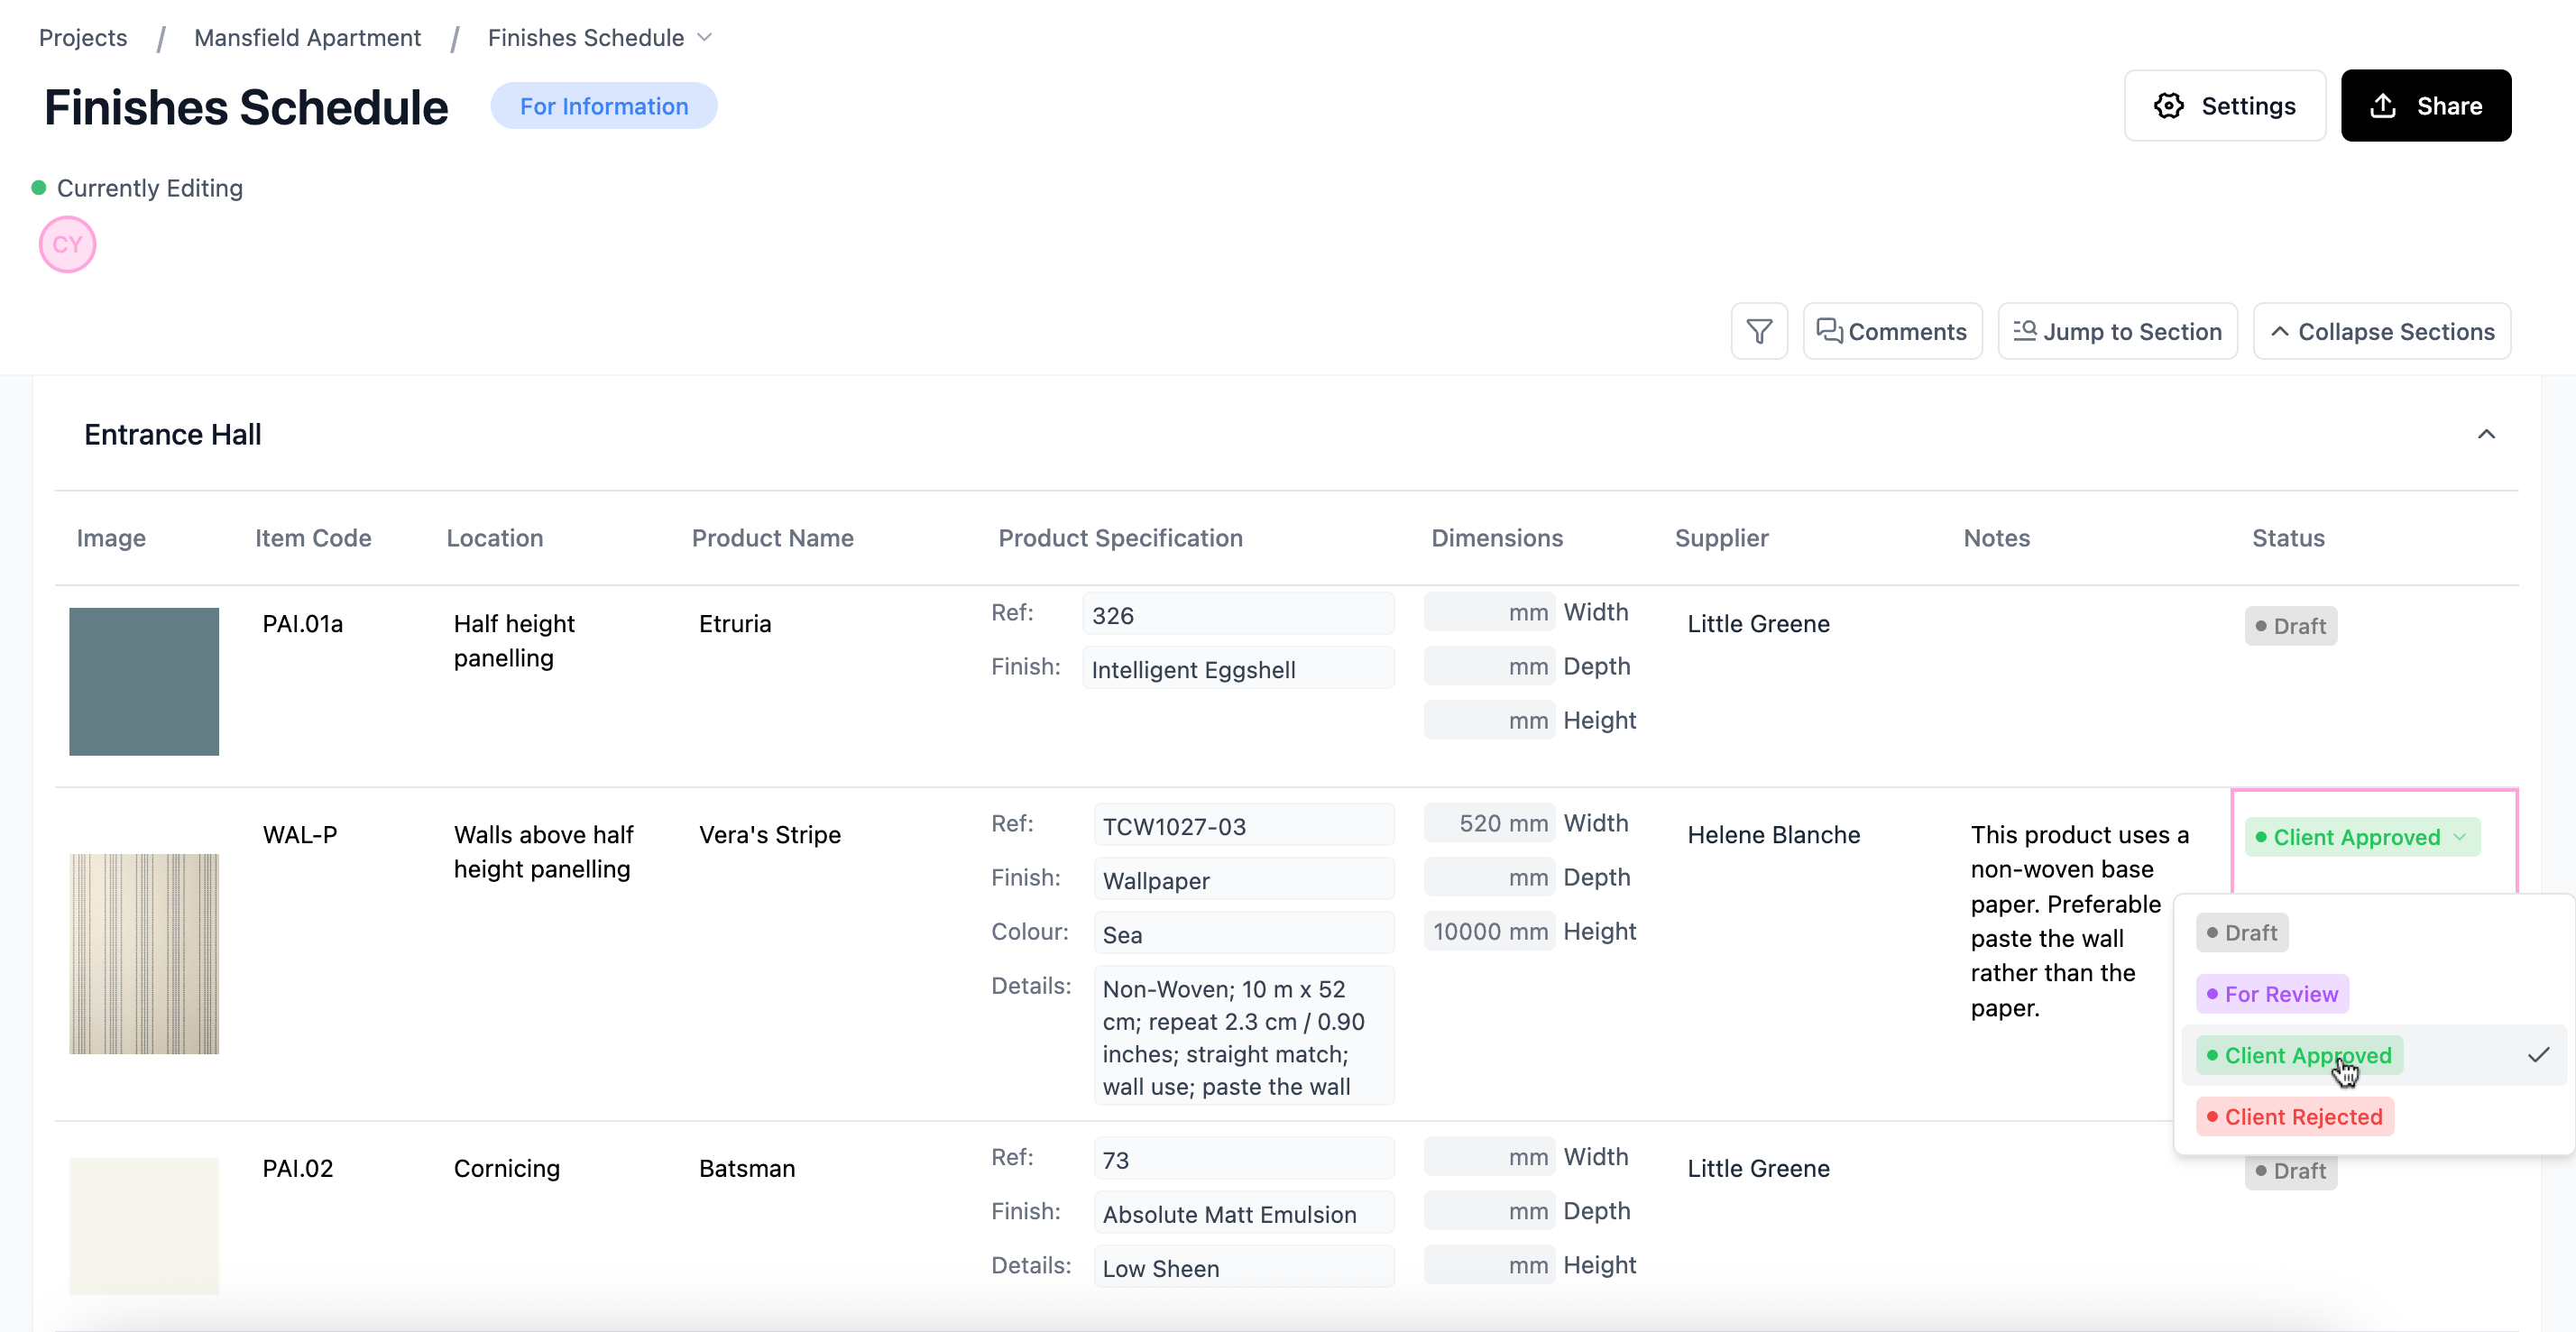
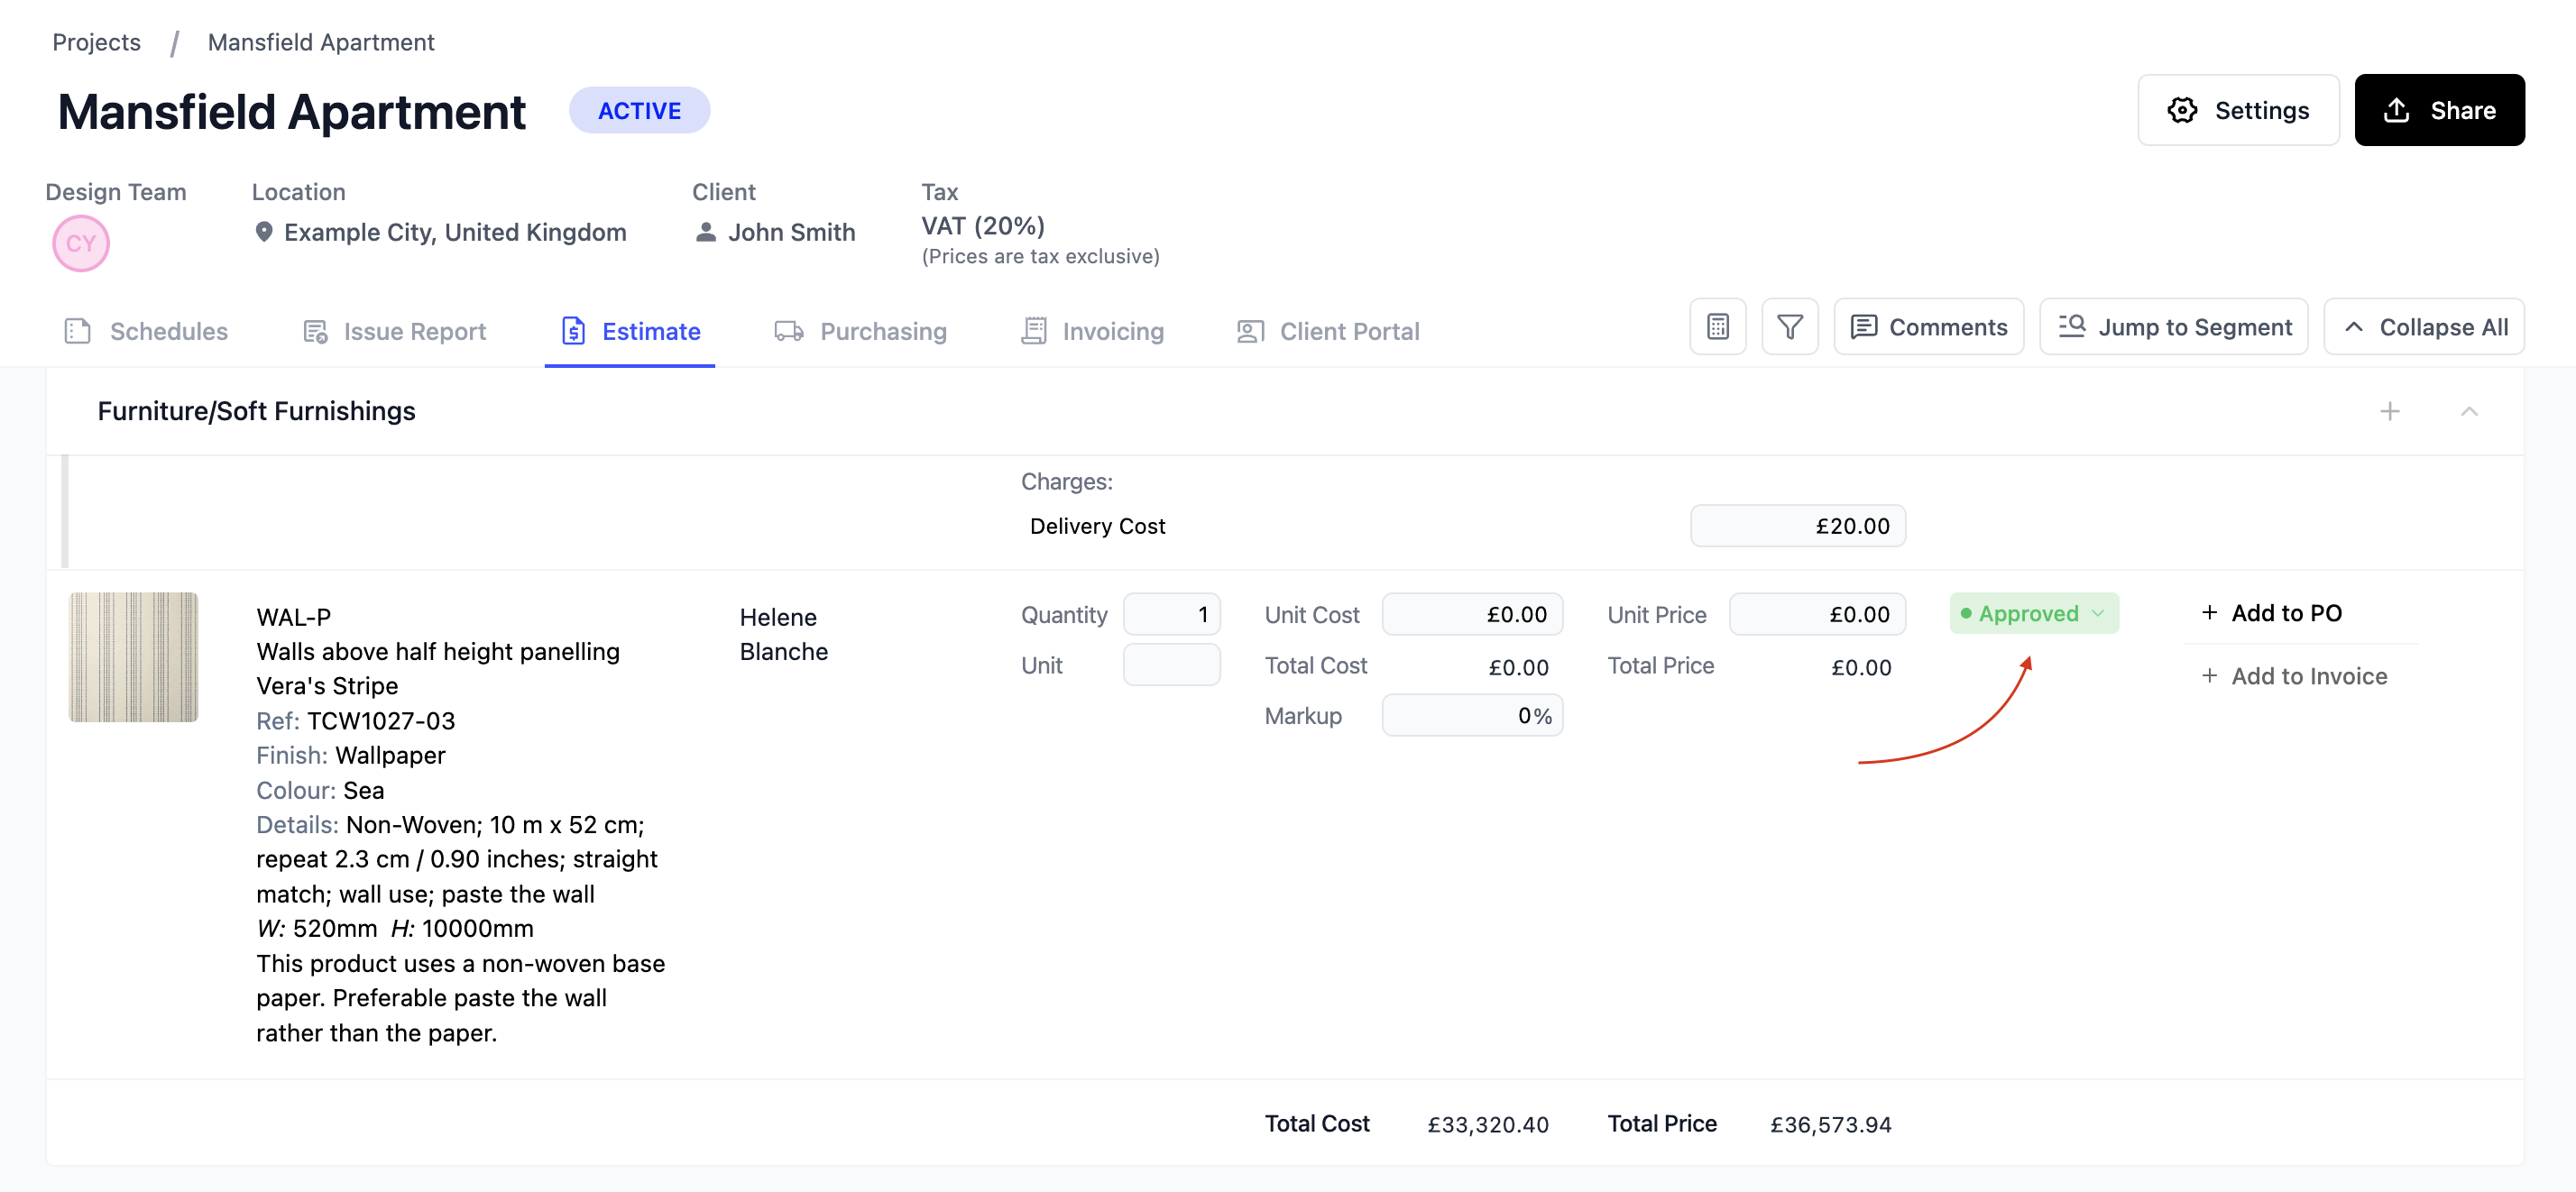
If your schedule template has a status field type, the status of the row in your schedule will be reflected in your estimate. To learn more about status fields in your schedules, click here.
For example, if your client has approved a specification in your schedule through the Client Portal, the status of the line item in your estimate will automatically show as Approved.
Note: Dynamic Status Fields
It is important to note that dynamic statuses only flow one direction - from your schedule to your estimate. If you update the status of a line item in your estimate, it will not update the status of the row in your schedule. This is to maintain the typical best practice workflow moving your projects forwards.
Line items
A line item is any individual product or item you add to your estimate. Line items are the building blocks of your estimate, containing all the essential information about a product: images, descriptions, supplier details, pricing and quantities.
Each line item operates independently, which gives you precise control over your procurement workflow. You can send specific line items to your client for approval, create purchase orders for individual items as specifications are finalised, and invoice clients for particular products without affecting others. For example, if your client approves the sofa but wants to reconsider the coffee table, each line item tracks its own approval status, allowing you to move forward with ordering the sofa while you source alternatives for the table.
Assigning custom tax rates to line items
Estimate line items can also have custom tax rates - for example, if you have an antique piece that is sold on the special margin scheme in the United Kingdom, you may want to assign this row a tax rate of 0%.
-
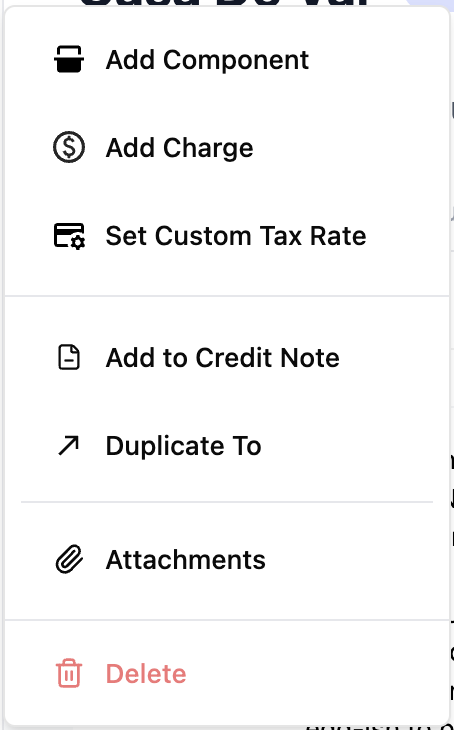
Click on the Grip Icon to the left of the row in your estimate
-
Select Set Custom Tax Rate from the dropdown menu
-
Set the new rate you'd like to apply to this row and whether you'd like it to apply to any charges. To learn more about charges, click here.
To learn more about how you can add specs, products or custom items to your estimate, click here.
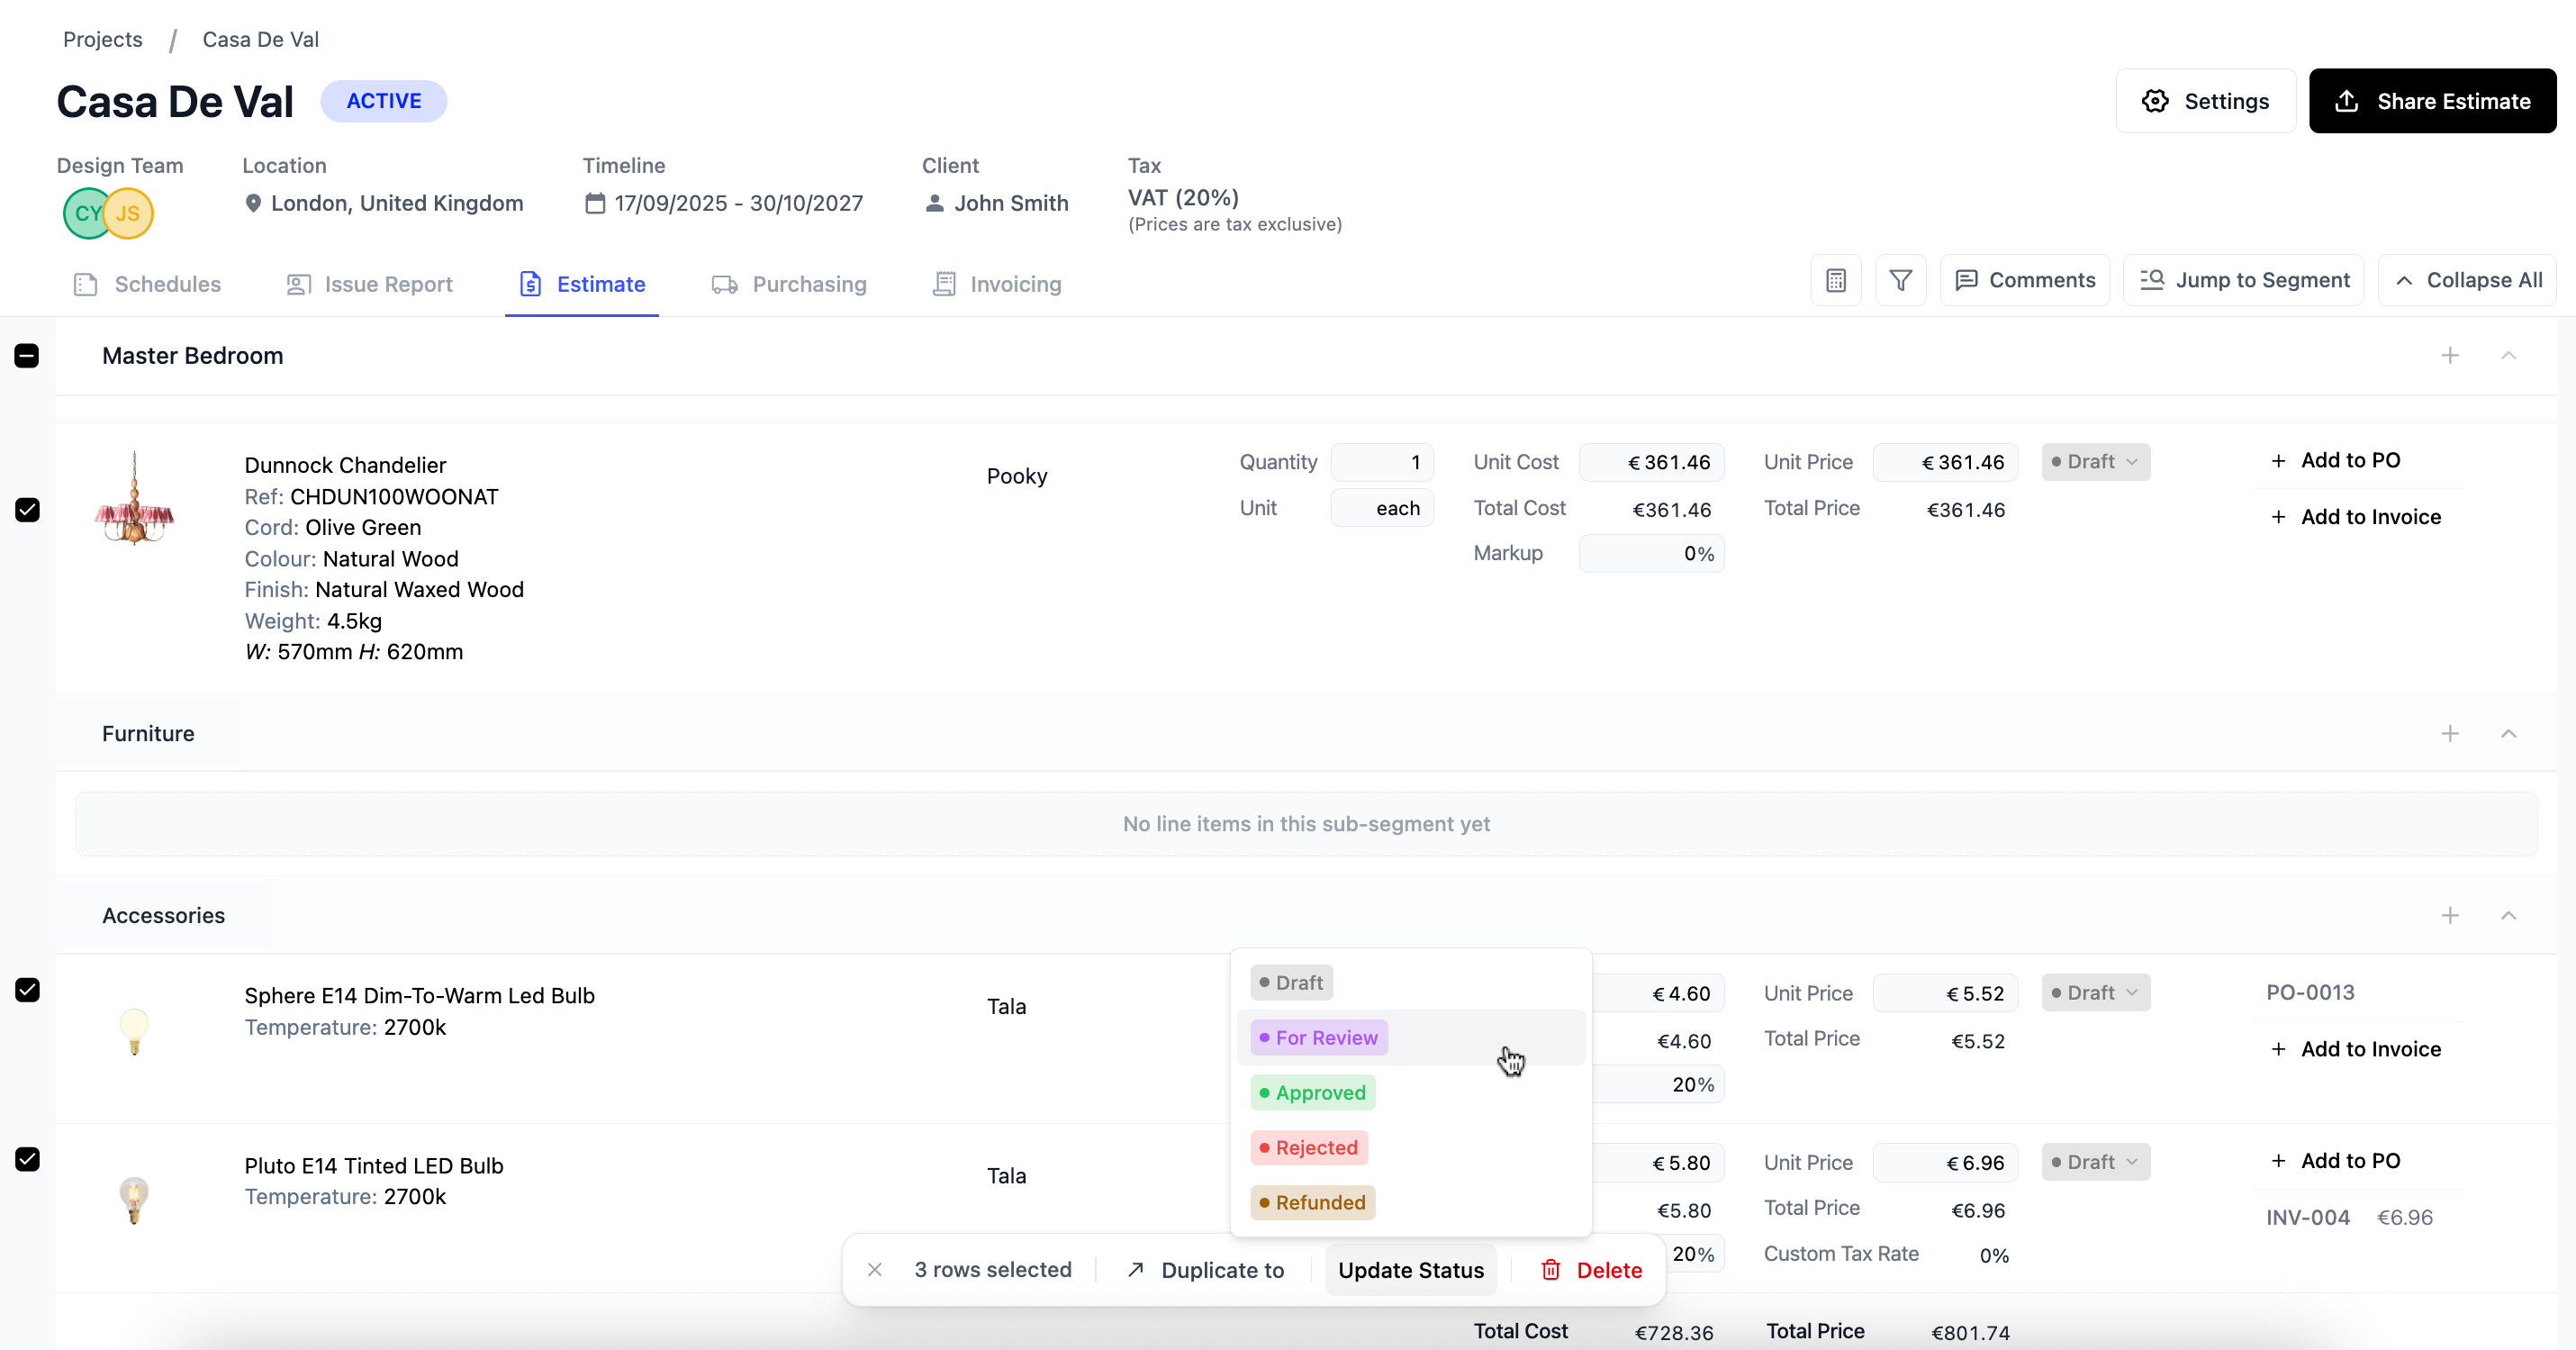
Line item statuses
Line item statuses can be set manually, or in some cases will update automatically based on activity in the Purchasing tab or Client Portal.
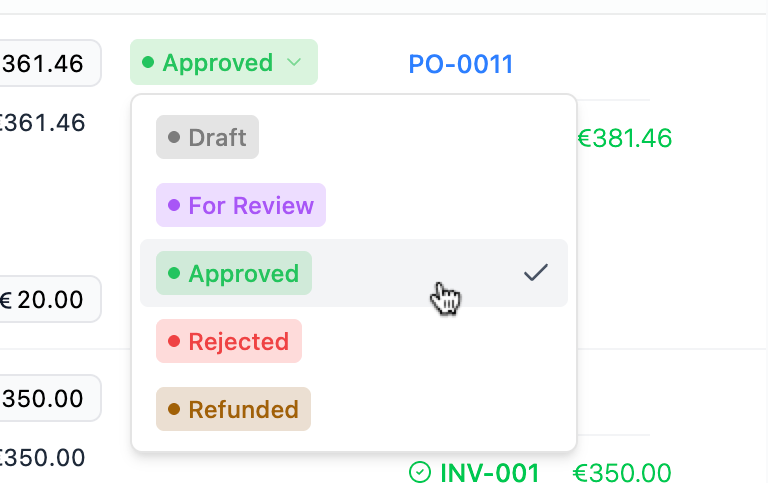
- Draft - The default status when a line item is first created. Use this while a line item is still being worked on or hasn't yet been confirmed. Lines set to draft will not appear in your Client Estimate on the Client Portal.
- For Review - Indicates the line item is awaiting client approval. Setting this status will automatically surface the item in your Client Portal for the client to action.
- Approved - Indicates the client has approved the item for purchase. This updates automatically when a client approves an item in the Client Portal.
- Rejected - Indicates the client has rejected the item. This updates automatically when a client rejects an item in the Client Portal.
- Refunded - Indicates the item has been refunded or returned. This updates automatically when a purchase order is marked as refunded and the line item will be greyed out.
You can update multiple line item statuses at once using the checkbox icon as shown below.
To learn more about purchase order statuses, click here.
Duplicating a line item
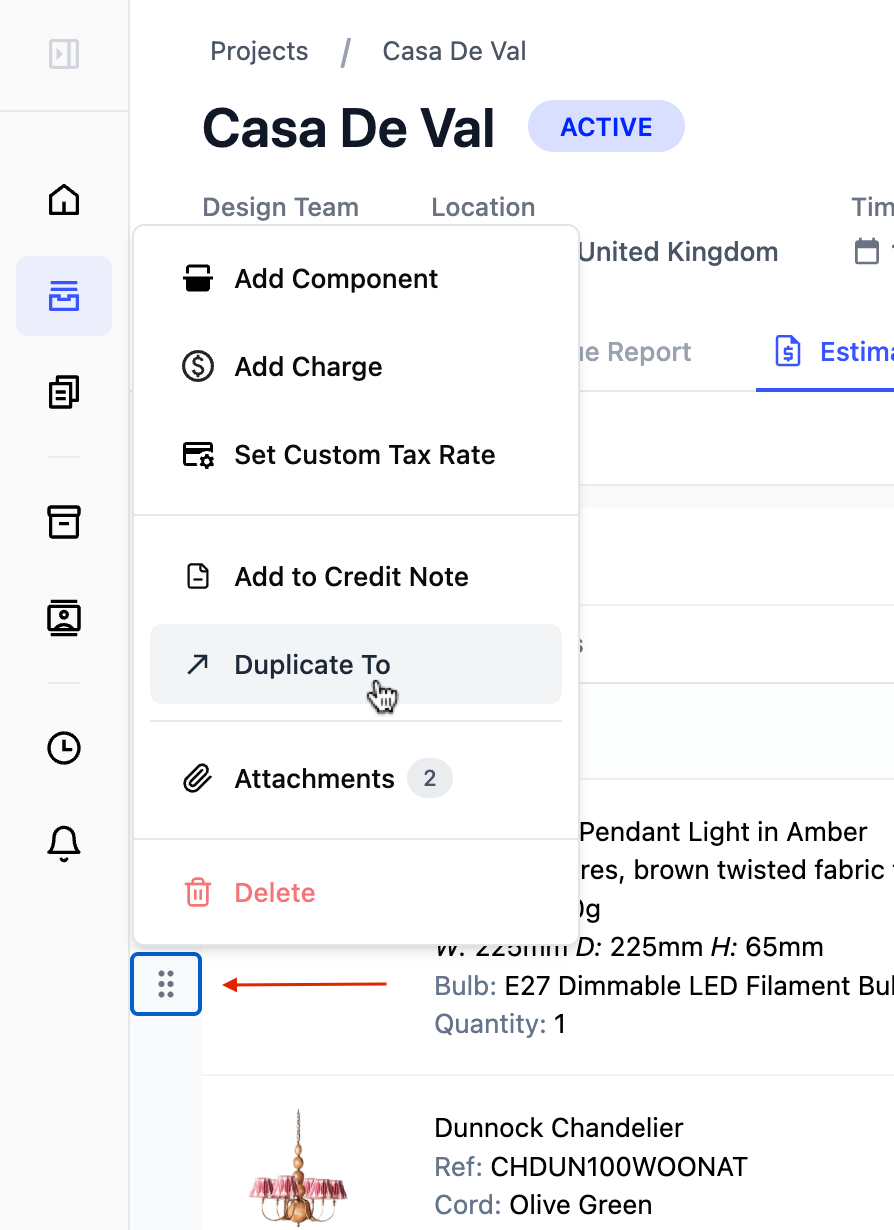
You can duplicate any line item to another segment or sub-segment within your estimate. Note that duplicating a line item will only copy the item details - any status, purchase order, or invoice information attached to the original will not carry across to the duplicate.
- Click grip icon - Click on the grip icon to the left of the line item row
- Duplicate - Select duplicate to from the dropdown menu and follow the prompts to select the destination.
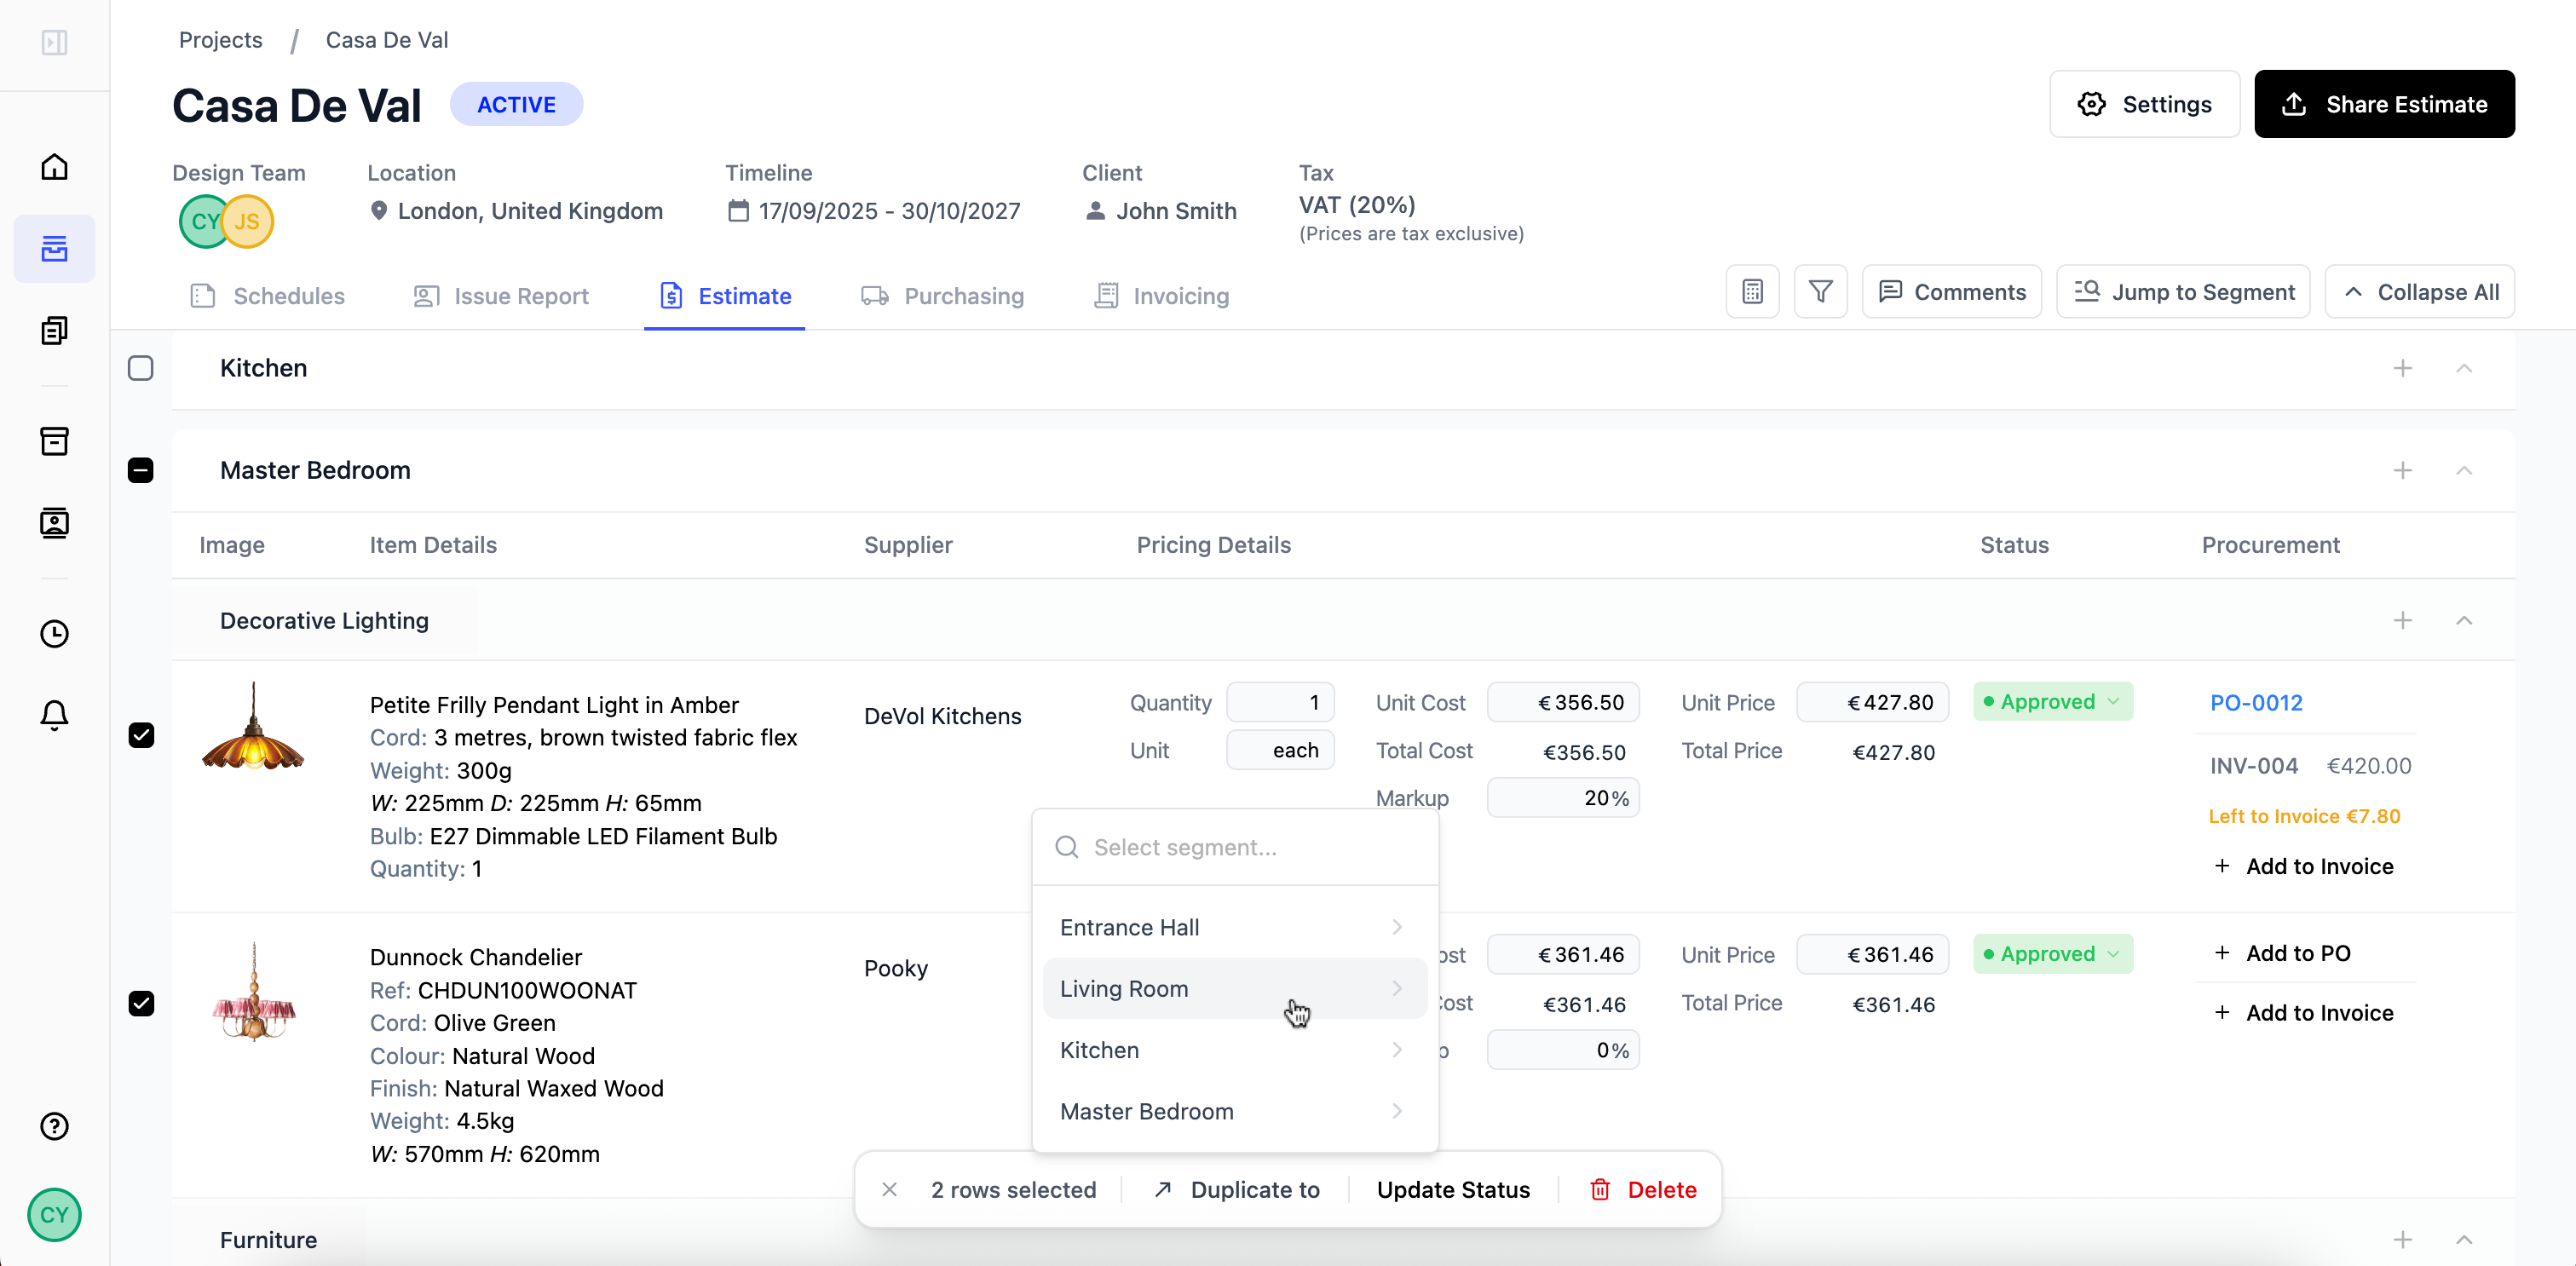
To duplicate multiple rows at the same time:
- Select line items - Select the line items to duplicate using the checkbox
- Duplicate To - Once all line items are selected, click on duplicate to in the action bar at the bottom of your screen.
- Select segment or sub-segment - choose the desired location for the copies. Note you can only select one new desired location at a time.
Deleting a line item
To delete a line item, any linked purchase orders or invoices must be removed first. Once those have been archived or refunded, the line item can be deleted as normal.
To learn more about archiving or refunding a purchase order, click here.
To learn more about archiving or refunding an invoice, click here.
Components
A component is a sub-item that belongs to a main line item, visually defined by a grey line and inset slightly as shown below. Components are a separately ordered part or material that's required for the complete product.
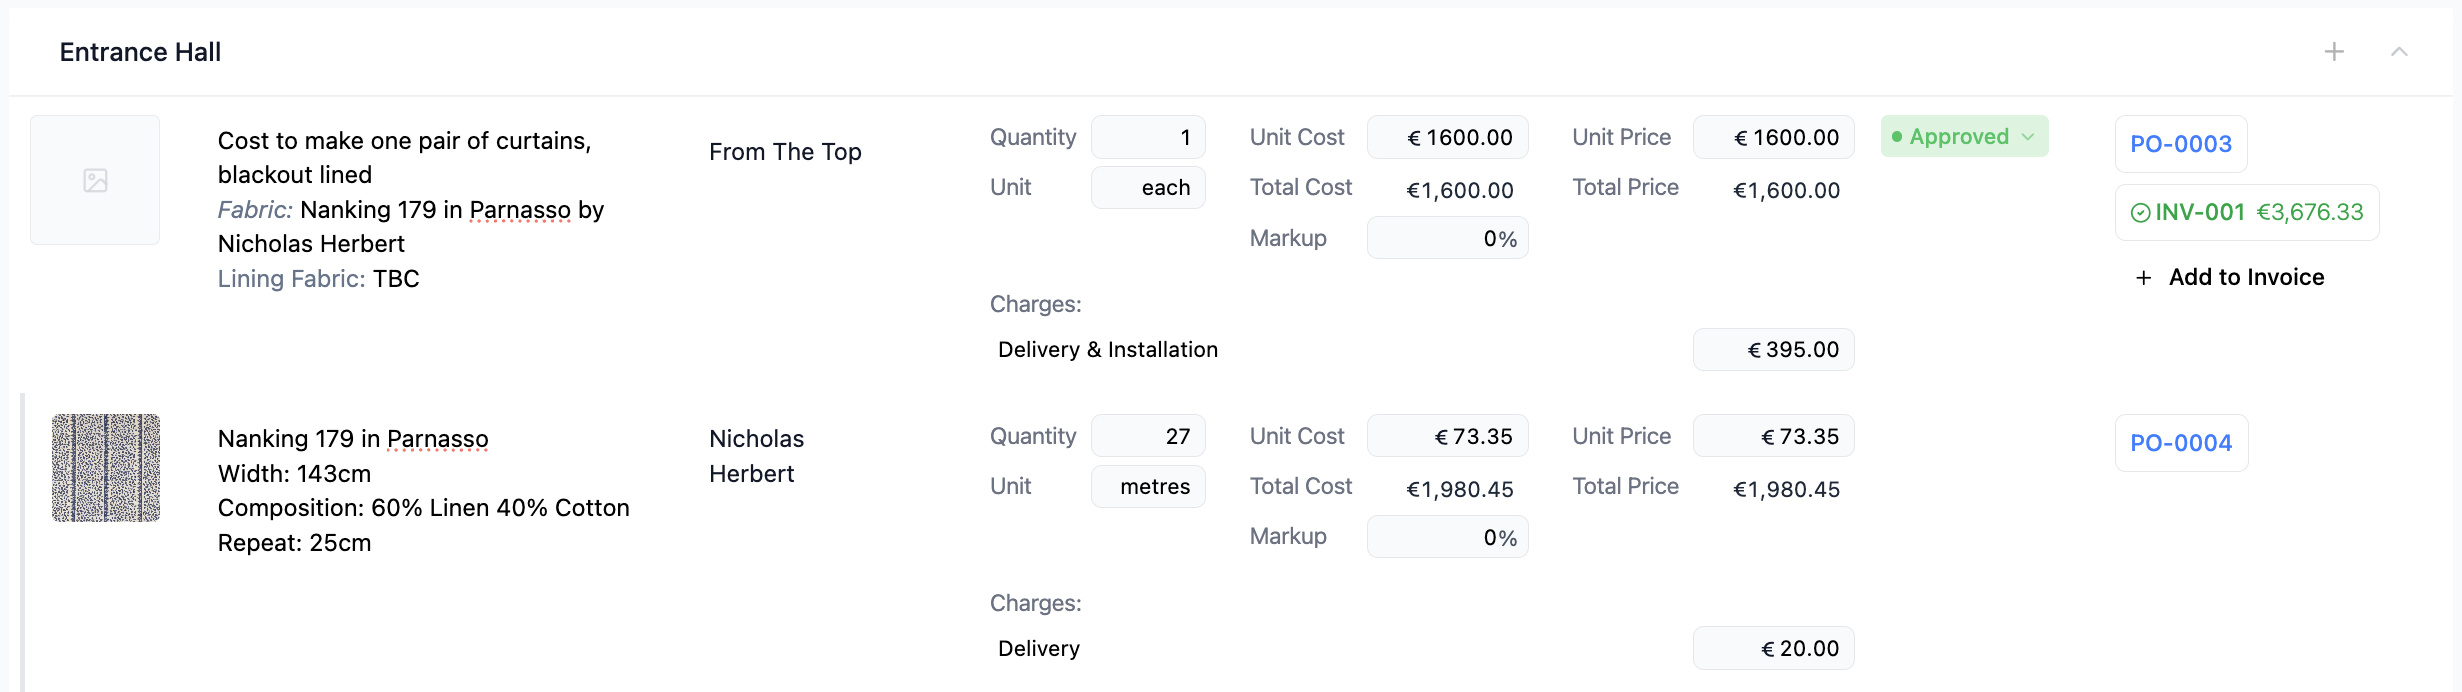
For example, if you're ordering curtains, the cost to make them would be the main line item, and the fabric (ordered separately from a different supplier) could be a component nested underneath it. Your client sees a "curtains" line item in their quote, but you can create separate purchase orders for each component, while keeping everything visually connected on your end.
Component examples
Here’s a few other examples of when you might use components in your estimates:
- Custom furniture requiring separately ordered upholstery fabric or materials
- Lighting fixtures with separately sourced lampshades or specialist bulbs
- Window treatments where fabric is ordered separately from the track or blind system
- Any item where materials need to be purchased independently and supplied to the maker
Whilst components can be indepently ordered, they cannot be invoiced for individually, they are always invoiced in a "group" format with the main line item. Therefore, the price of the component is built into a group total and is hidden to your client. To learn more about invoicing for components, click here.
Creating a component
- Click on the Grip Icon button to the left of your desired main line item
- Select Add Component from the drop down menu
Raising credit notes for components
If a component needs to be credited to the client, you will need to raise the credit note from the main line item by clicking on the grip icon to the left of the line.
We always recommending checking with your supplier that the item can be cancelled before processing a credit note to your client. To learn more about processing supplier credit notes, click here.
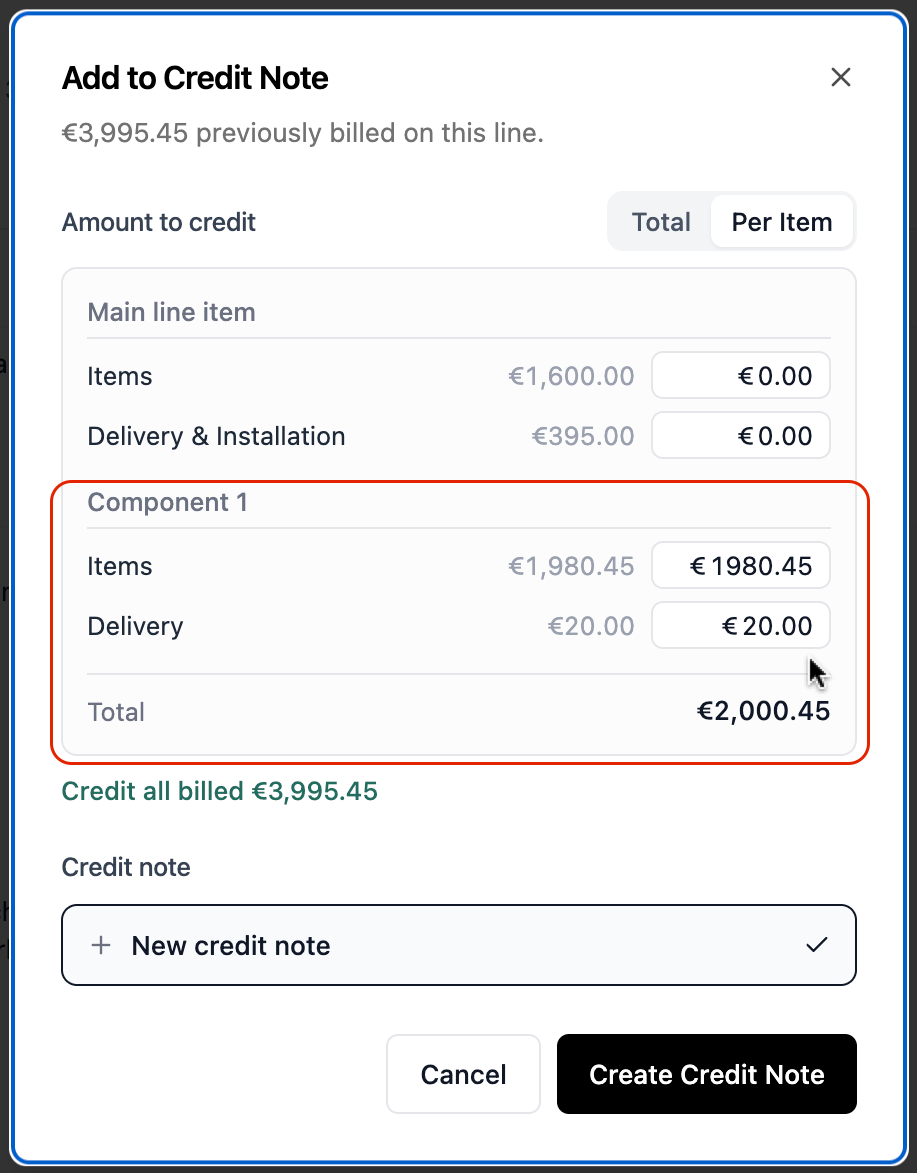
On the Add to Credit Note pop up - toggle the Per Item button to see a break down of all the items grouped together under the main line item. Fill in the amounts for the component you want to credit to the client, or alternatively you can credit the whole group.
To learn more about raising itemised credit notes, click here.
Charges
A charge is a small additional cost that gets built into the total price of a line item - like delivery/duties and tax fees, installation costs, fabric cutting fees, or handling charges. Unlike the main product price, charges bypass any markup you've applied, so you're only passing through to your client exactly what the supplier charges you. Charges are hidden from the client's view but included in the line item's final cost, keeping your estimate clean and simple.
To create a charge, click on the grip icon to the left of your line item and select Add Charge.

Applying charges after order has been placed
Charges can be added at any point during the procurement process. If your line item has been ordered but you've received a new associated cost, you can still add a charge to the line.
- Go to the PO - You will need to manually adjust the status of that PO to open to add a charge to the line item. This will not affect any existing payment activity recorded.
- Update the status - click on the status of the PO and change to open
- Return to estimate - return to the line item in your estimate to add the new charge
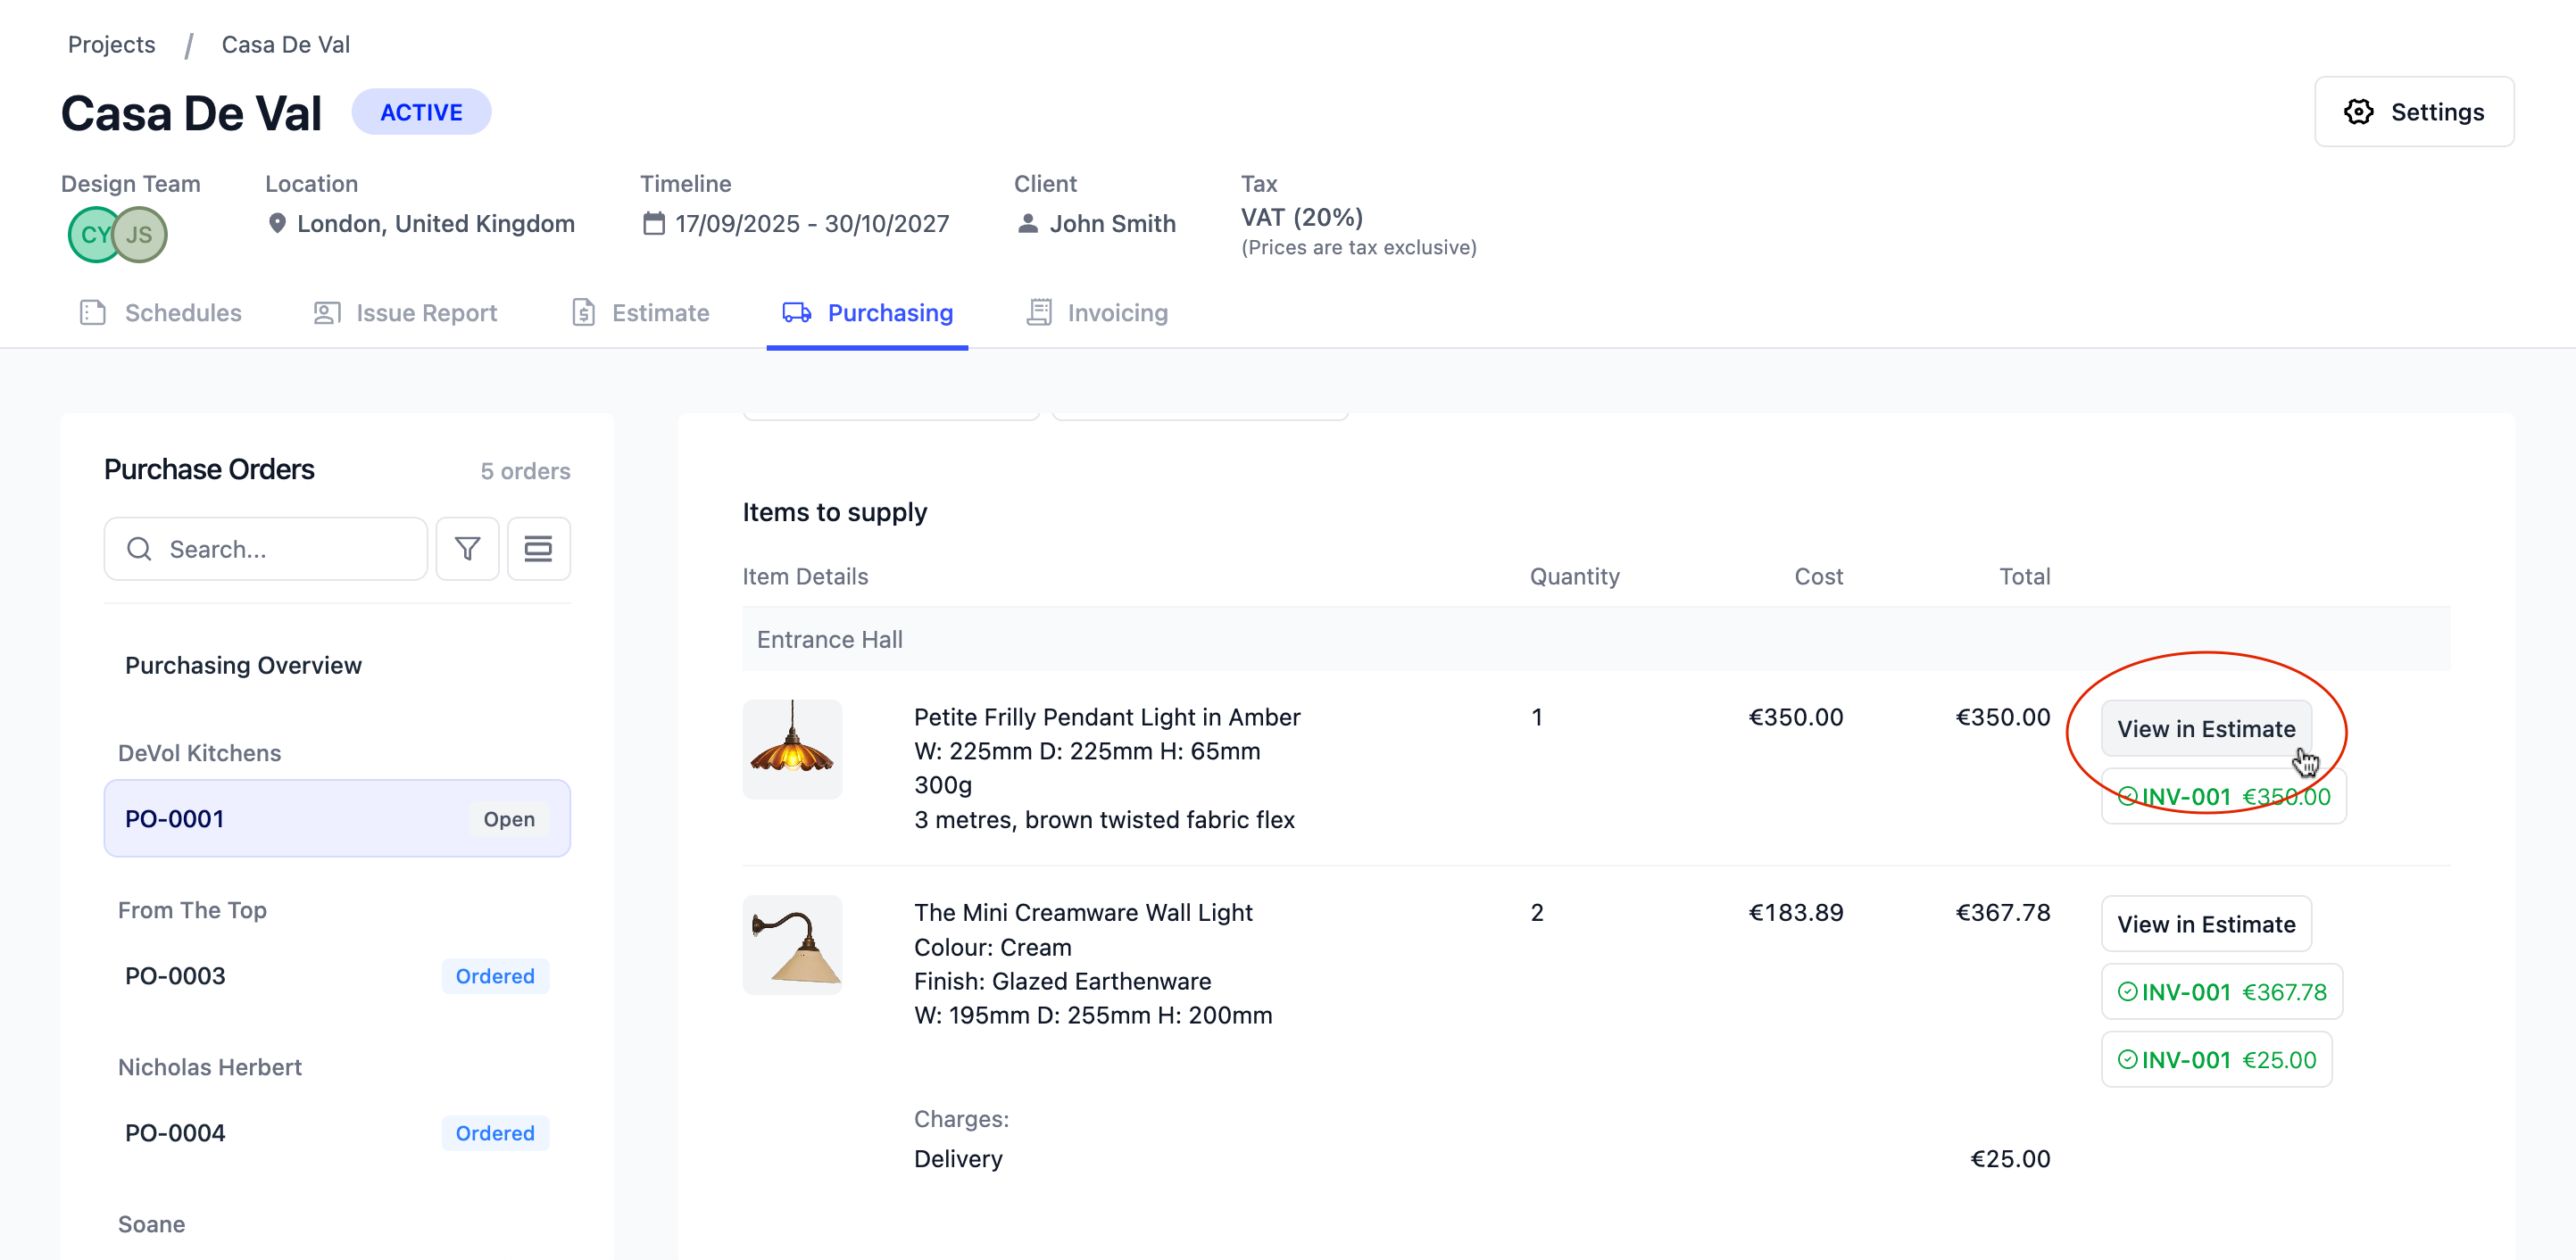
- Add Charge - Click on the grip icon to the left of the line item and select Add Charge from the dropdown menu
- Customise your charge - Update the description and add the cost, remembering to either exclude/include tax depending on your settings.
- Return to PO - Go back into your order and manually update the status back to ordered since you don't need to send a revised PO.
To learn more about how to manage your Purchase Orders, click here.
Applying markups to line items
Applying a markup to a line item means a percentage is added to the unit/trade cost of the product, before it is invoiced to the client. Typically, this percentage compensates designers for the time and liability involved in purchasing, tracking, inspecting, and delivering items.
Each line item can have its own markup percentage, or you can set a default rate in Settings to save time on new estimates. You can also remove this field entirely if you don't markup your products.
- Go to Settings - Click the Settings button in the top right corner of your screen and navigate to the Procurement tab.
- Set a default markup - Scroll to Default Markup Percentage and enter your preferred rate. This will apply to all future line items; any existing line items will need to be updated manually. Remember to Save Changes
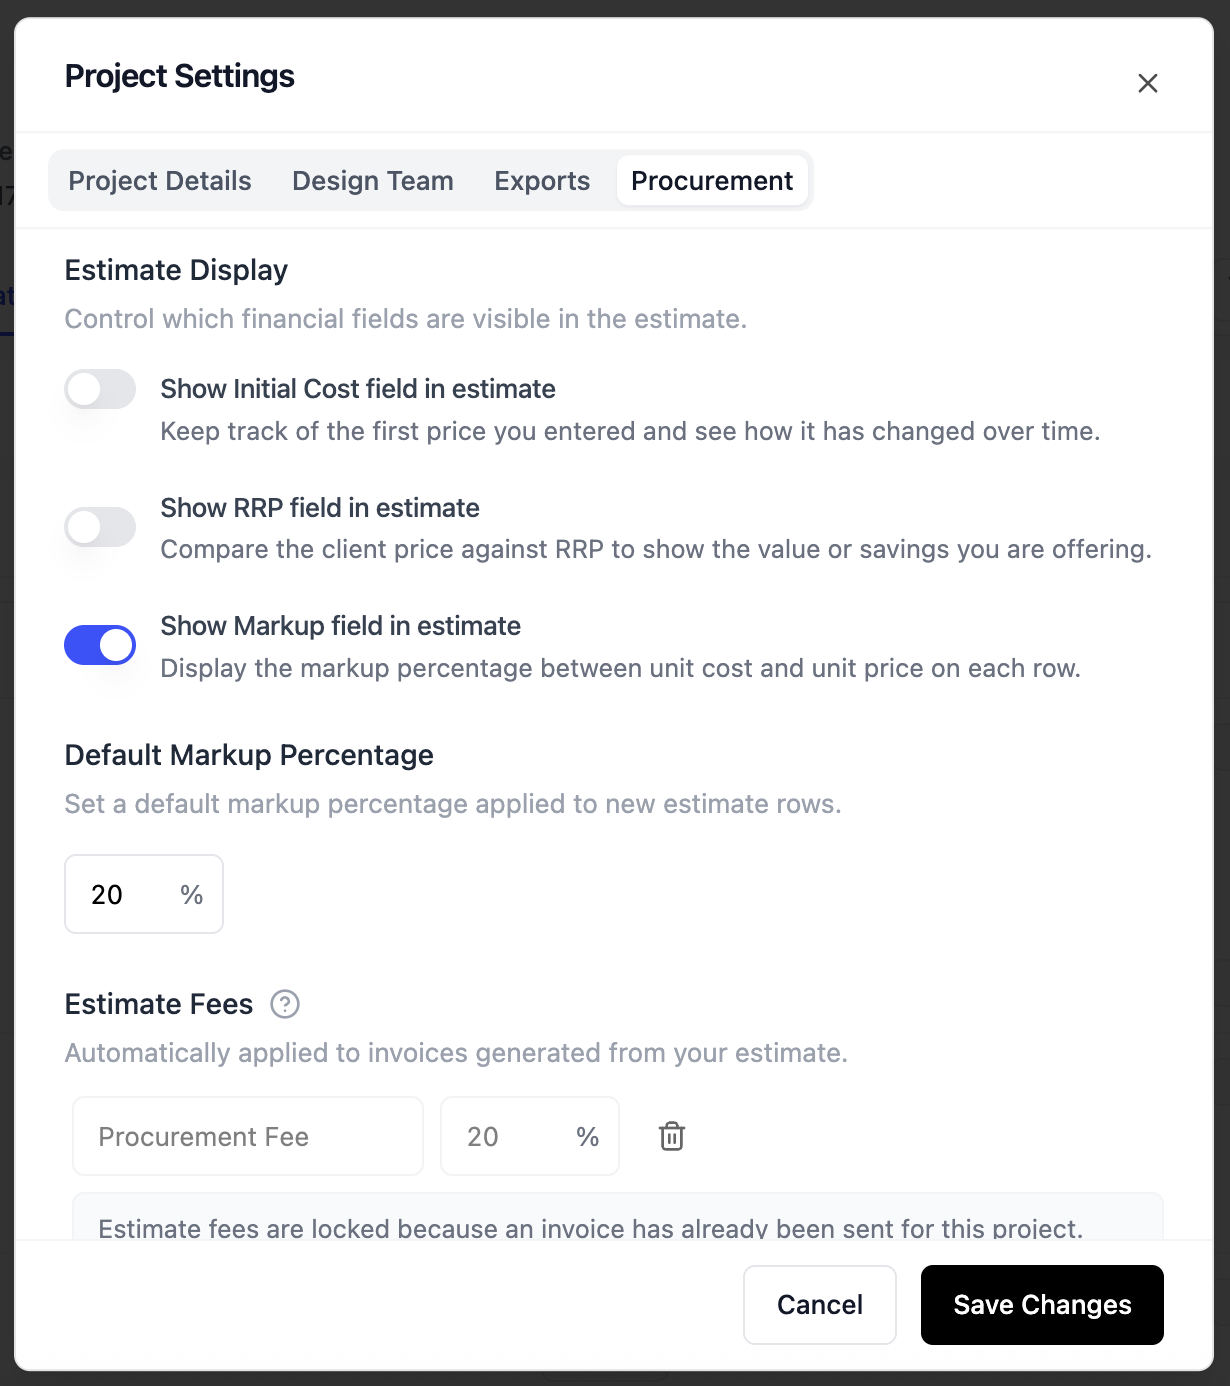
- Override when needed - You can always adjust the markup on individual line items, regardless of your default setting.
Note: Markups are not visible to clients
The markup field is never visible to your clients - there's no need to hide or disable it before sharing your estimate.
Tax and markups
Tax is calculated on the combined total of the unit cost and any markup applied, rather than the unit cost alone. Here's how that works in practice:
Example - purchasing a lampshade from a UK supplier:
Unit Cost of Lampshade: £100 excluding tax (VAT 20%)
Apply Markup (gets your sell price to the client): 20% Markup on Unit Cost = £120 excluding tax
Invoice the client (tax gets applied): £120 × 20% VAT = £24
Total Price for Client: Sell price + VAT = £144 including tax
To learn more about how to set your default tax rate for projects, click here.
Updating saved product costs
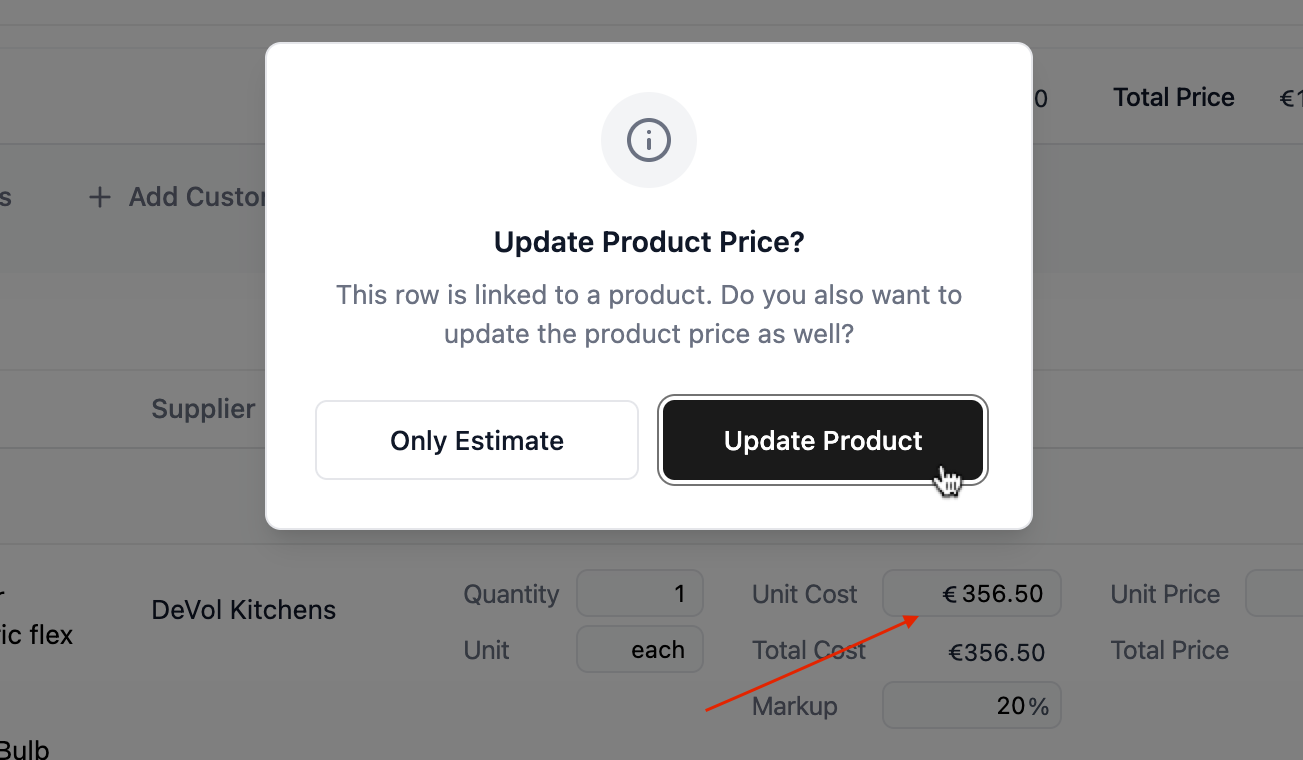
When you add a product from your company catalogue to an estimate, any unit or RRP cost already saved against that product will automatically populate the relevant cost fields, saving you from entering the same information twice.
If you need to adjust the price on your estimate, Inspec will ask whether you'd like to update the saved product cost in your catalogue at the same time, or apply the change to this estimate only. This keeps your catalogue accurate without you having to update it separately.
Requesting product quotes from suppliers
If you need to request a quote from a supplier, you can do so by clicking on the grip icon to the left of the line item and selecting Request Quote from the dropdown menu.
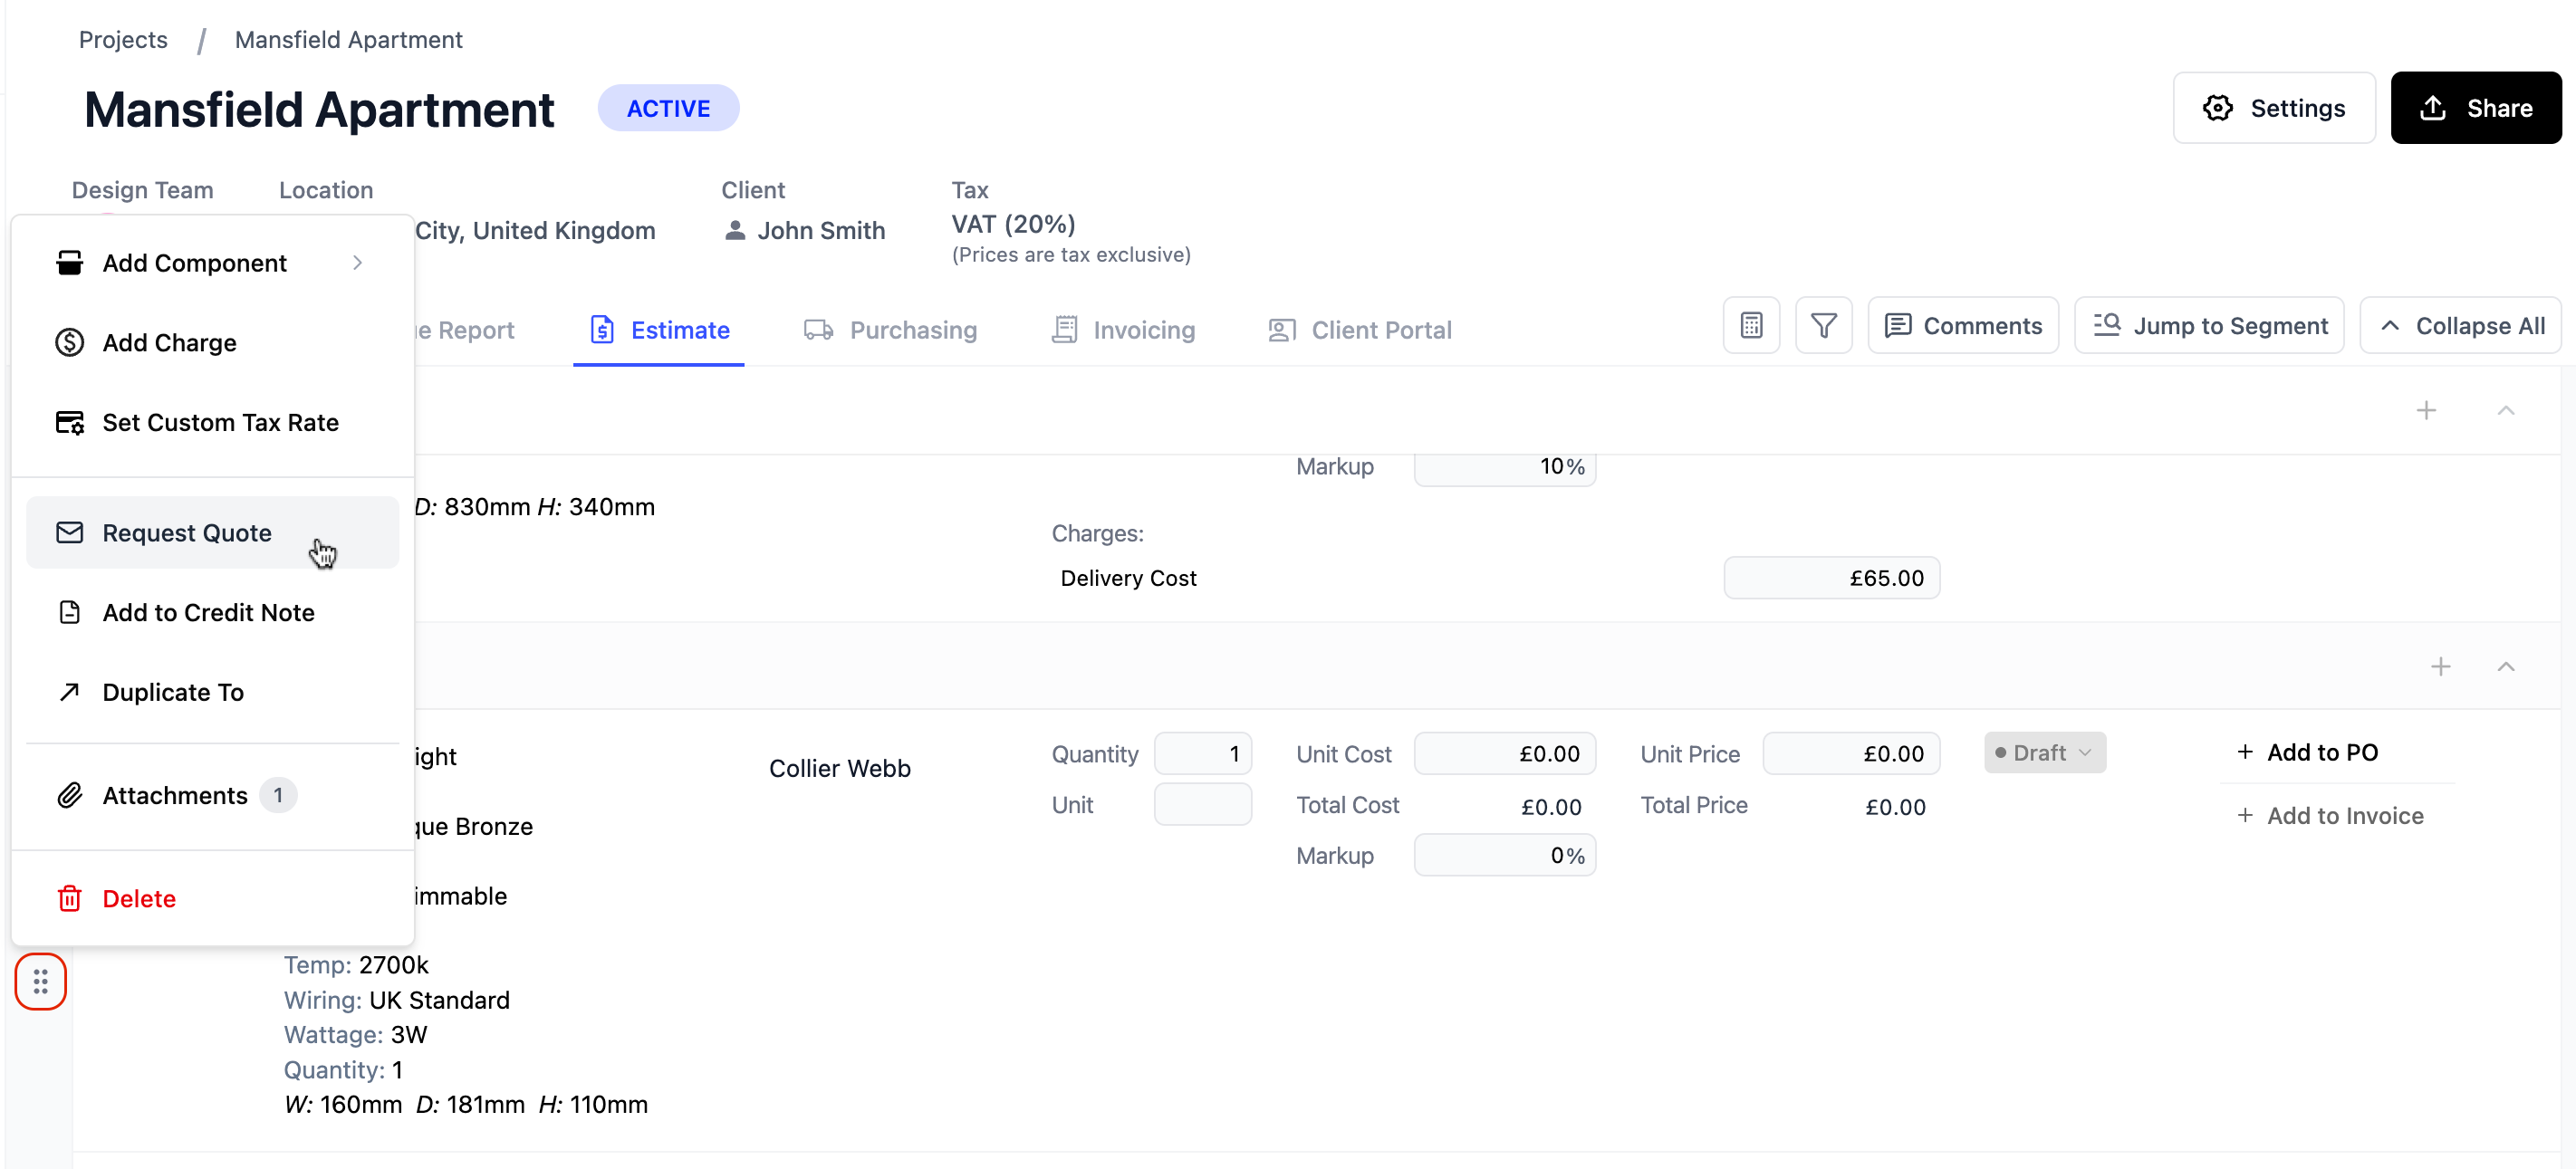
If you have multiple line items from the same supplier, you can select the line items you want to request a quote for by clicking on the checkbox icon to the left of the line item. Select Request Quote from the action bar at the bottom of your screen to send the request to the supplier.
Remember: Filter by Supplier
Remember you can filter your estimate by Supplier to narrow down a long list of items to select. To learn about how to filter your Estimate, click here.
Referencing quotes on your estimate and purchase orders
Once you have received a quote from the supplier, you can add this as an attachment to the line item by clicking on the grip icon to the left of the line item and selecting Add Attachment from the dropdown menu. That way, you can keep all your quotes in one place and easily reference them when needed.
Alternatively, if your quote includes prices for multiple items, it can also be attached against a specific purchase order for future reference, by uploading the quote as an attachment in the Purchase Order Activity section at the bottom of the page.
To learn more about Purchase Order Activity, click here.