Intro to Procurement
An overview of the functionality and benefits of Inspec's Procurement features
What is the purpose of the Procurement features
Inspec's Procurement features were built to help designers streamline the step-by-step process of taking a project from concept to reality, including sourcing, purchasing, tracking and managing the delivery of furniture and materials. Our intention with this feature is to help design professionals execute their projects in the most efficient manner possible, by consolidating the entire design process on one easy-to-use platform.
Procurement core features include:
- Automatic calculations and totals
- Tax rate integration
- Budget management tools
- Client-facing documentation and estimate summaries
- Full transparency on pricing breakdown for your clients
- Ability to hide confidential information regarding pricing, suppliers or imagery
- Purchase order payment activity to monitor cash flow in your studio
- Flexible invoicing, your choice between instalment or itemised client invoices
- Management of client payments by recording dates and methods
Note: Inspec does not process payments
All of Inspec's procurement tools are designed to help you track and manage cash flow throughout a project - but we don't handle payments directly through the platform. This means no transaction fees, no hidden charges, and no unexpected costs passed on to you or your clients. Payments between your studio and suppliers, or between you and your clients, are made through your own preferred channels.
Understanding the three main tabs in Procurement
The Procurement release has introduced three additional tabs to your Project page - Estimate, Purchasing and Invoicing. To learn more about navigating your Project pages, click here.
Estimate - contains all the items/spec details/costs that a designer will purchase on behalf of the design client that go that particular project.
Purchasing - all generated purchase orders for that particular project.
Invoicing - all generated invoices sent to the client for that particular project.
The difference between using Inspec vs Spreadsheets for Procurement
Inspec eliminates the time-consuming manual work that comes with managing procurement in spreadsheets.
- Instead of updating the same information across multiple files, you'll update once and watch it flow automatically through your estimates, purchase orders, and invoices.
- You'll be able to present clients with professional, branded quotes through an interactive portal where they can review and approve items in real-time, meaning you can keep track of your client’s decisions and when exactly they were confirmed.
- You can also track every item's journey from quote to delivery in one place
- Manage multiple supplier orders/invoices effortlessly, and maintain perfect invoice and purchase order numbering across all your projects.
Switching to Inspec means less admin, fewer errors, better cash flow visibility, and more time to focus on design. Inspec transforms procurement from a tedious administrative task into a streamlined, professional process that enhances your client experience and keeps your projects on track.
The difference between an Estimate and a Schedule
The Estimate is the financial hub of your project in Inspec. It gives your client a clear, detailed breakdown of everything your studio will be purchasing and managing on their behalf — including product costs, supplier details, quantities, and markup. Beyond client transparency, the Estimate is also your starting point for procurement: from here you can generate purchase orders to send to suppliers, raise invoices for your client, and submit proposals to the Client Portal for approval. If you need to track what's being spent and what's been ordered, the Estimate is where that all lives.
Specification schedules serve a different purpose entirely. They are design communication documents, used to convey your design intent and product selections to the contractors, architects, and consultants working on the project. A schedule tells the on-site team what has been specified, where it goes, and how it should be installed or finished — it's not designed to track costs or manage procurement. While there may be overlap in the products referenced across both, think of the schedule as the construction and coordination document, and the Estimate as the financial and procurement tool.
How Procurement helps track project costs from concept to completion
Across the three Procurement tabs, you have a complete picture of your project's financials - from what you're charging the client, to what your studio is spending, to what's left in the client's account as spendable funds. To keep these figures accurate, only add items to your estimate that you intend to purchase and charge the client for directly. Items being supplied by contractors or other consultants should be left off the estimate, as including them will affect your project cost totals.
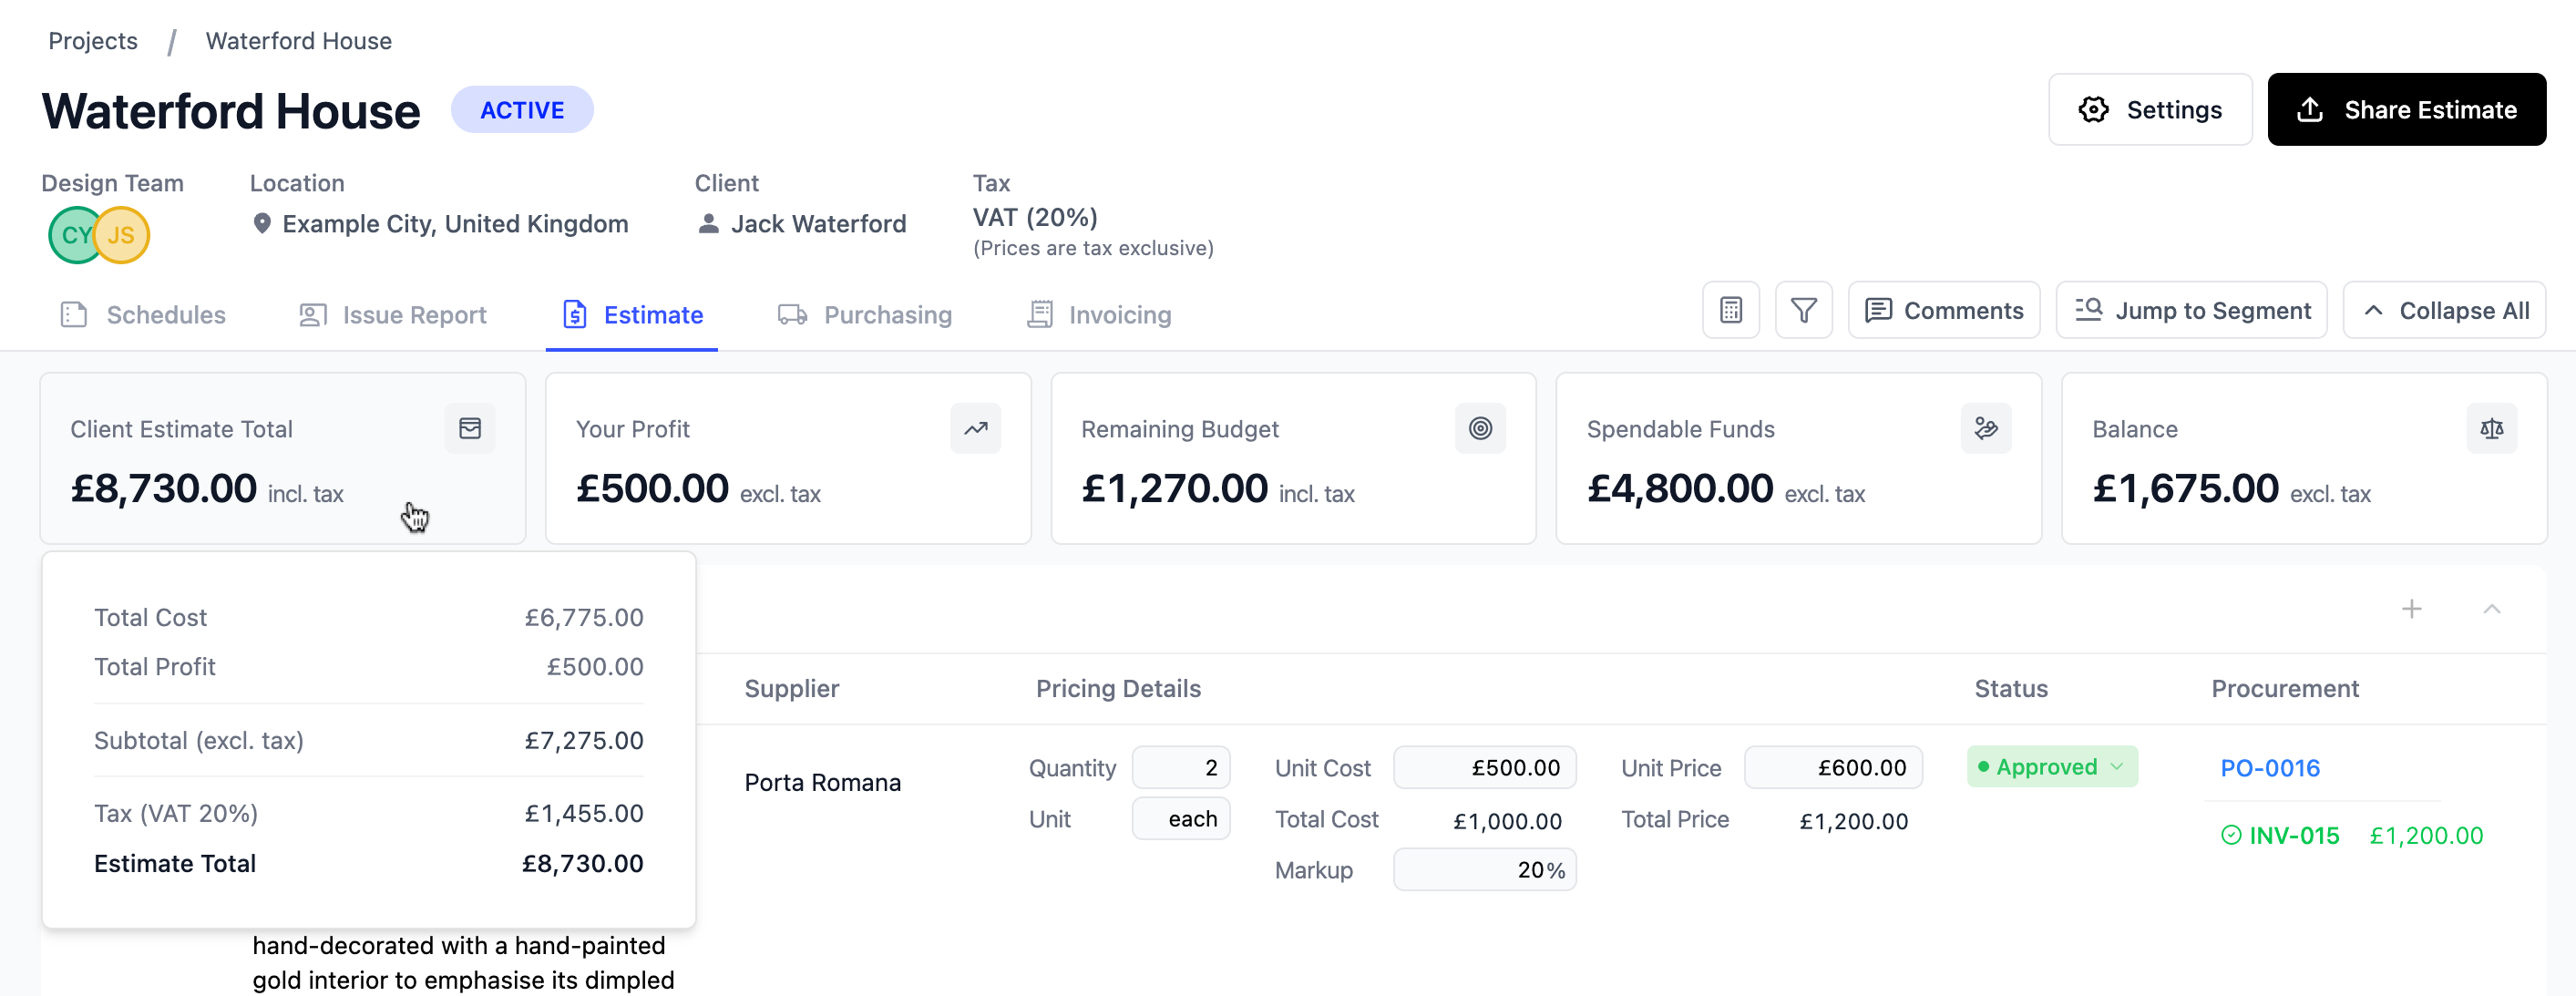
At the top of your estimate page, a row of summary figures gives you an at-a-glance view of where your project stands financially:
- Client Estimate Total - The total price presented to your client, inclusive of tax.
- Your Profit - The difference between your total cost and total price once markup is applied. If you apply project fees to your invoices, these also count towards your profit. Learn more about setting project fees here.
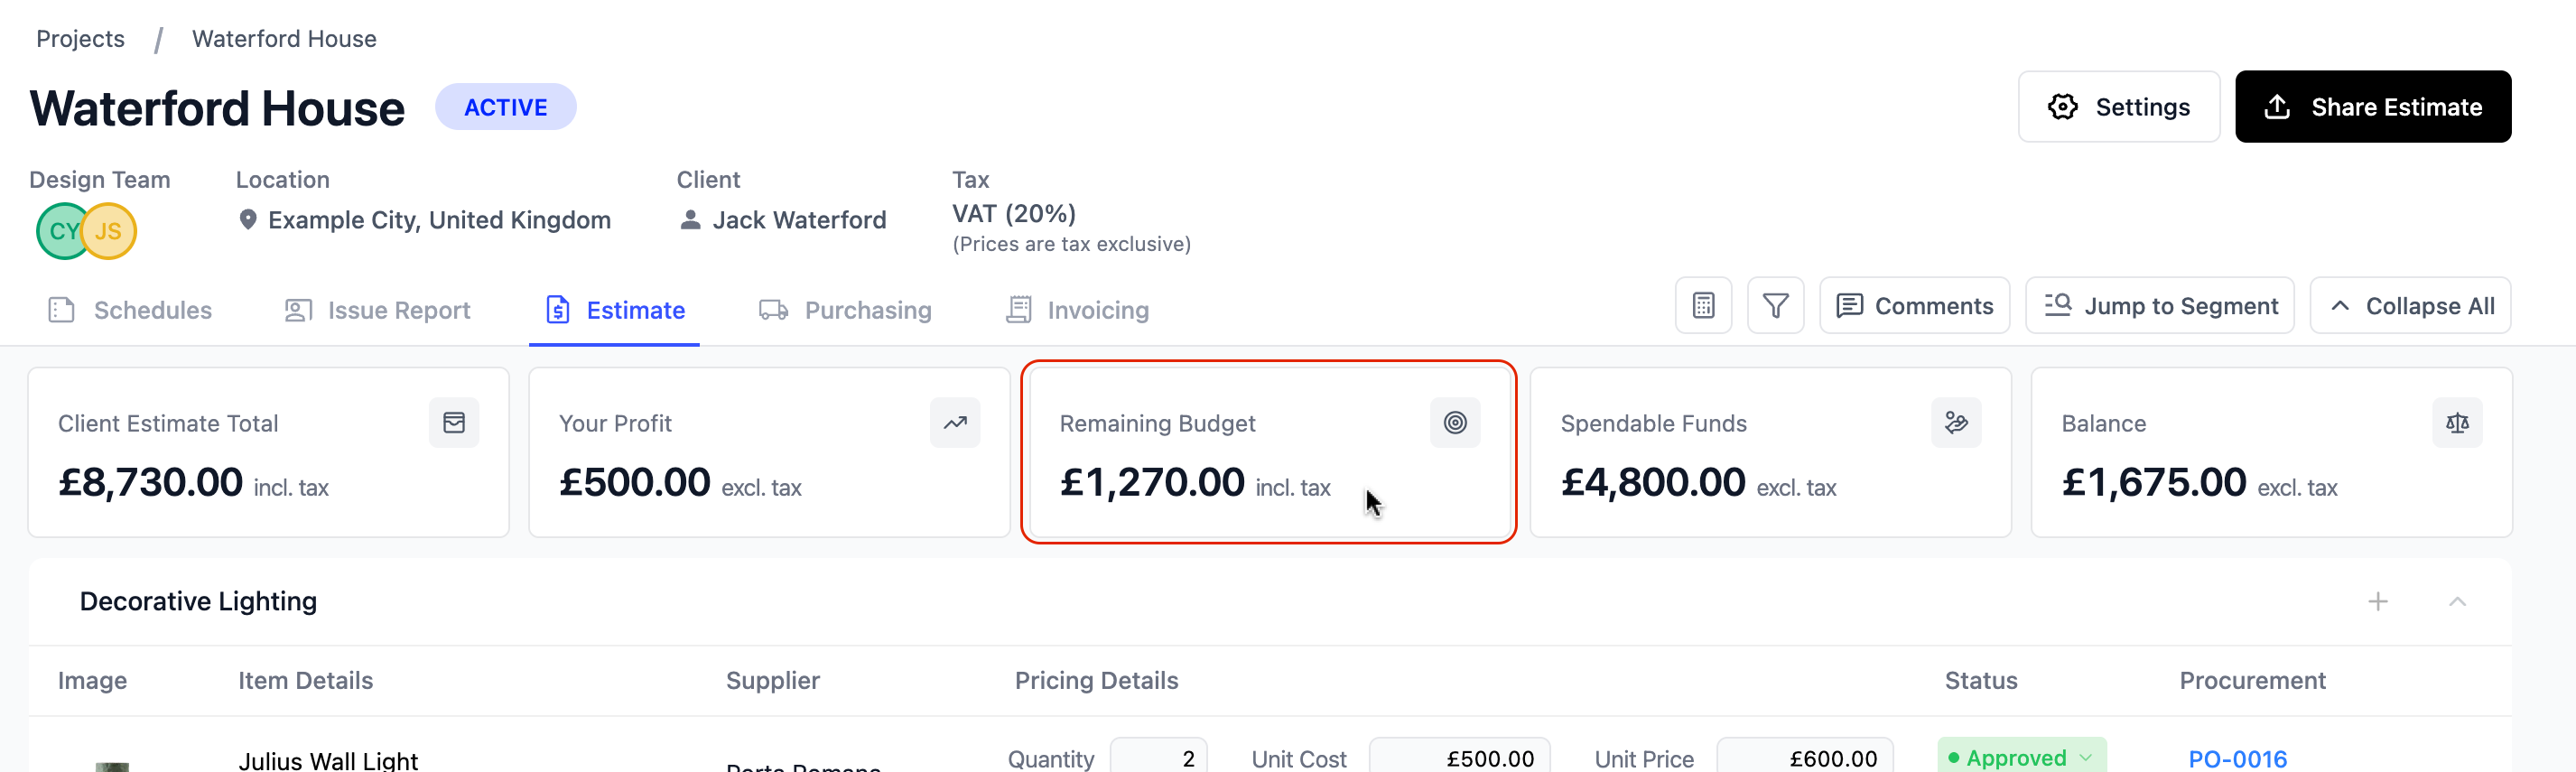
- Remaining Budget - The client's total budget minus the Client Estimate Total, giving you a clear view of how much headroom is left. To learn more about setting a budget, click here.
- Spendable Funds - The total amount that the client has paid to your studio, excluding tax, minus the amount you have already spent on purchases from suppliers. This amount will go up and down as you invoice your clients, receive payment and then place orders with suppliers.
- Balance - The remaining amount to be invoiced to the clients. This can also go into negatives if you have charged the clients more than the total estimate amount.
Setting an Estimate budget
You can set a budget for your project estimate in Project Settings under the procurement tab.
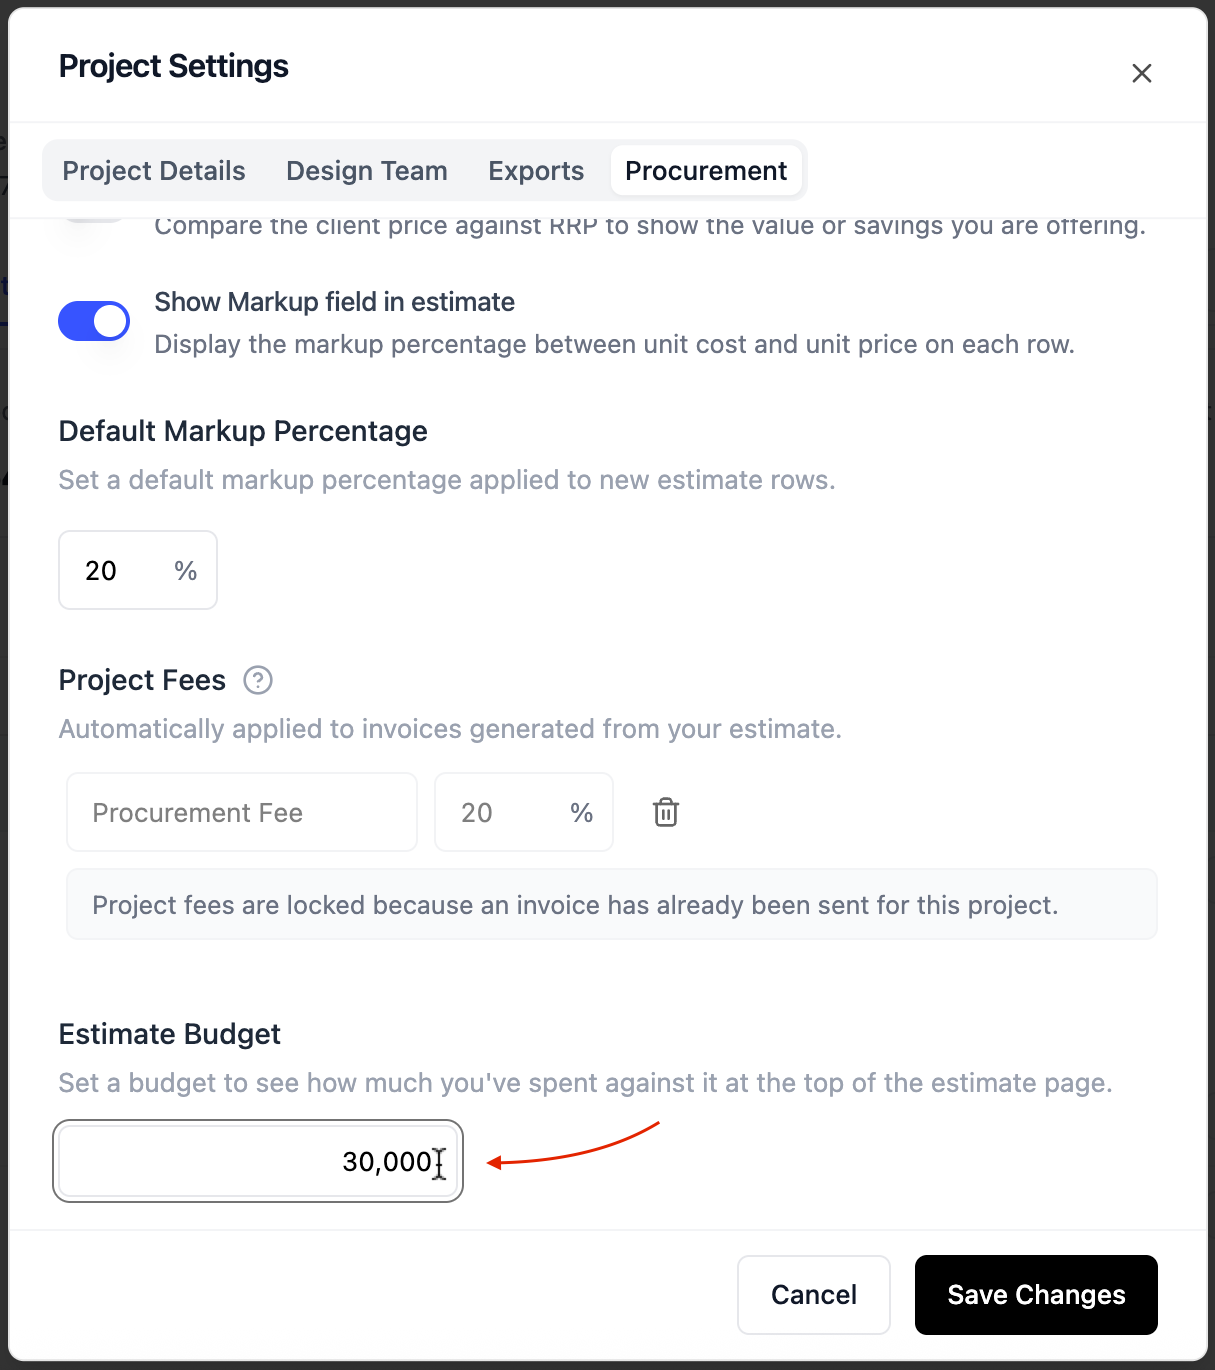
Setting a client budget gives you a clear benchmark to work against as you build out your estimate. It allows you to monitor how your proposed specifications track against what the client has allocated to spend, helping you make informed decisions early and avoid any budget surprises down the line.
Your budget (or what's left of it) will be displayed at the top of your estimate as shown below:
How does Invoice and Purchase Order numbering work in Inspec
Invoice and Purchase Order numbers are assigned company-wide, not per project. By default, your first purchase order will be PO-0001 and your first invoice will be INV-0001, incrementing automatically with each new document you create across all projects.
Customising Invoice and Purchase Order numbers
You can customise the starting number in your Company Settings, which is particularly useful if you're switching to Inspec from another system. Instead of restarting at #0001, you can pick up exactly where you left off.
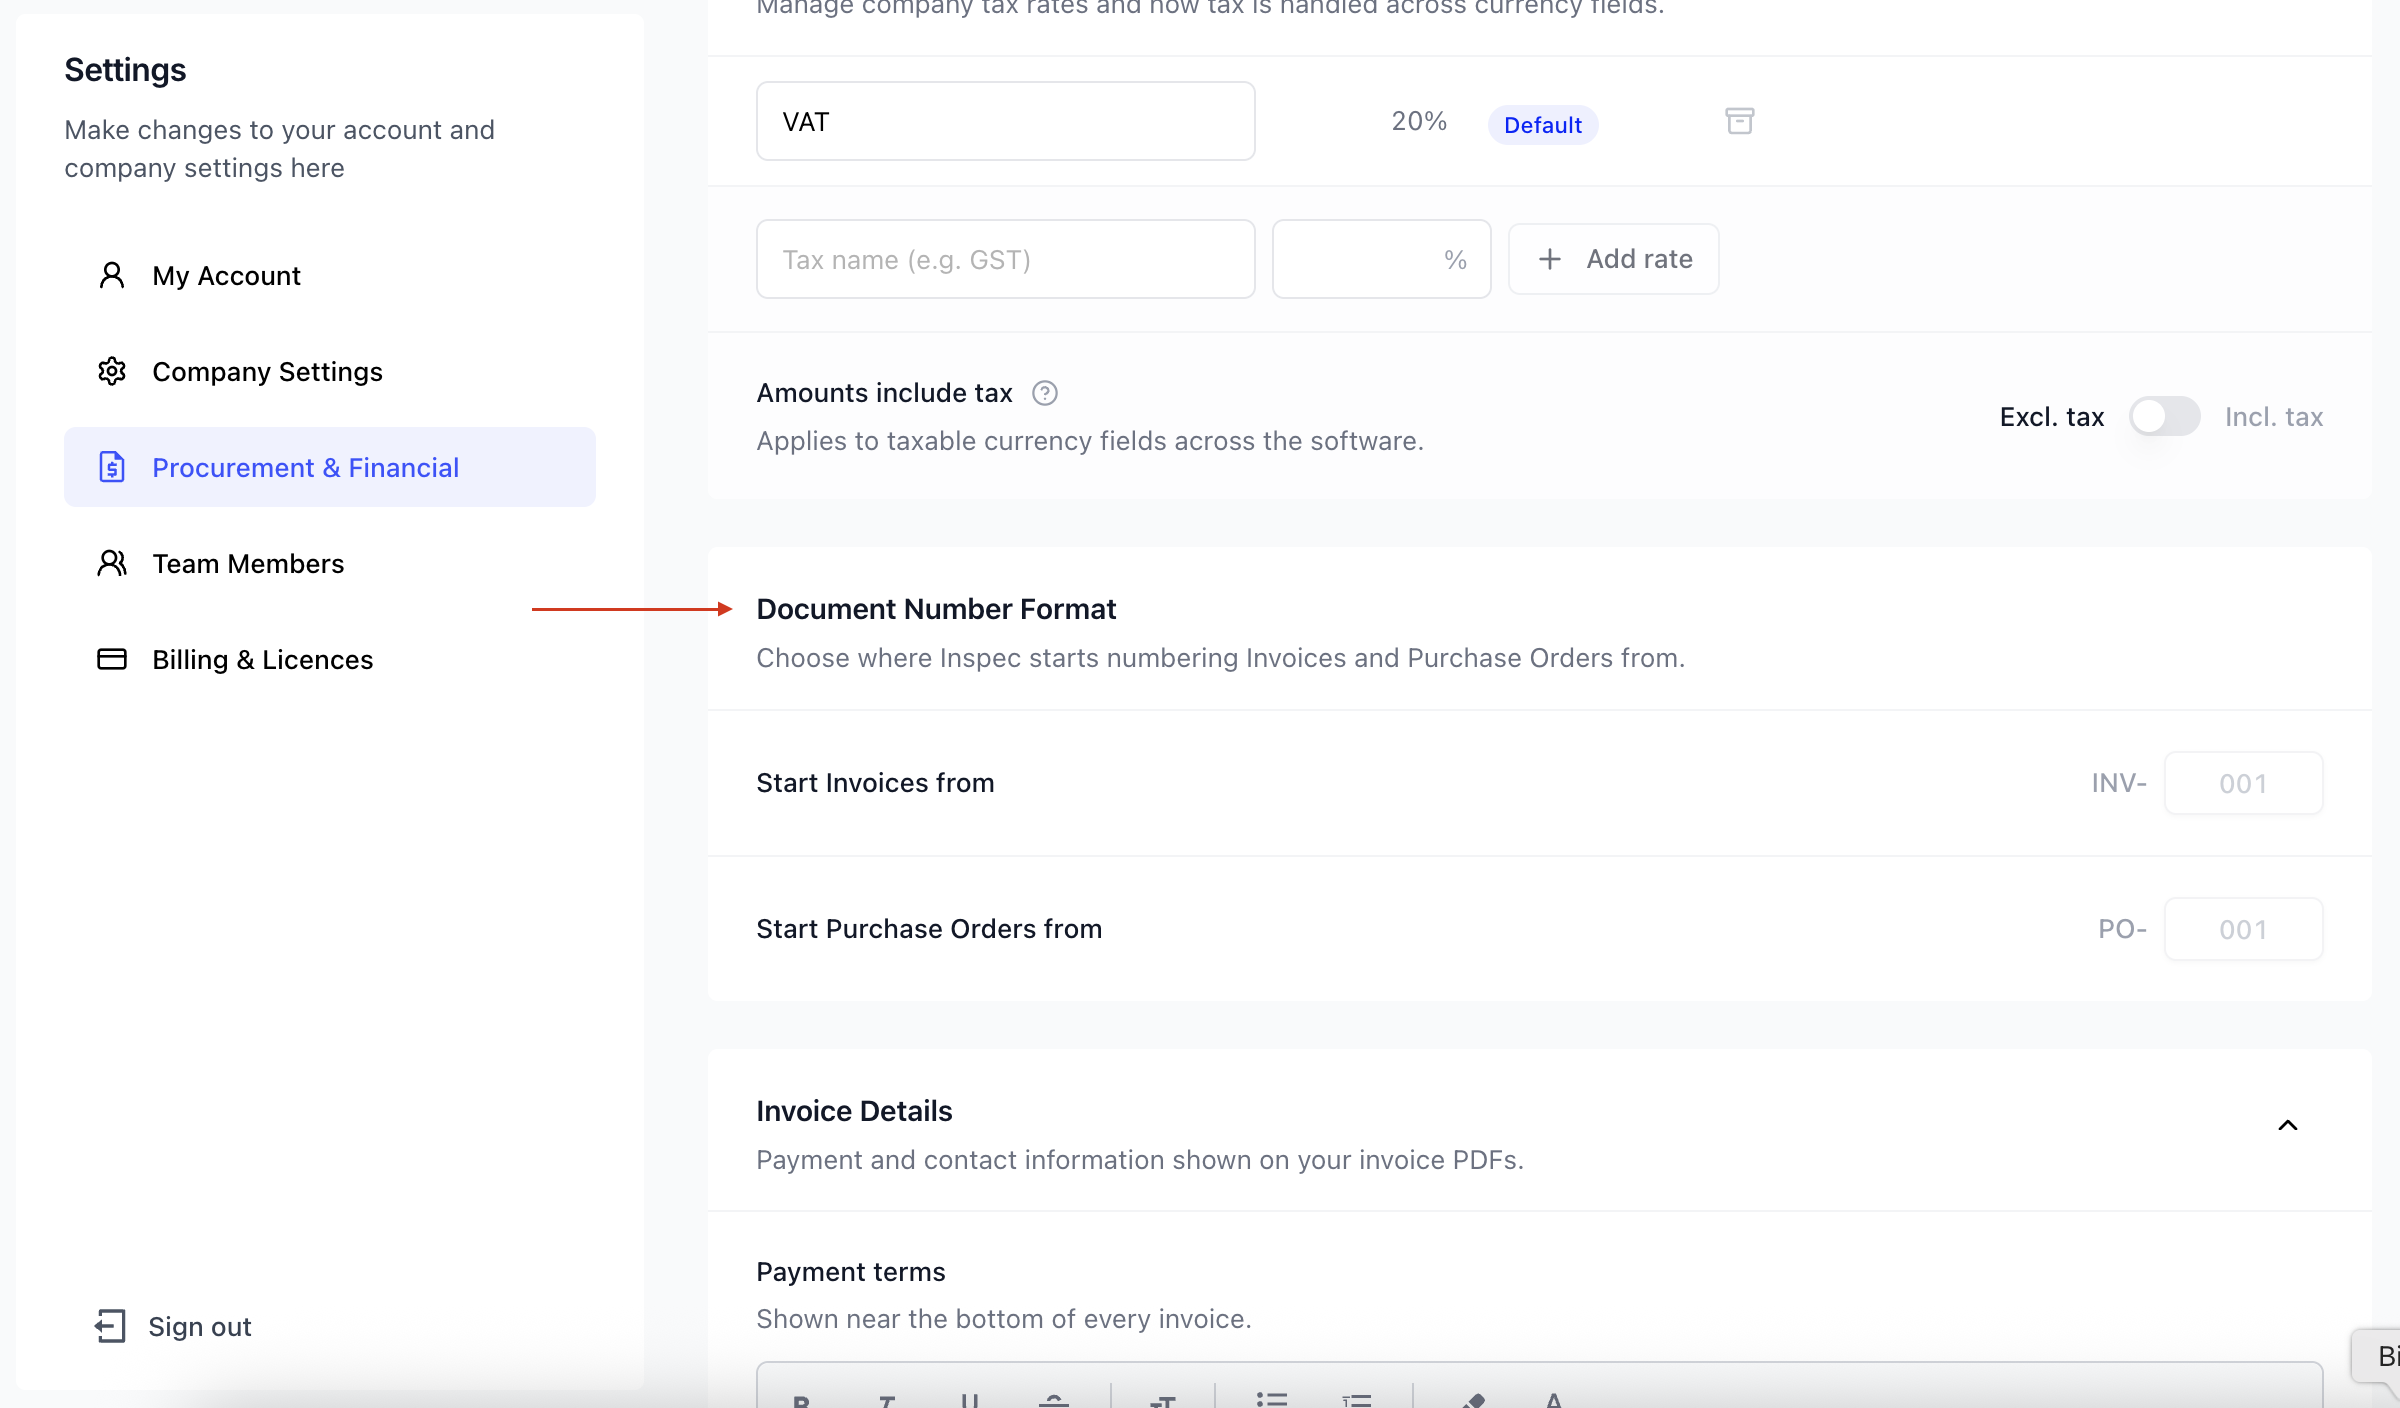
For example, if your last invoice was INV-23001, simply set your starting number to 23002 - your first Inspec invoice will automatically be INV-23002. This maintains consistency for accounting, prevents confusion with clients and suppliers, and ensures you never accidentally duplicate a number from your previous system.
Deleting Invoices/Purchase orders
Once a number is assigned, it's permanent. If you archive an invoice or purchase order, that number is retired and will never be reassigned. This ensures your numbering sequence remains accurate for accounting and audit purposes, even if you need to void or cancel orders along the way.
To learn more about archiving purchase orders, click here.
To learn more about archiving invoices, click here.
Procurement quick navigation
When working across your estimate, purchase orders, and invoices, you can jump between related documents for the same line item without losing your place.
-
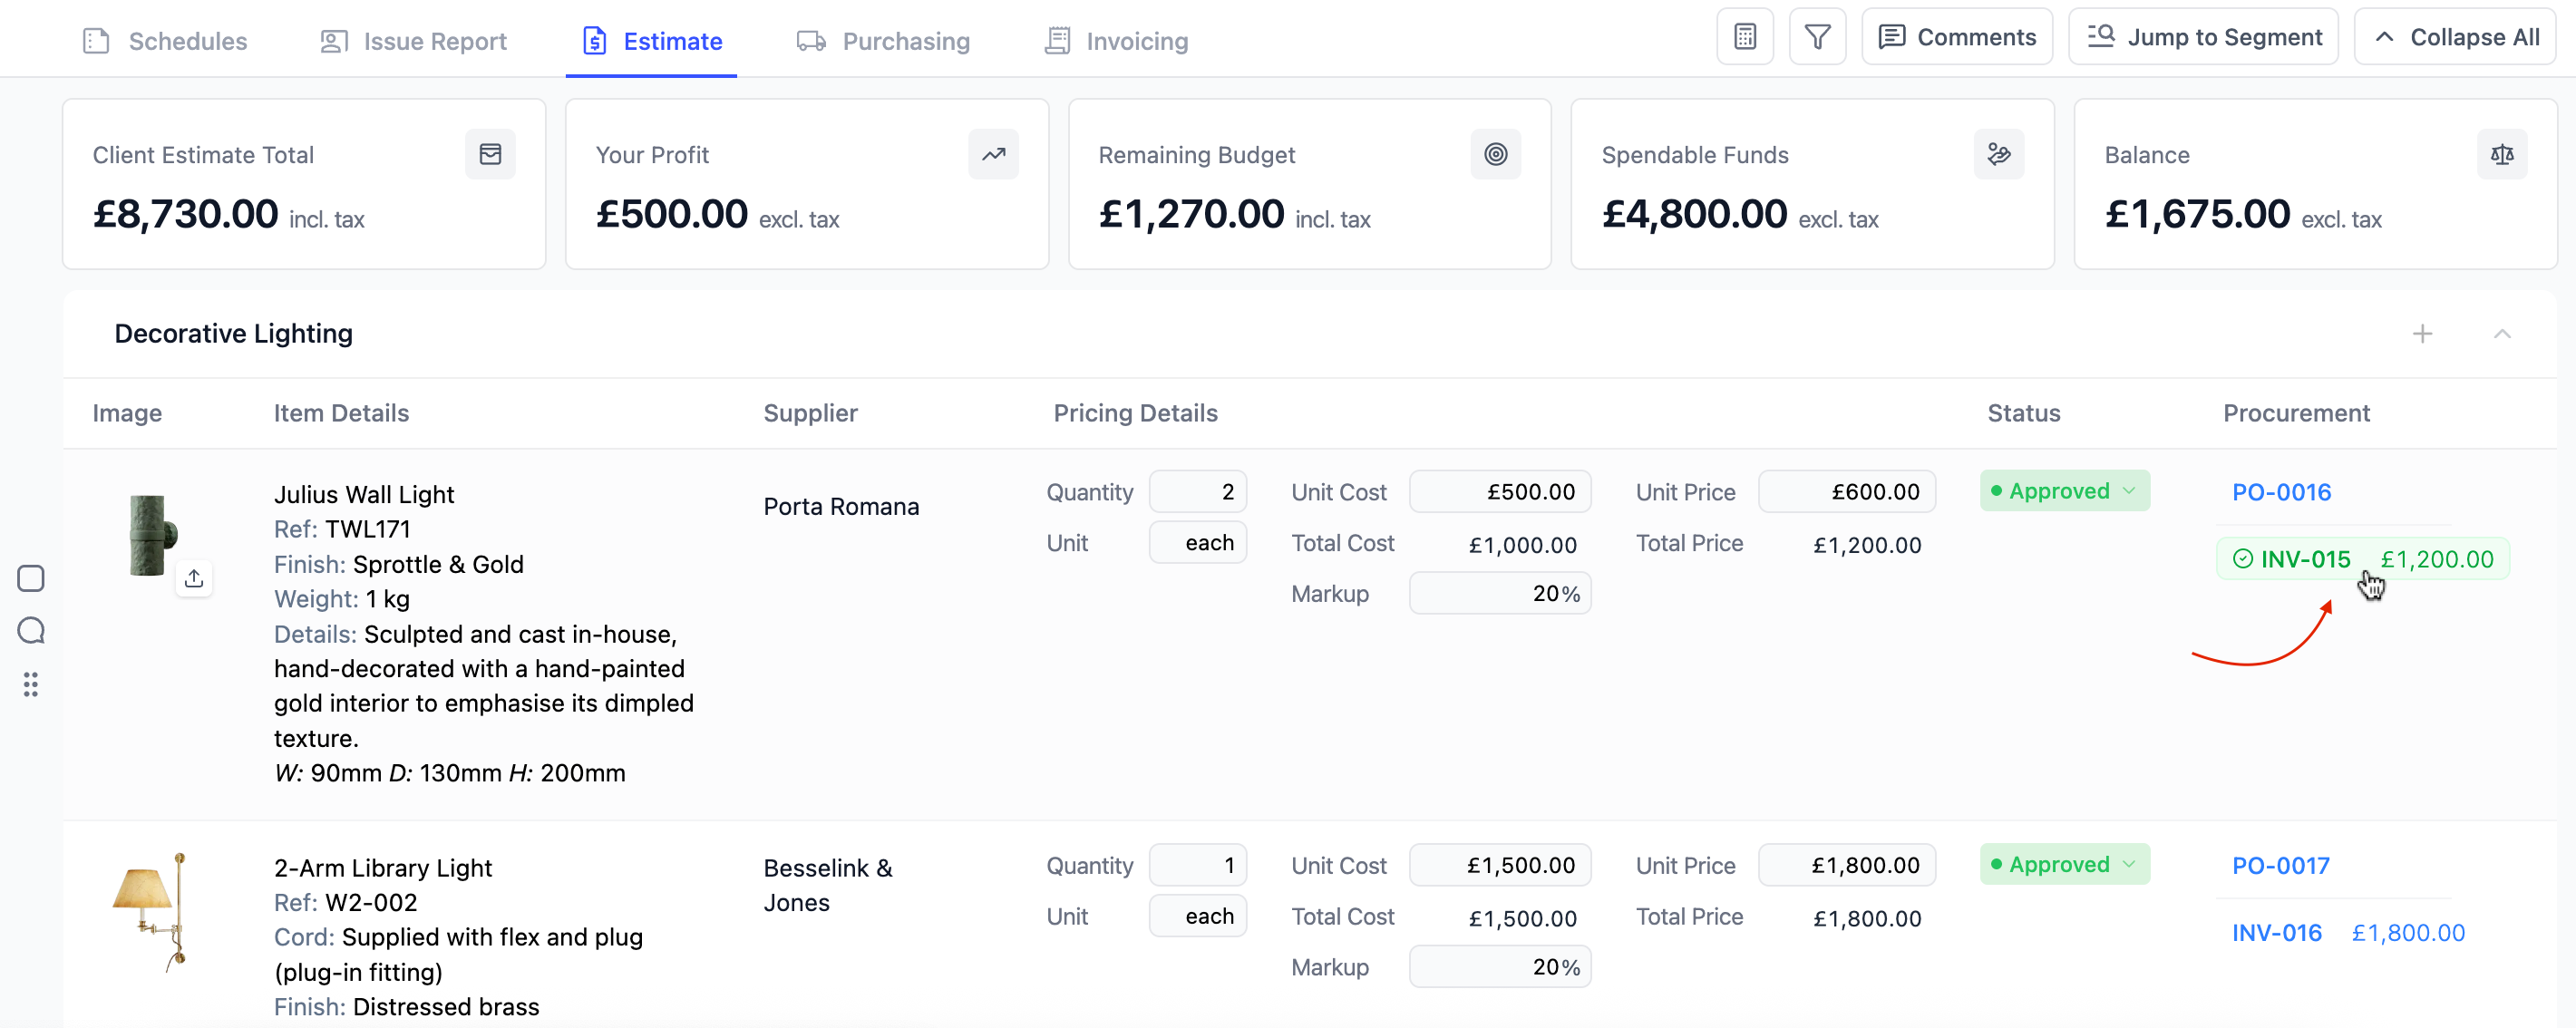
In Estimate - In the Procurement column, each line item displays its linked purchase order and invoice. Clicking on either will take you directly to that document, and from there you can navigate back to the estimate or forward to the invoice - all in one click.
-
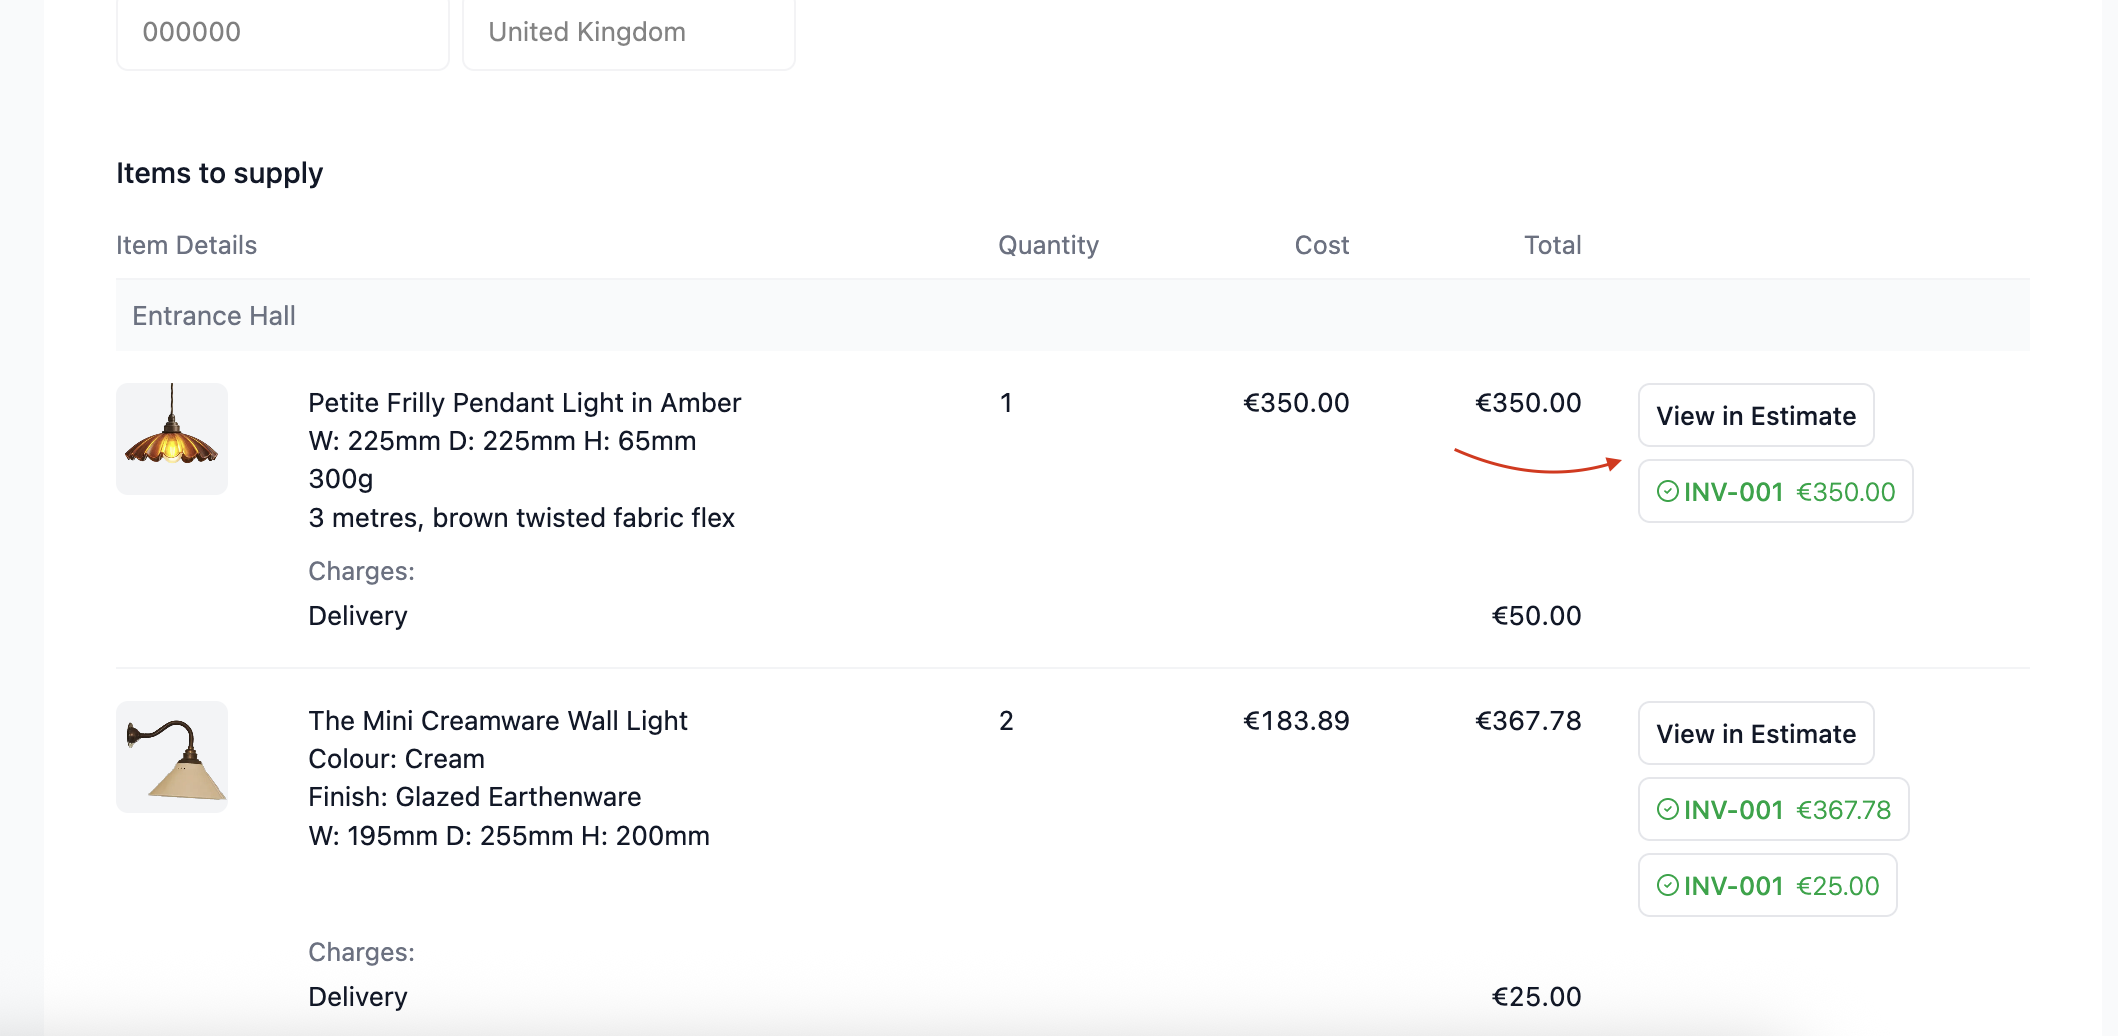
In Purchasing - look for the "View in Estimate" or "INV-XXXX" buttons to the far right of your items to supply lines.
-
In Invoicing - look for the "View in Estimate" or PO-XXXX" buttons to the far right of your items to invoice lines.
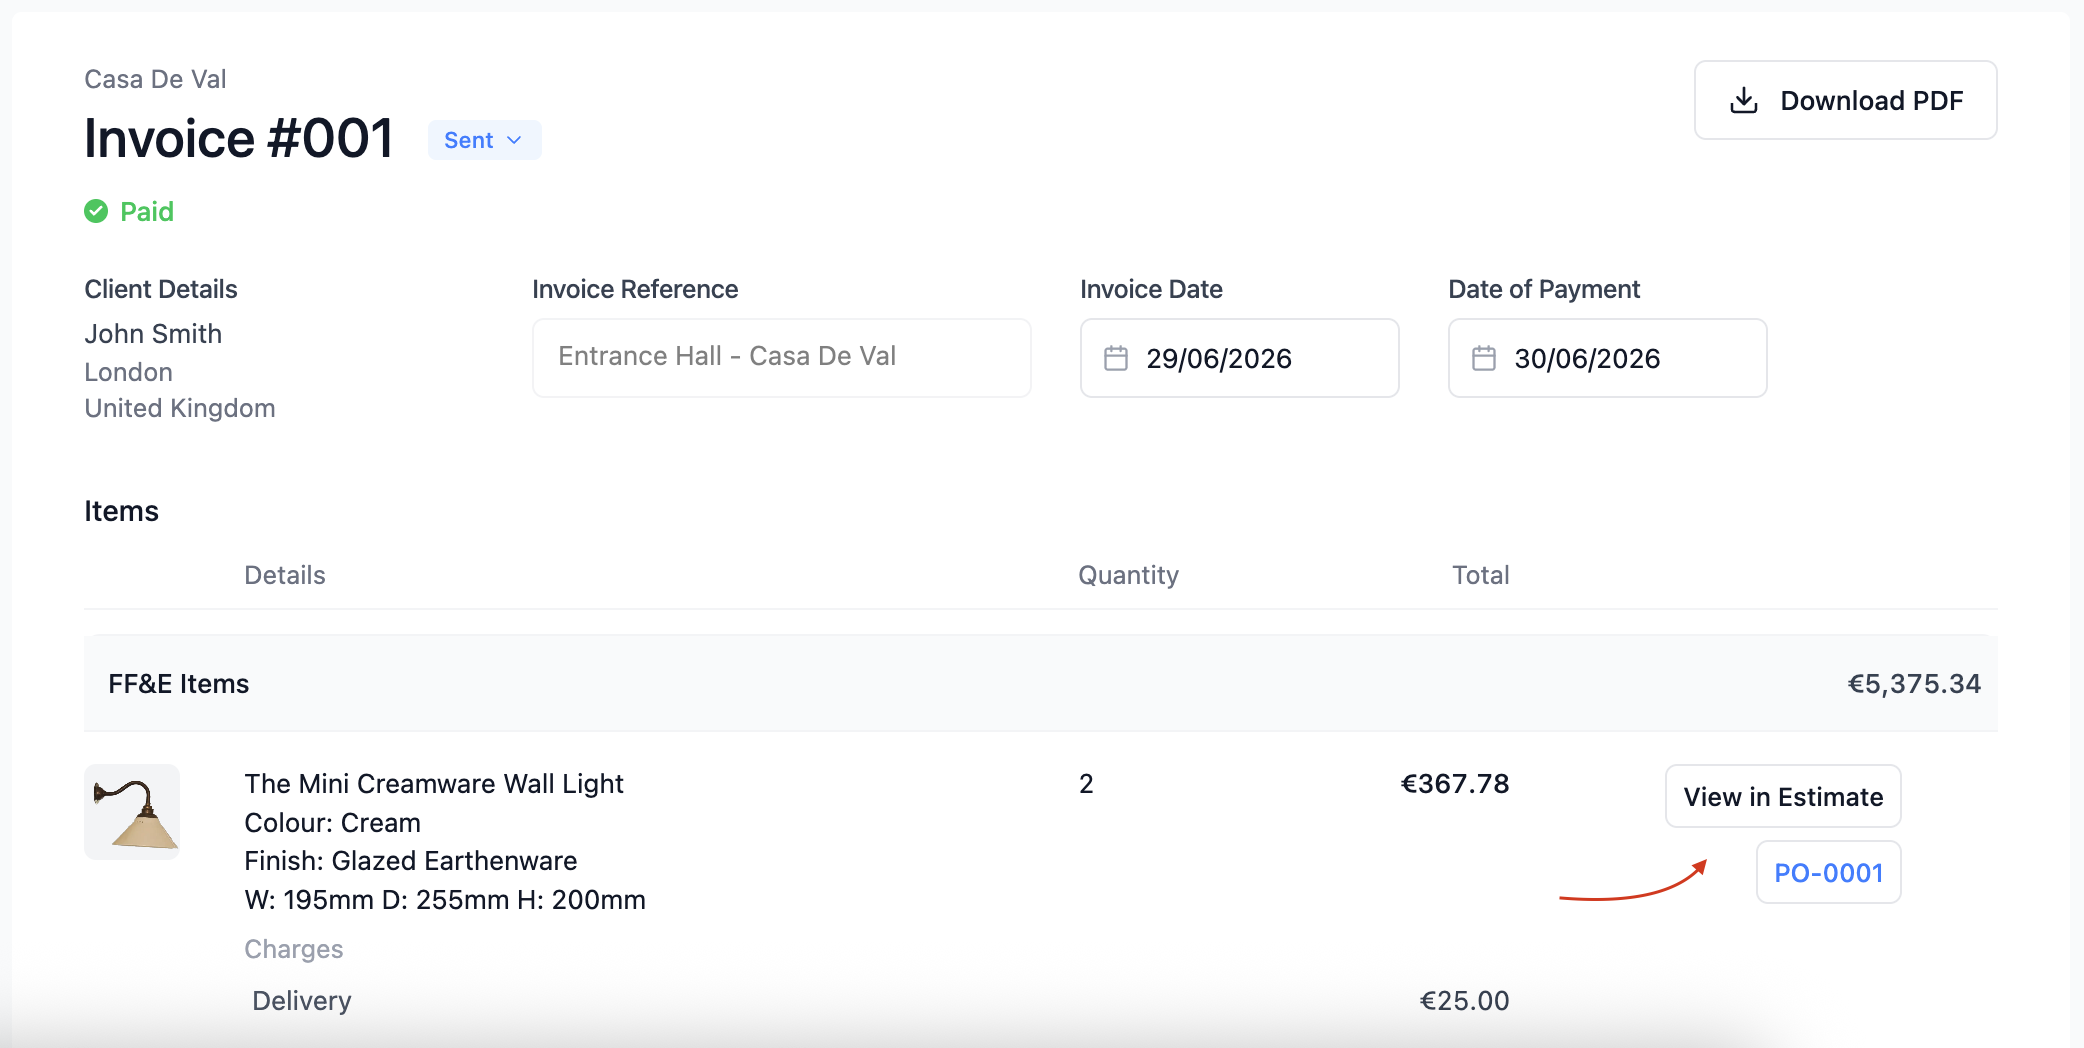
This means you can stay in flow, checking a purchase order while building an estimate, or cross-referencing an invoice without having to navigate back through the project manually.
Link colour coding
All procurement quick navigation links in the Procurement column of your estimate and on your orders & invoices, are colour coded, so you can understand the status of each purchase order and invoice at a glance, without needing to open each document individually.
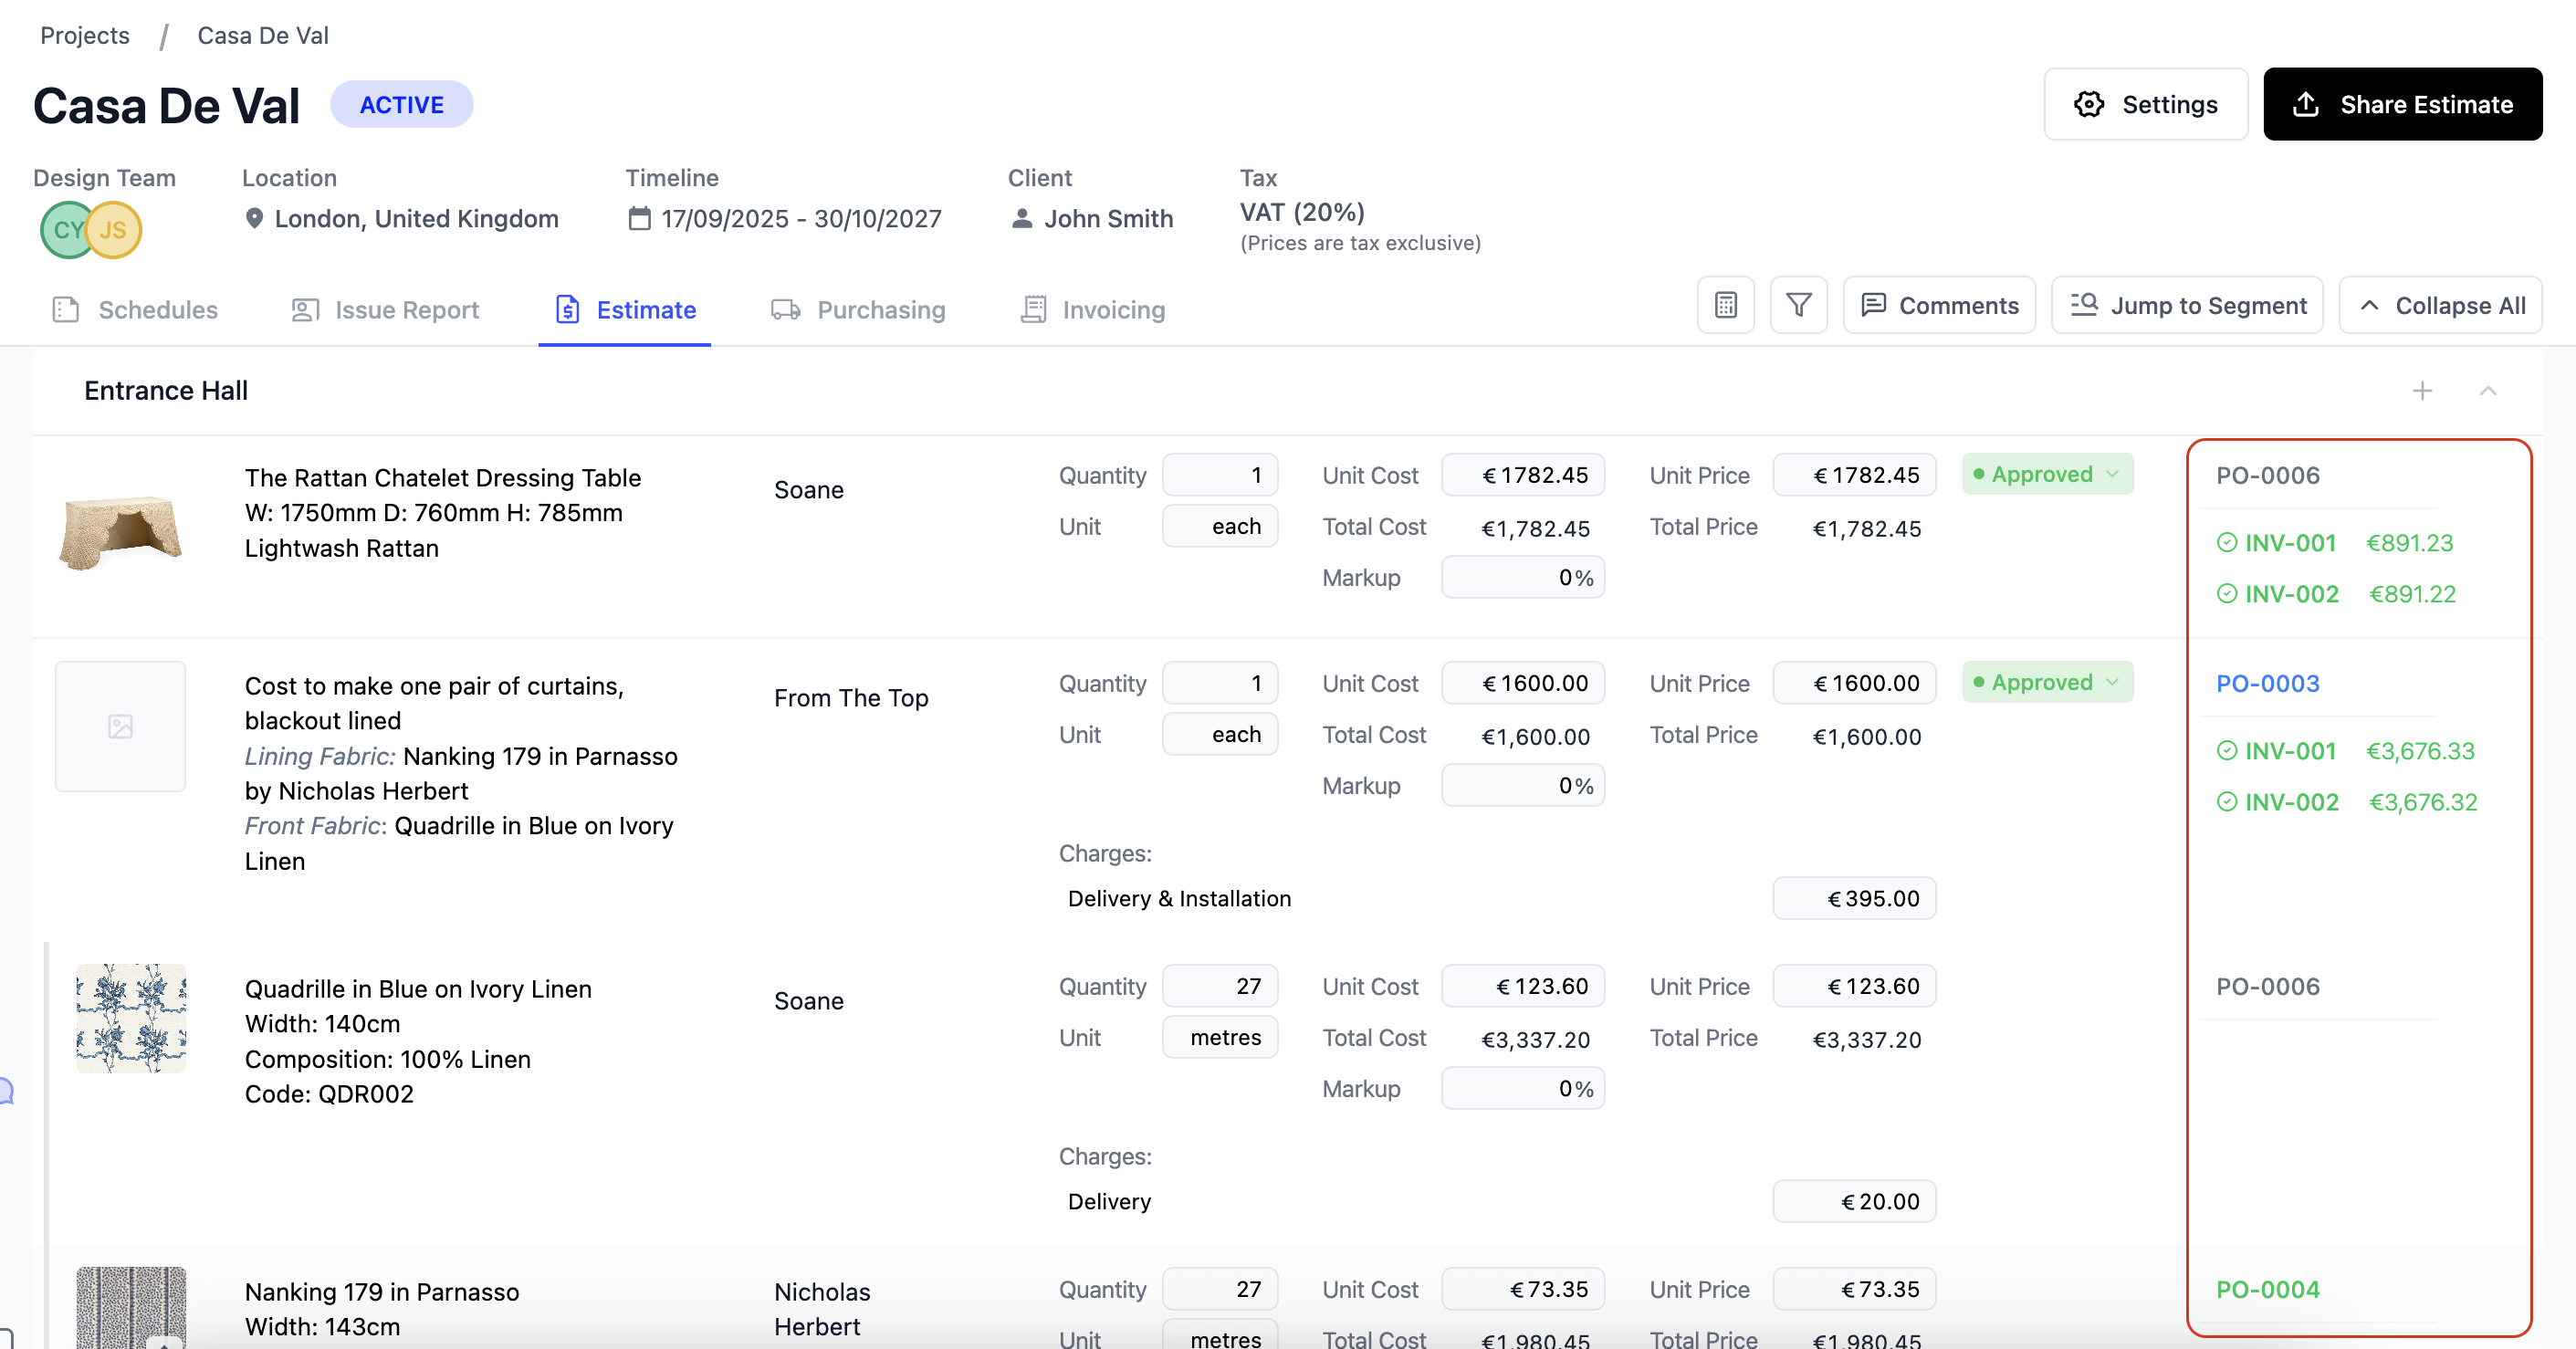
Purchase order links:
- Grey - The purchase order is open and has not yet been placed with the supplier.
- Blue - The purchase order has been placed and is with the supplier. Note the colour does not change if the order has been paid.
- Green - The order has been delivered.
- Brown - The order has been refunded and cancelled.
Invoice/Credit note links:
- Grey - The invoice/credit note is open and has not yet been sent to the client.
- Blue - The invoice/credit note has been sent to the client and is awaiting payment.
- Green - The invoice/credit note has been paid in full/refunded to the client.
- Purple - The credit note amount has been applied to the client's account.
This colour system makes it easy to spot where attention is needed across your estimate - for example, any purchase order still showing grey may need to be chased up, while a blue invoice indicates you're waiting on payment from the client.
To learn more about updating the status of your purchase orders, click here.
Using the Address Book
The Address Book keeps all your most frequently used delivery addresses in one place, so you're never re-entering the same information twice. By default, your suppliers' and clients' addresses are saved here automatically and can be pulled through to the address field on your purchase orders. 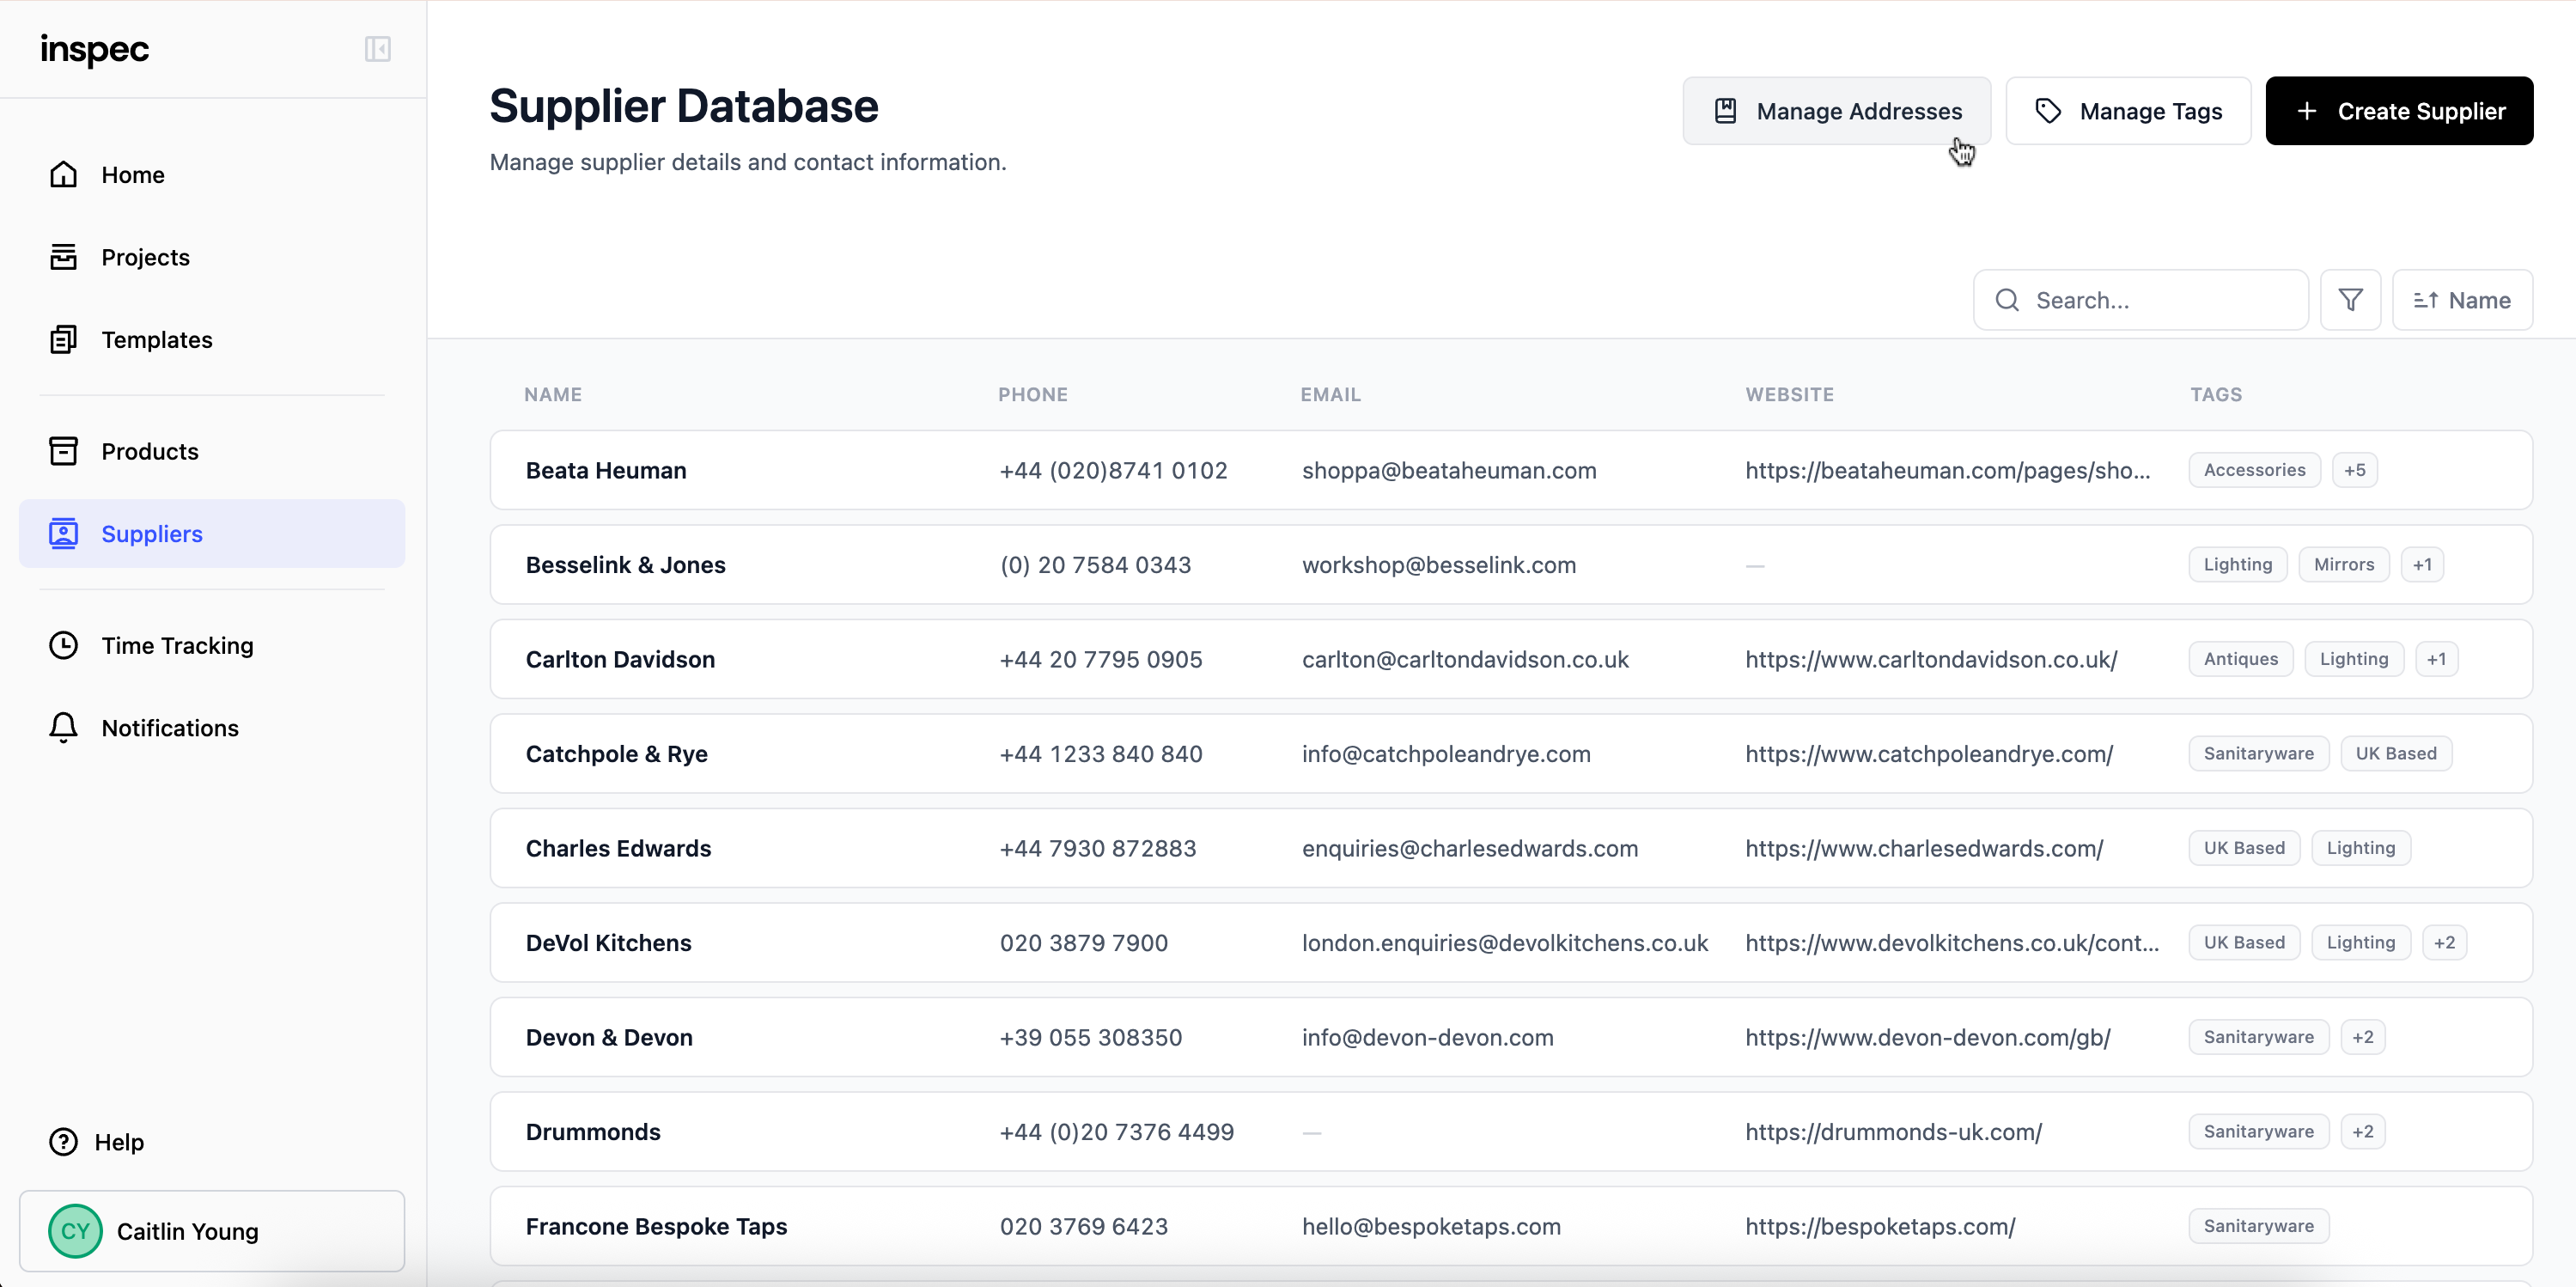
Your Address Book can be managed at any time under the Supplier Database tab in the sidebar, and any new addresses added while working on a purchase order can be saved on the go, keeping everything up to date without interrupting your workflow. 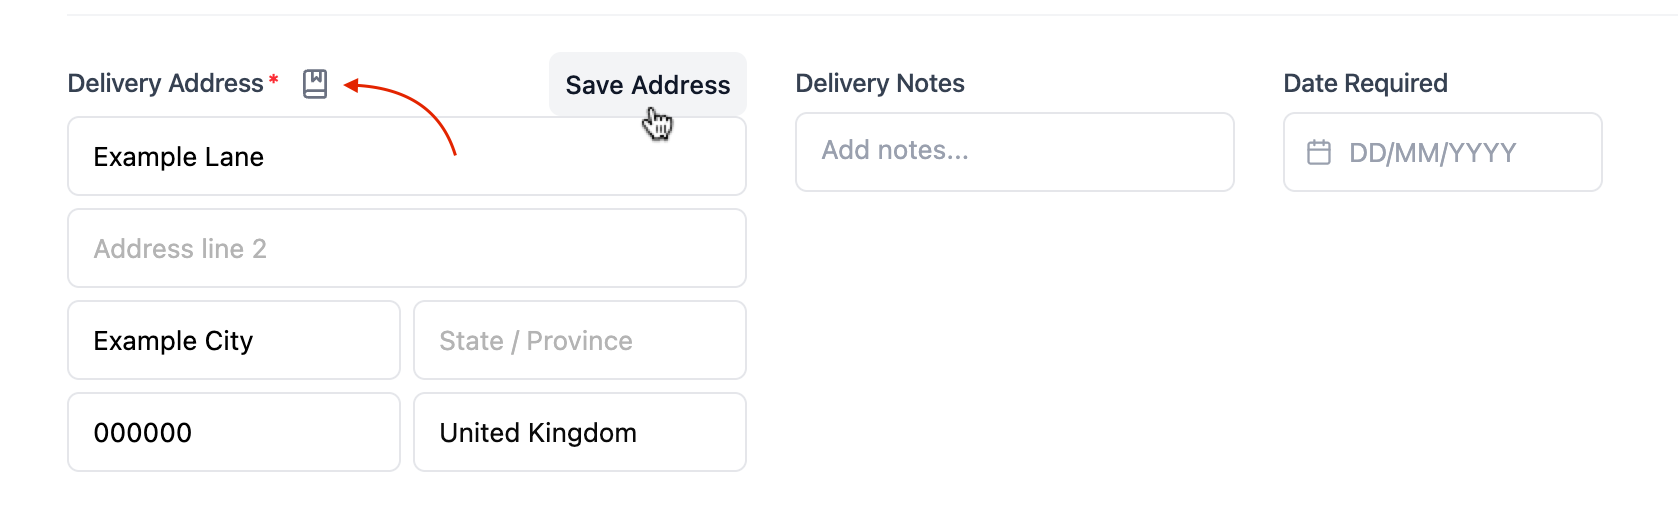
Use the Address Book Icon indicated by the red arrow in the image above to pull saved addresses into your purchase order.