Invoicing
Learn how to create, manage, and send your invoices to clients on Inspec.
Getting started with invoicing
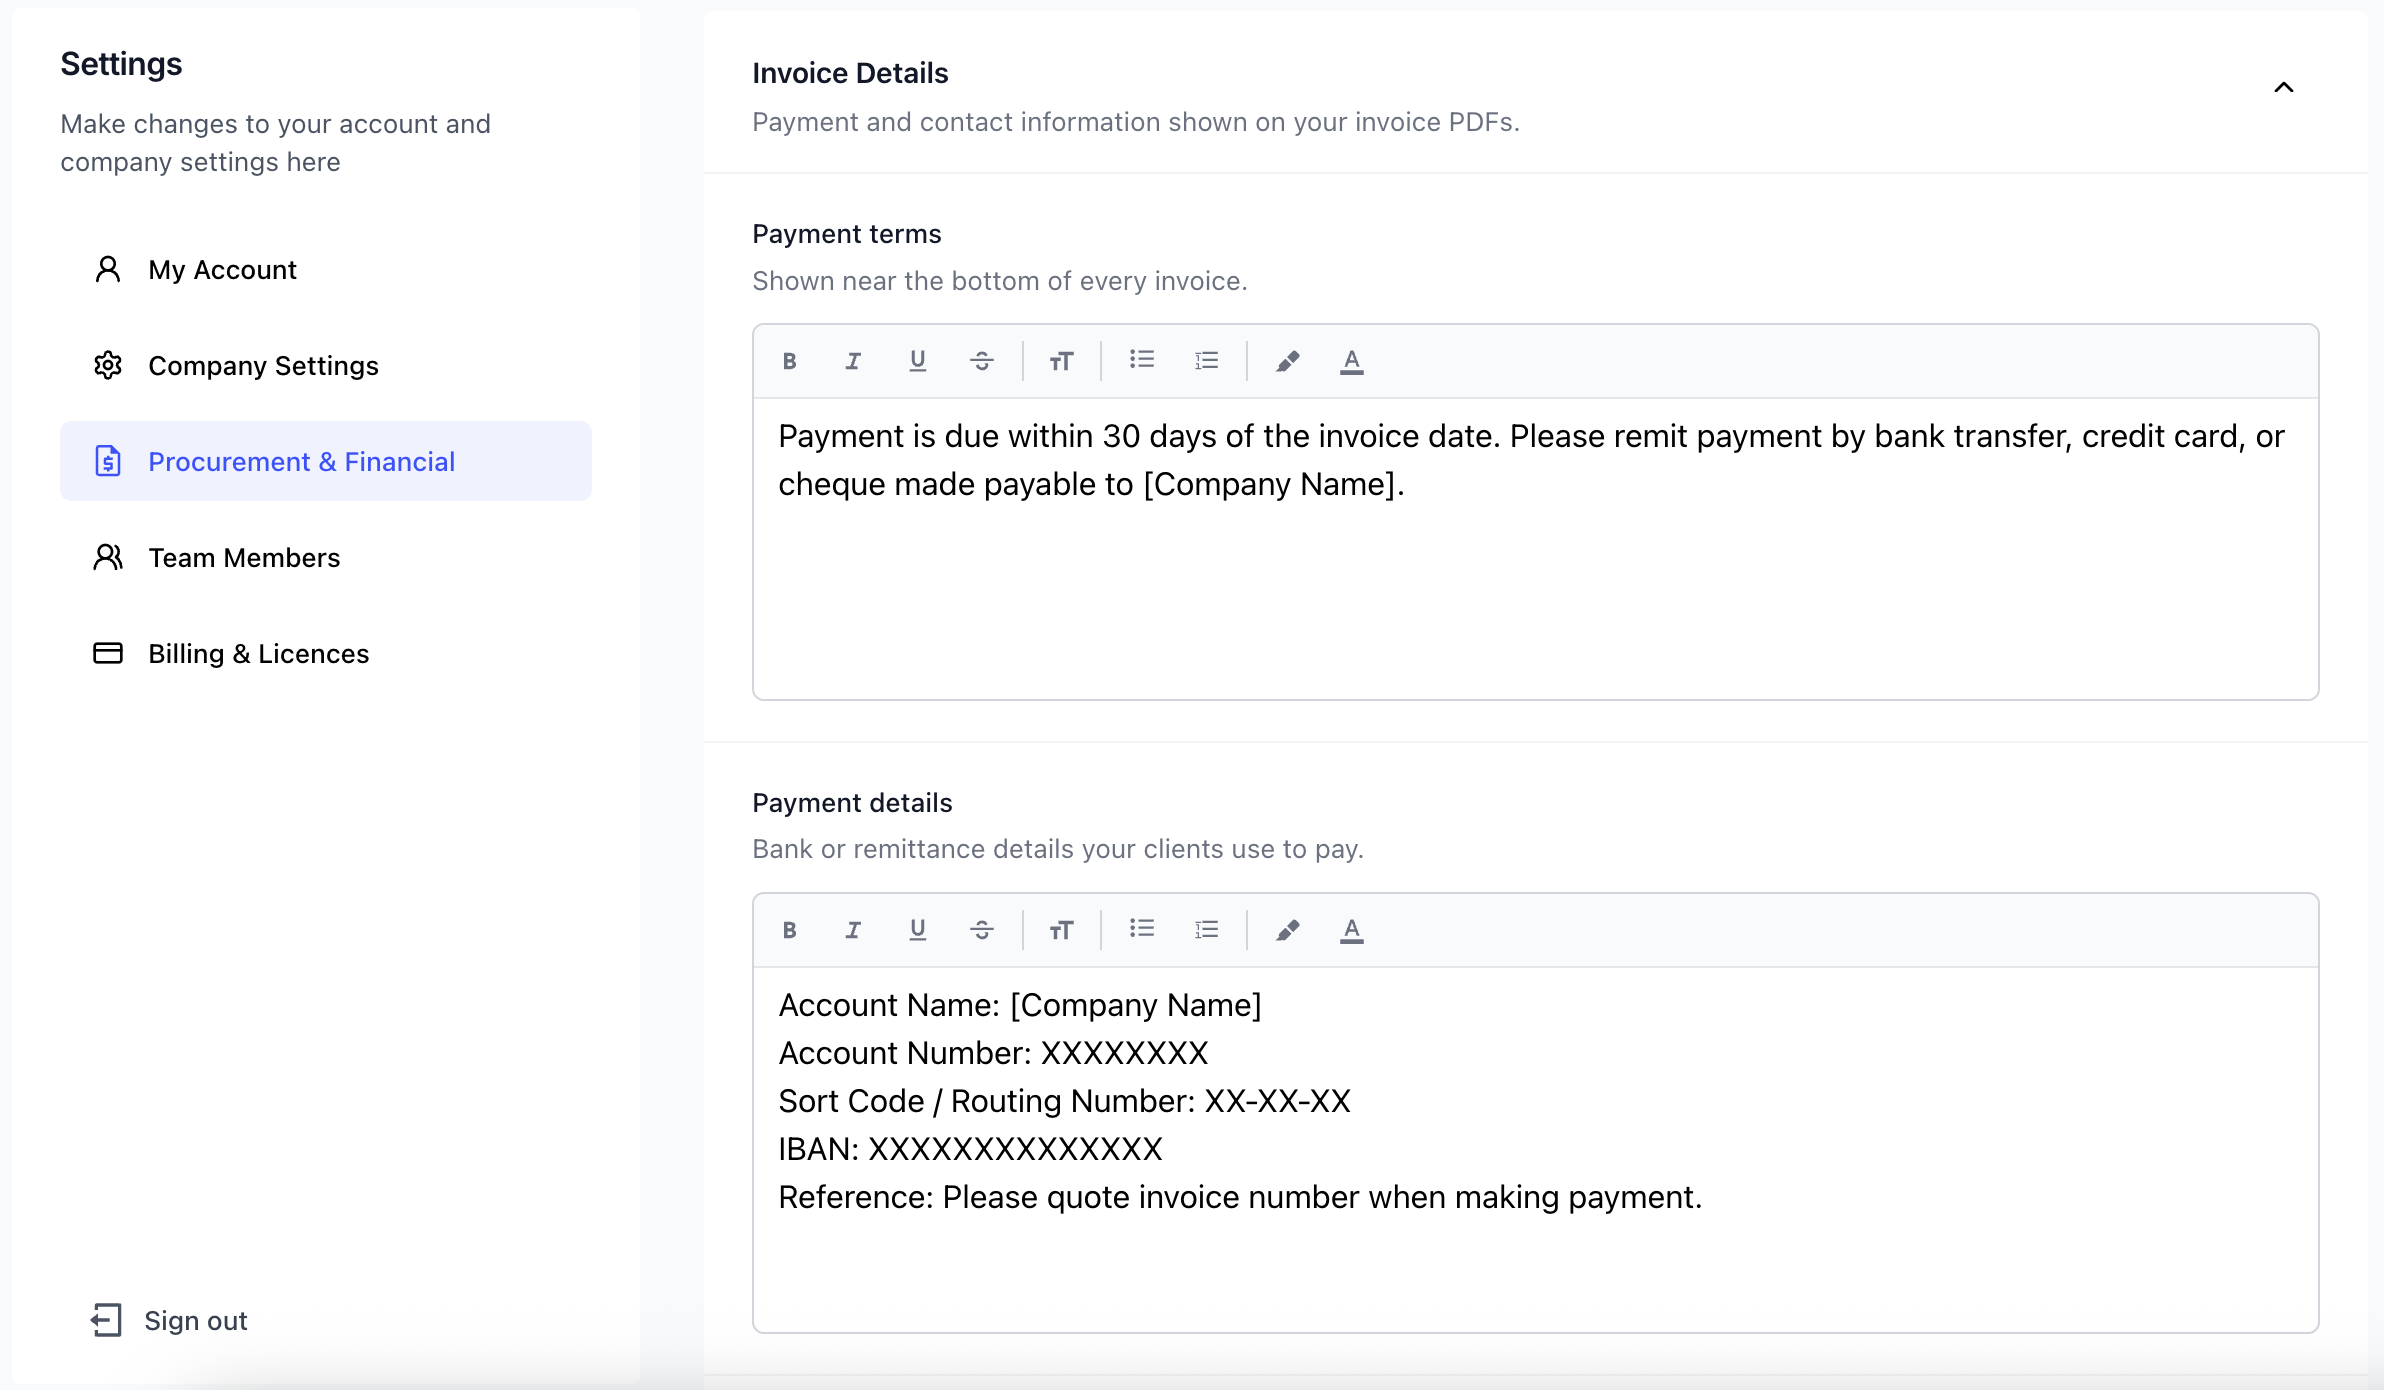
Before sending your first invoice, you'll need to set up your invoice template in Settings under the Procurement & Financials tab. This only needs to be done once by a company admin user, and ensures every invoice you generate is ready to send without any manual additions each time. The fields are completely customisable text fields, so you can fill them out however you like.
You will need to provide a few invoice details. Scroll to the section as shown in the image below to fill out the below fields:
- Payment Terms - The payment terms you'd like to appear on your invoices, for example 30 days from date of issue.
- Payment Details - How your clients should pay you, such as bank transfer details or payment instructions. Remember, Inspec does not handle payments between you and your clients - this information simply appears on the invoice for your client's reference.
- Invoice Address - Your registered company address as you'd like it to appear on invoices.
Instalment vs Itemised invoices
Two types of invoices can be generated for presentation to your clients:
- Instalment Invoices - Based on a nominal amount or a partial percentage of the total client estimate price.
- Itemised Invoices - Based on selected estimate line items, either the full line item prices or a partial percentage.
The type of invoice you choose will depend on how much or how little detail you want to present to your client. In some cases you can combine the two types, for example, you might raise an Instalment Invoice for an initial deposit amount and then an Itemised Invoice for a later or final stage payment as the project progresses.
Understanding the invoicing tab
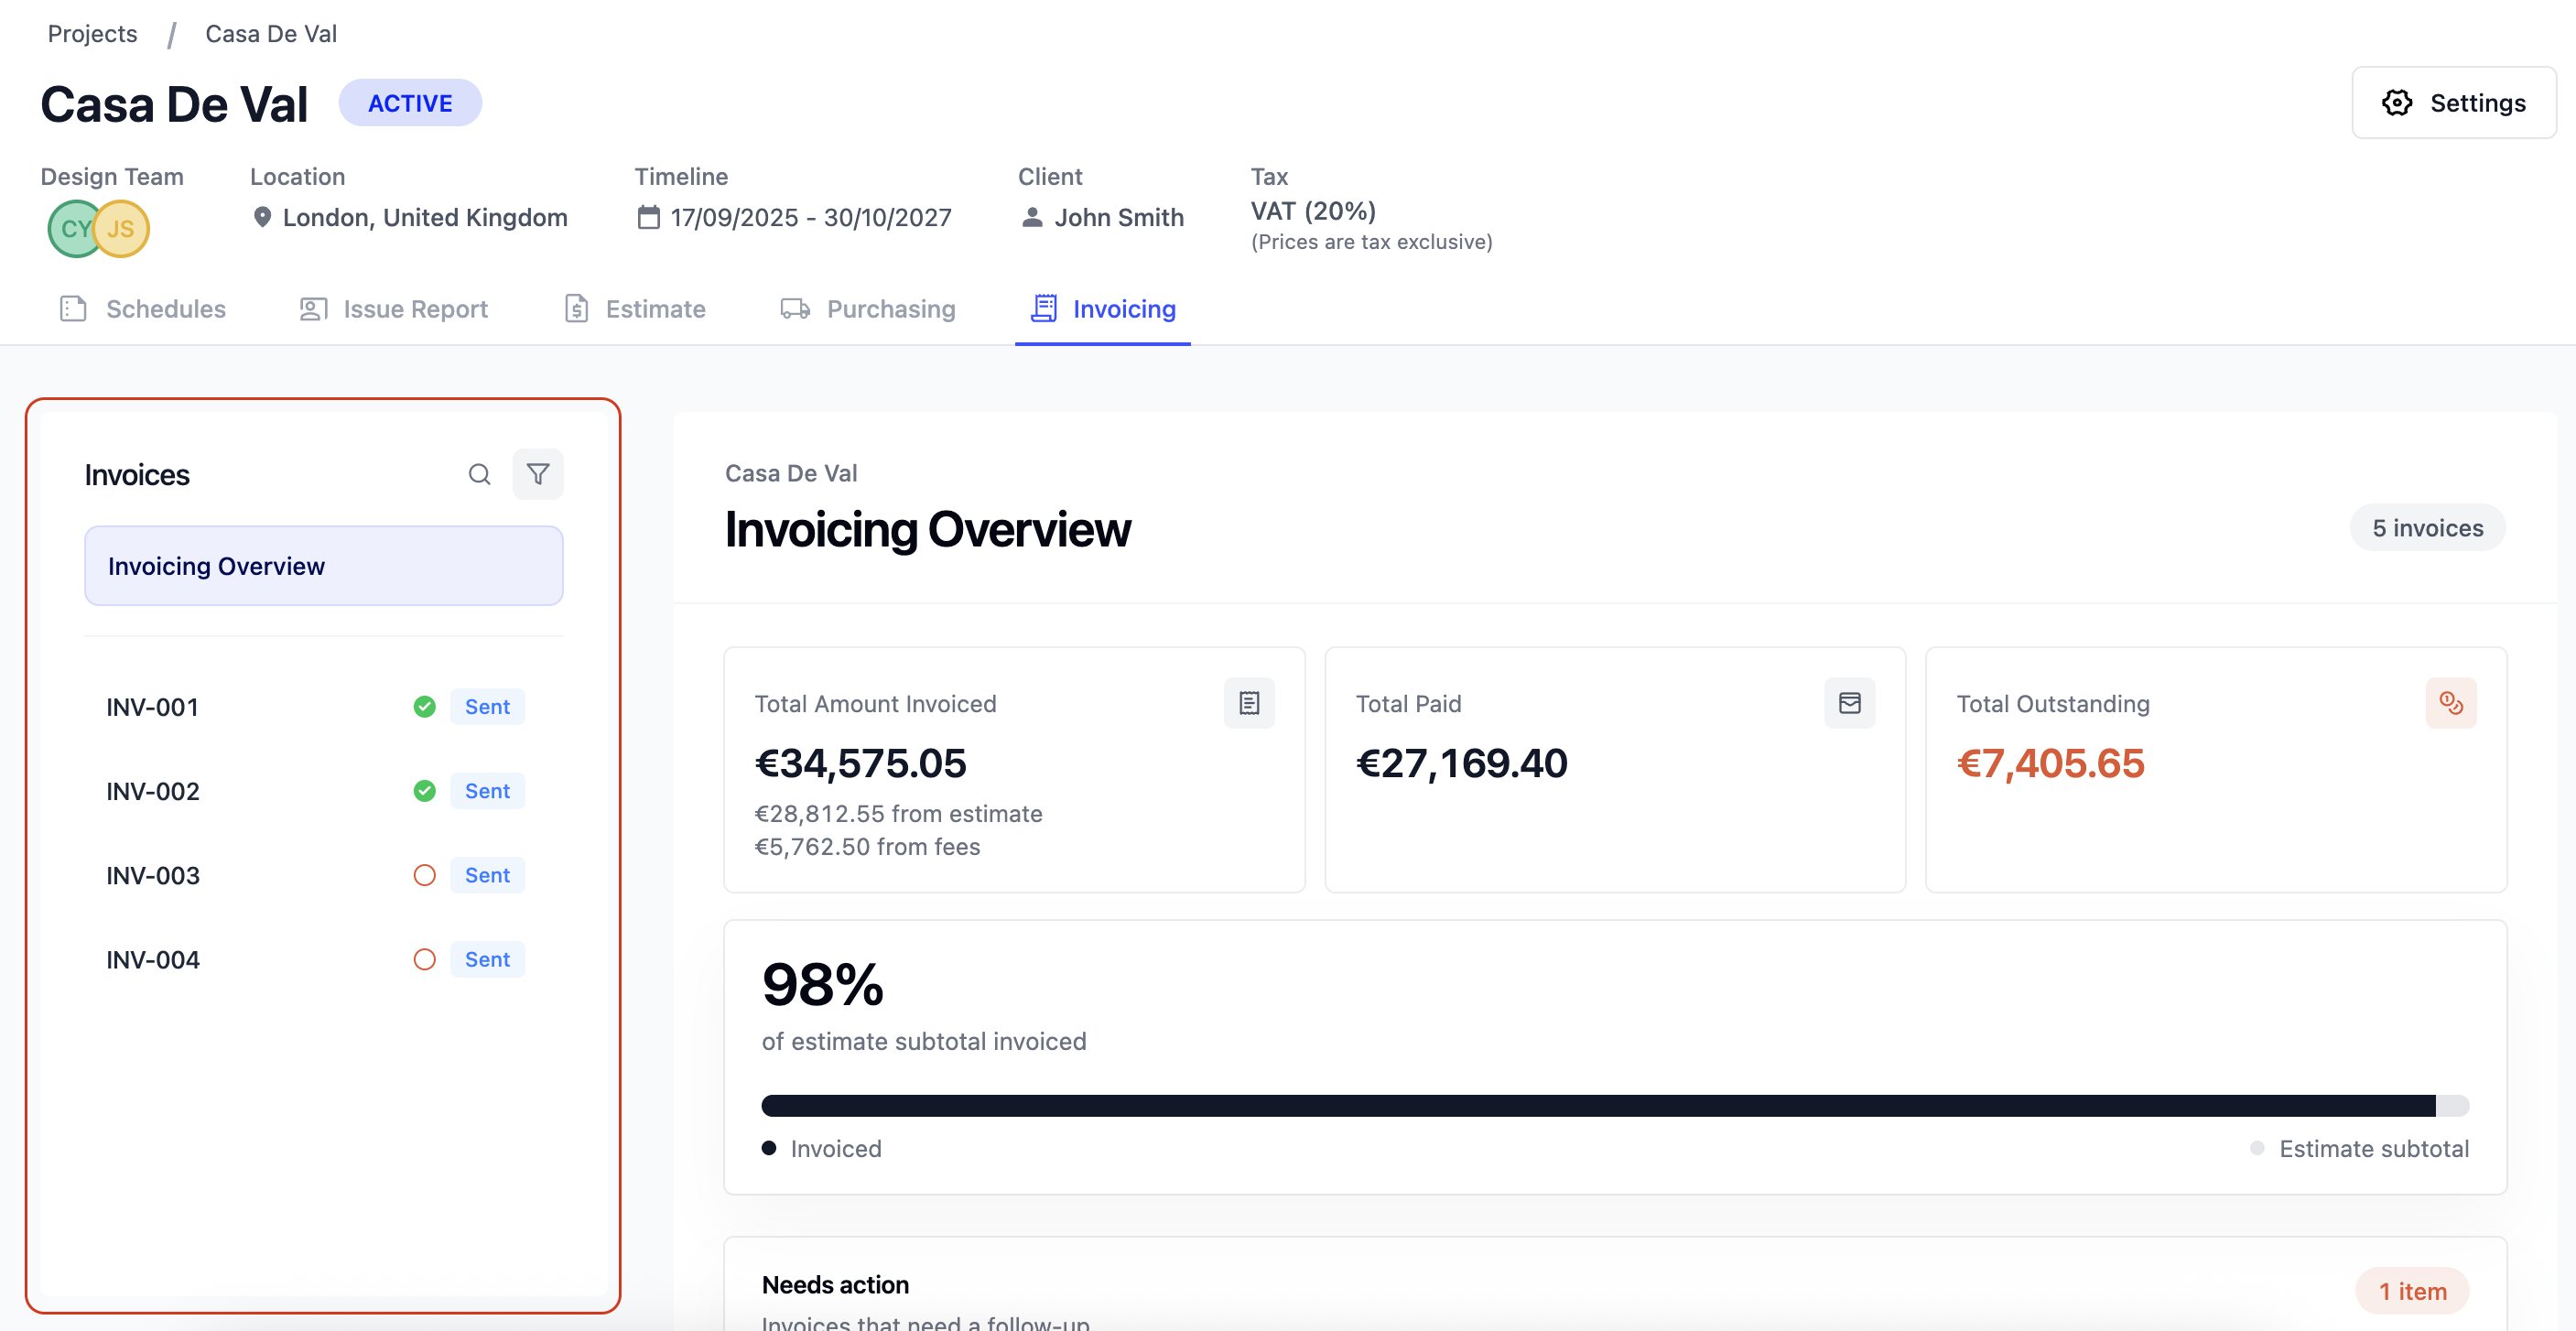
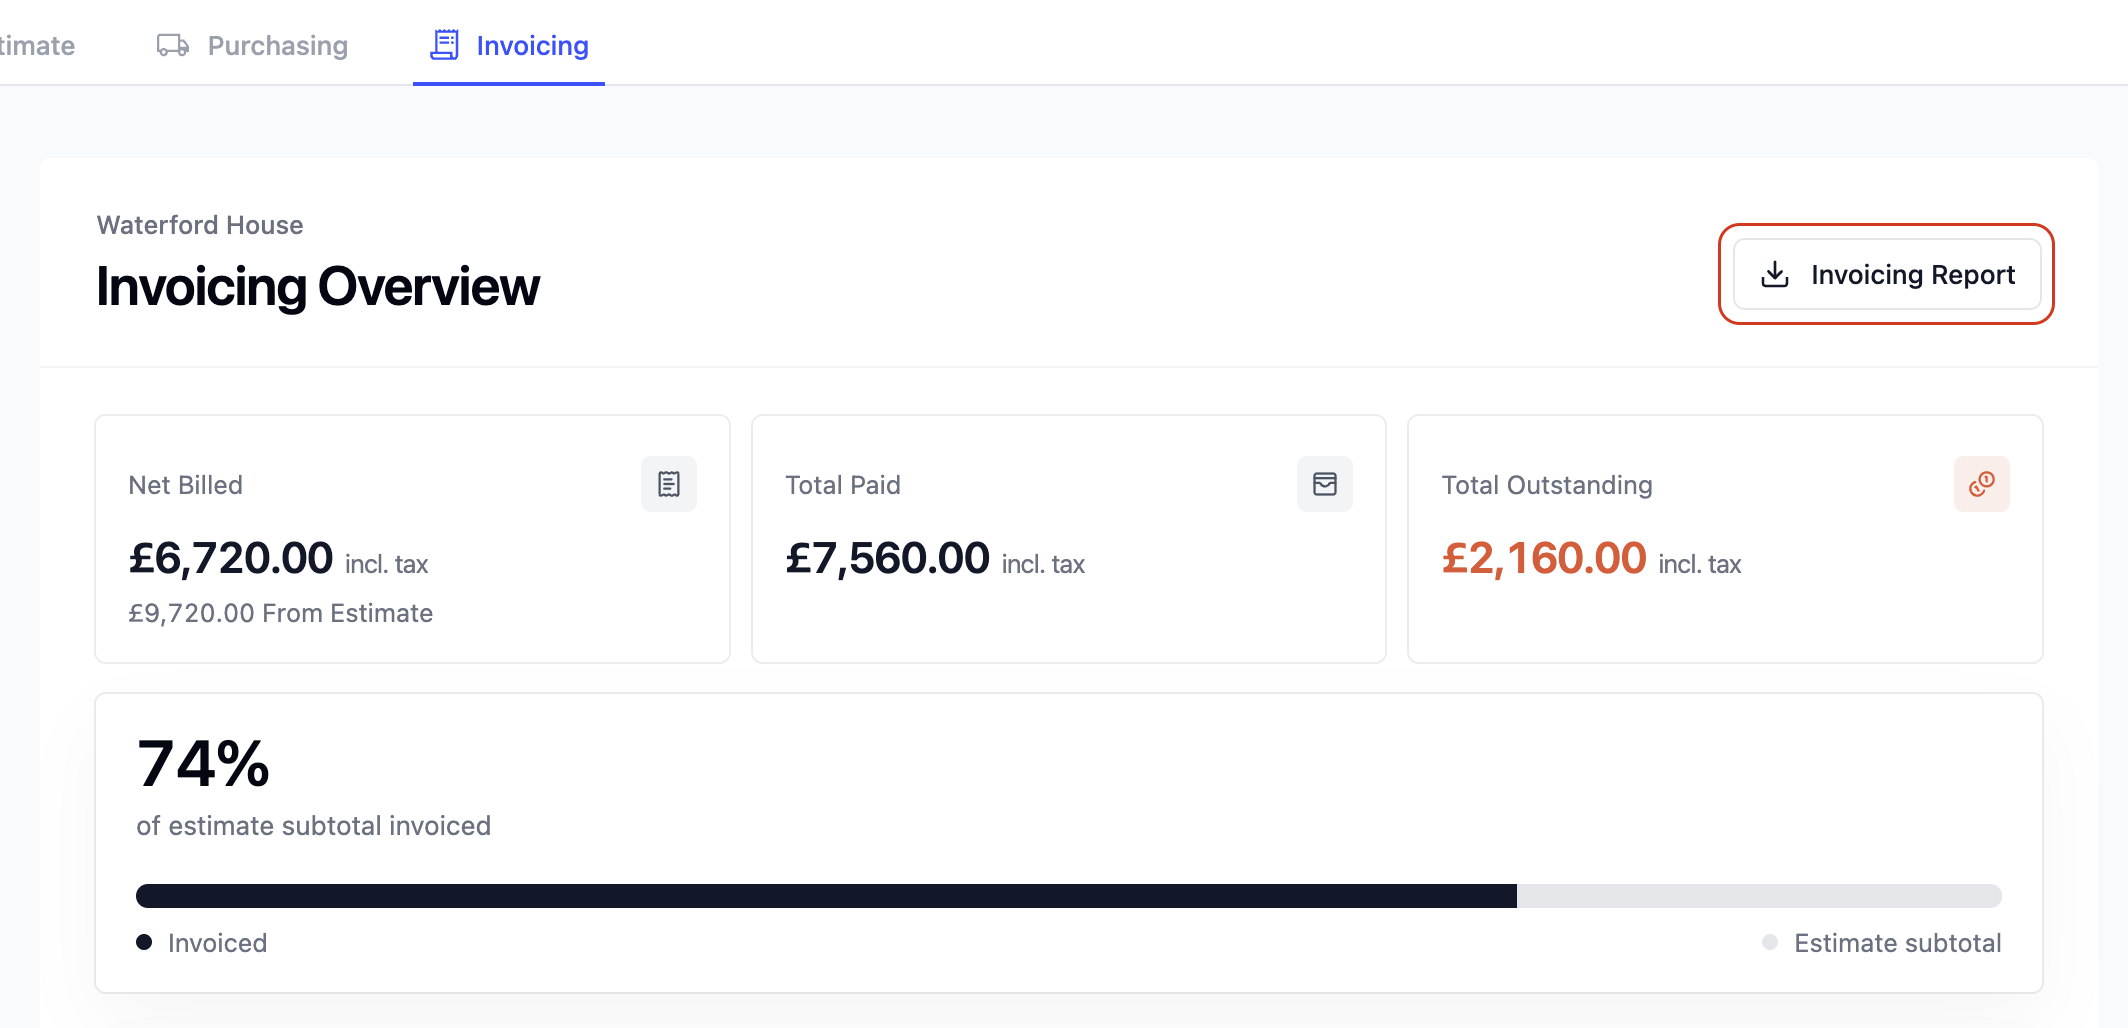
The Invoicing tab opens with a summary of all invoice activity for the project, giving you a clear picture of your invoiced amounts, how much has been paid, and what's still left to pay/on the client's account.
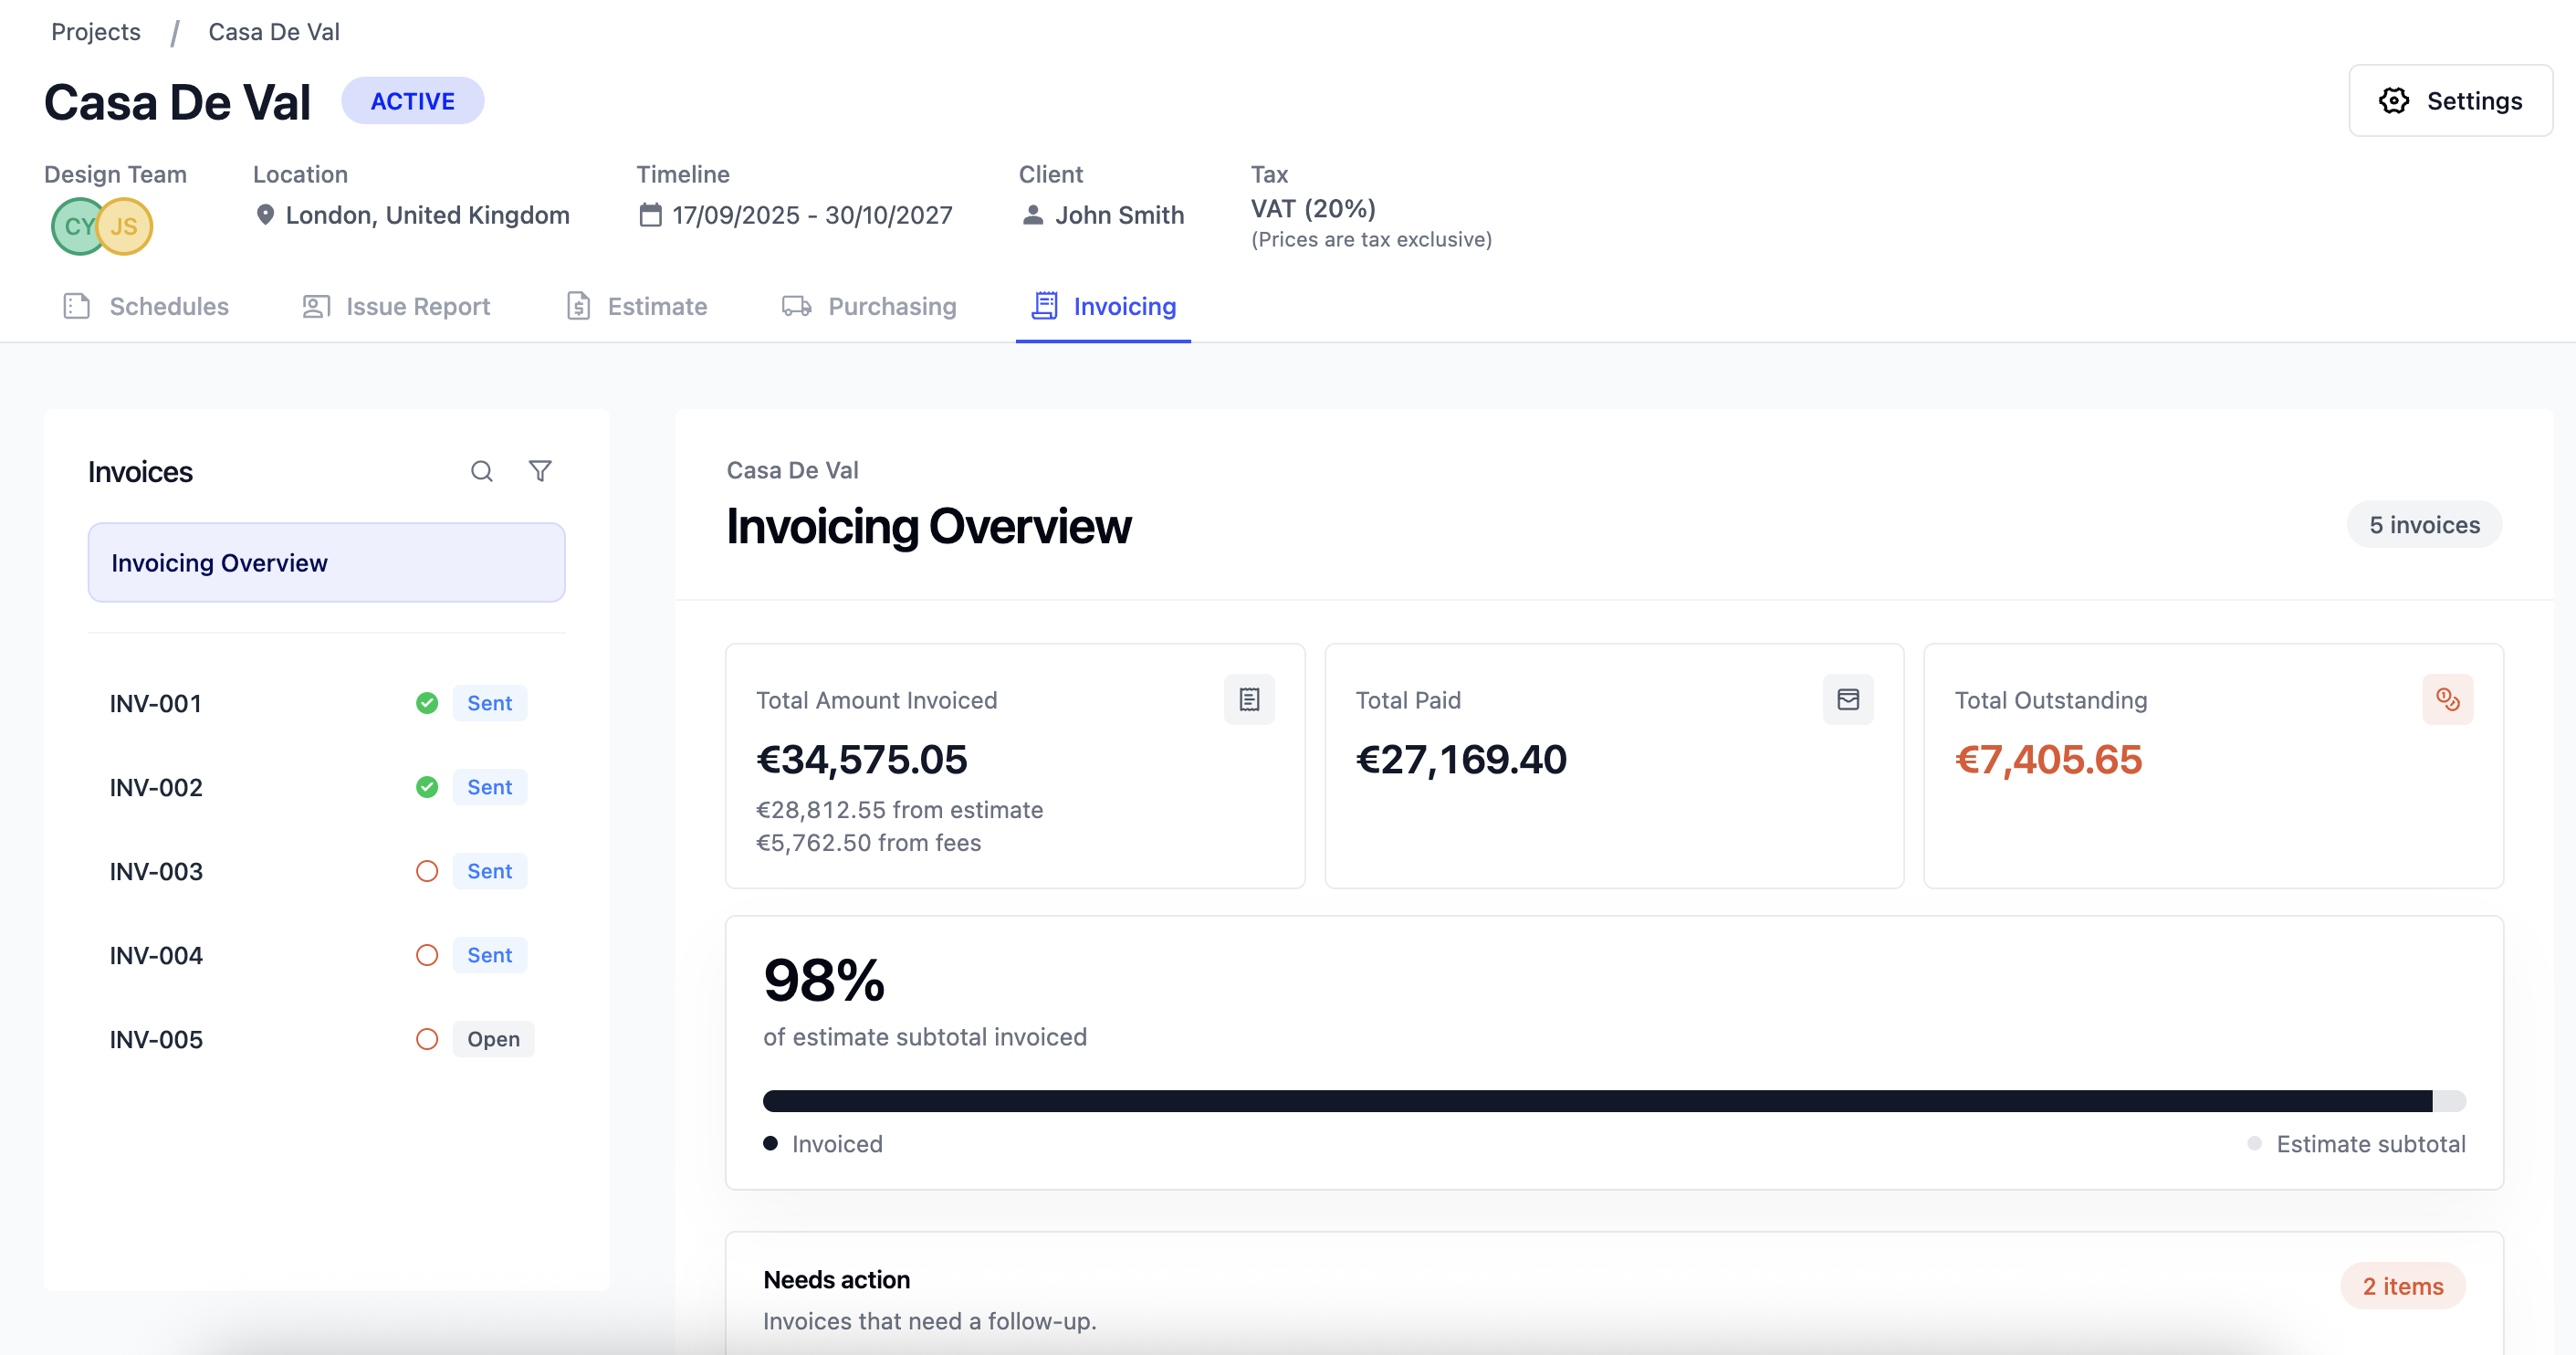
- Net Billed - The total amount your studio has invoiced the client for against the estimate, including any applied project fees and tax. It does not include any amount that has been credited to the client.
- Total Paid - The sum of all invoices marked as paid by the client.
- Total Outstanding - The sum of all outstanding invoices awaiting payment.
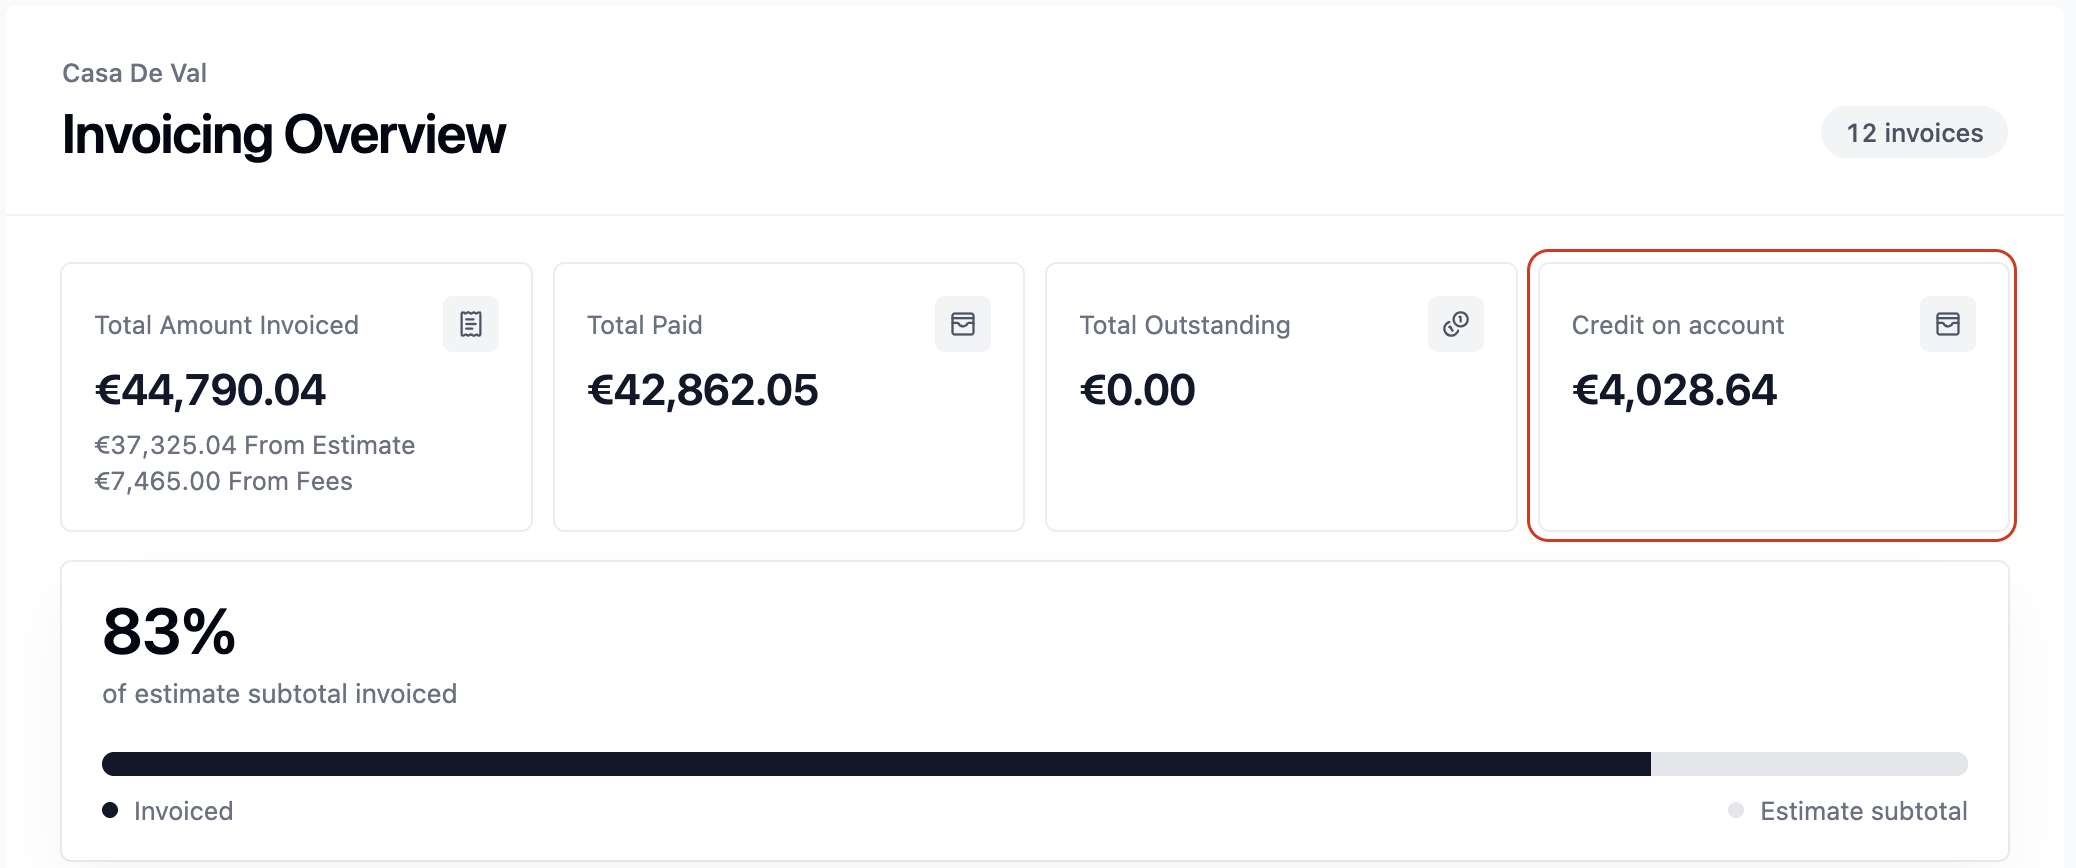
- Credit on Account - The total amount credited to the client's account that is available to be applied to future invoices. This will only appear when a credit balance exists on the account.
Below the summary, you'll find a list of actionable items to help you stay on top of your invoices. Invoices will appear here automatically if they have not been marked as paid for 14+ days or if they are open and ready to be sent to the client.
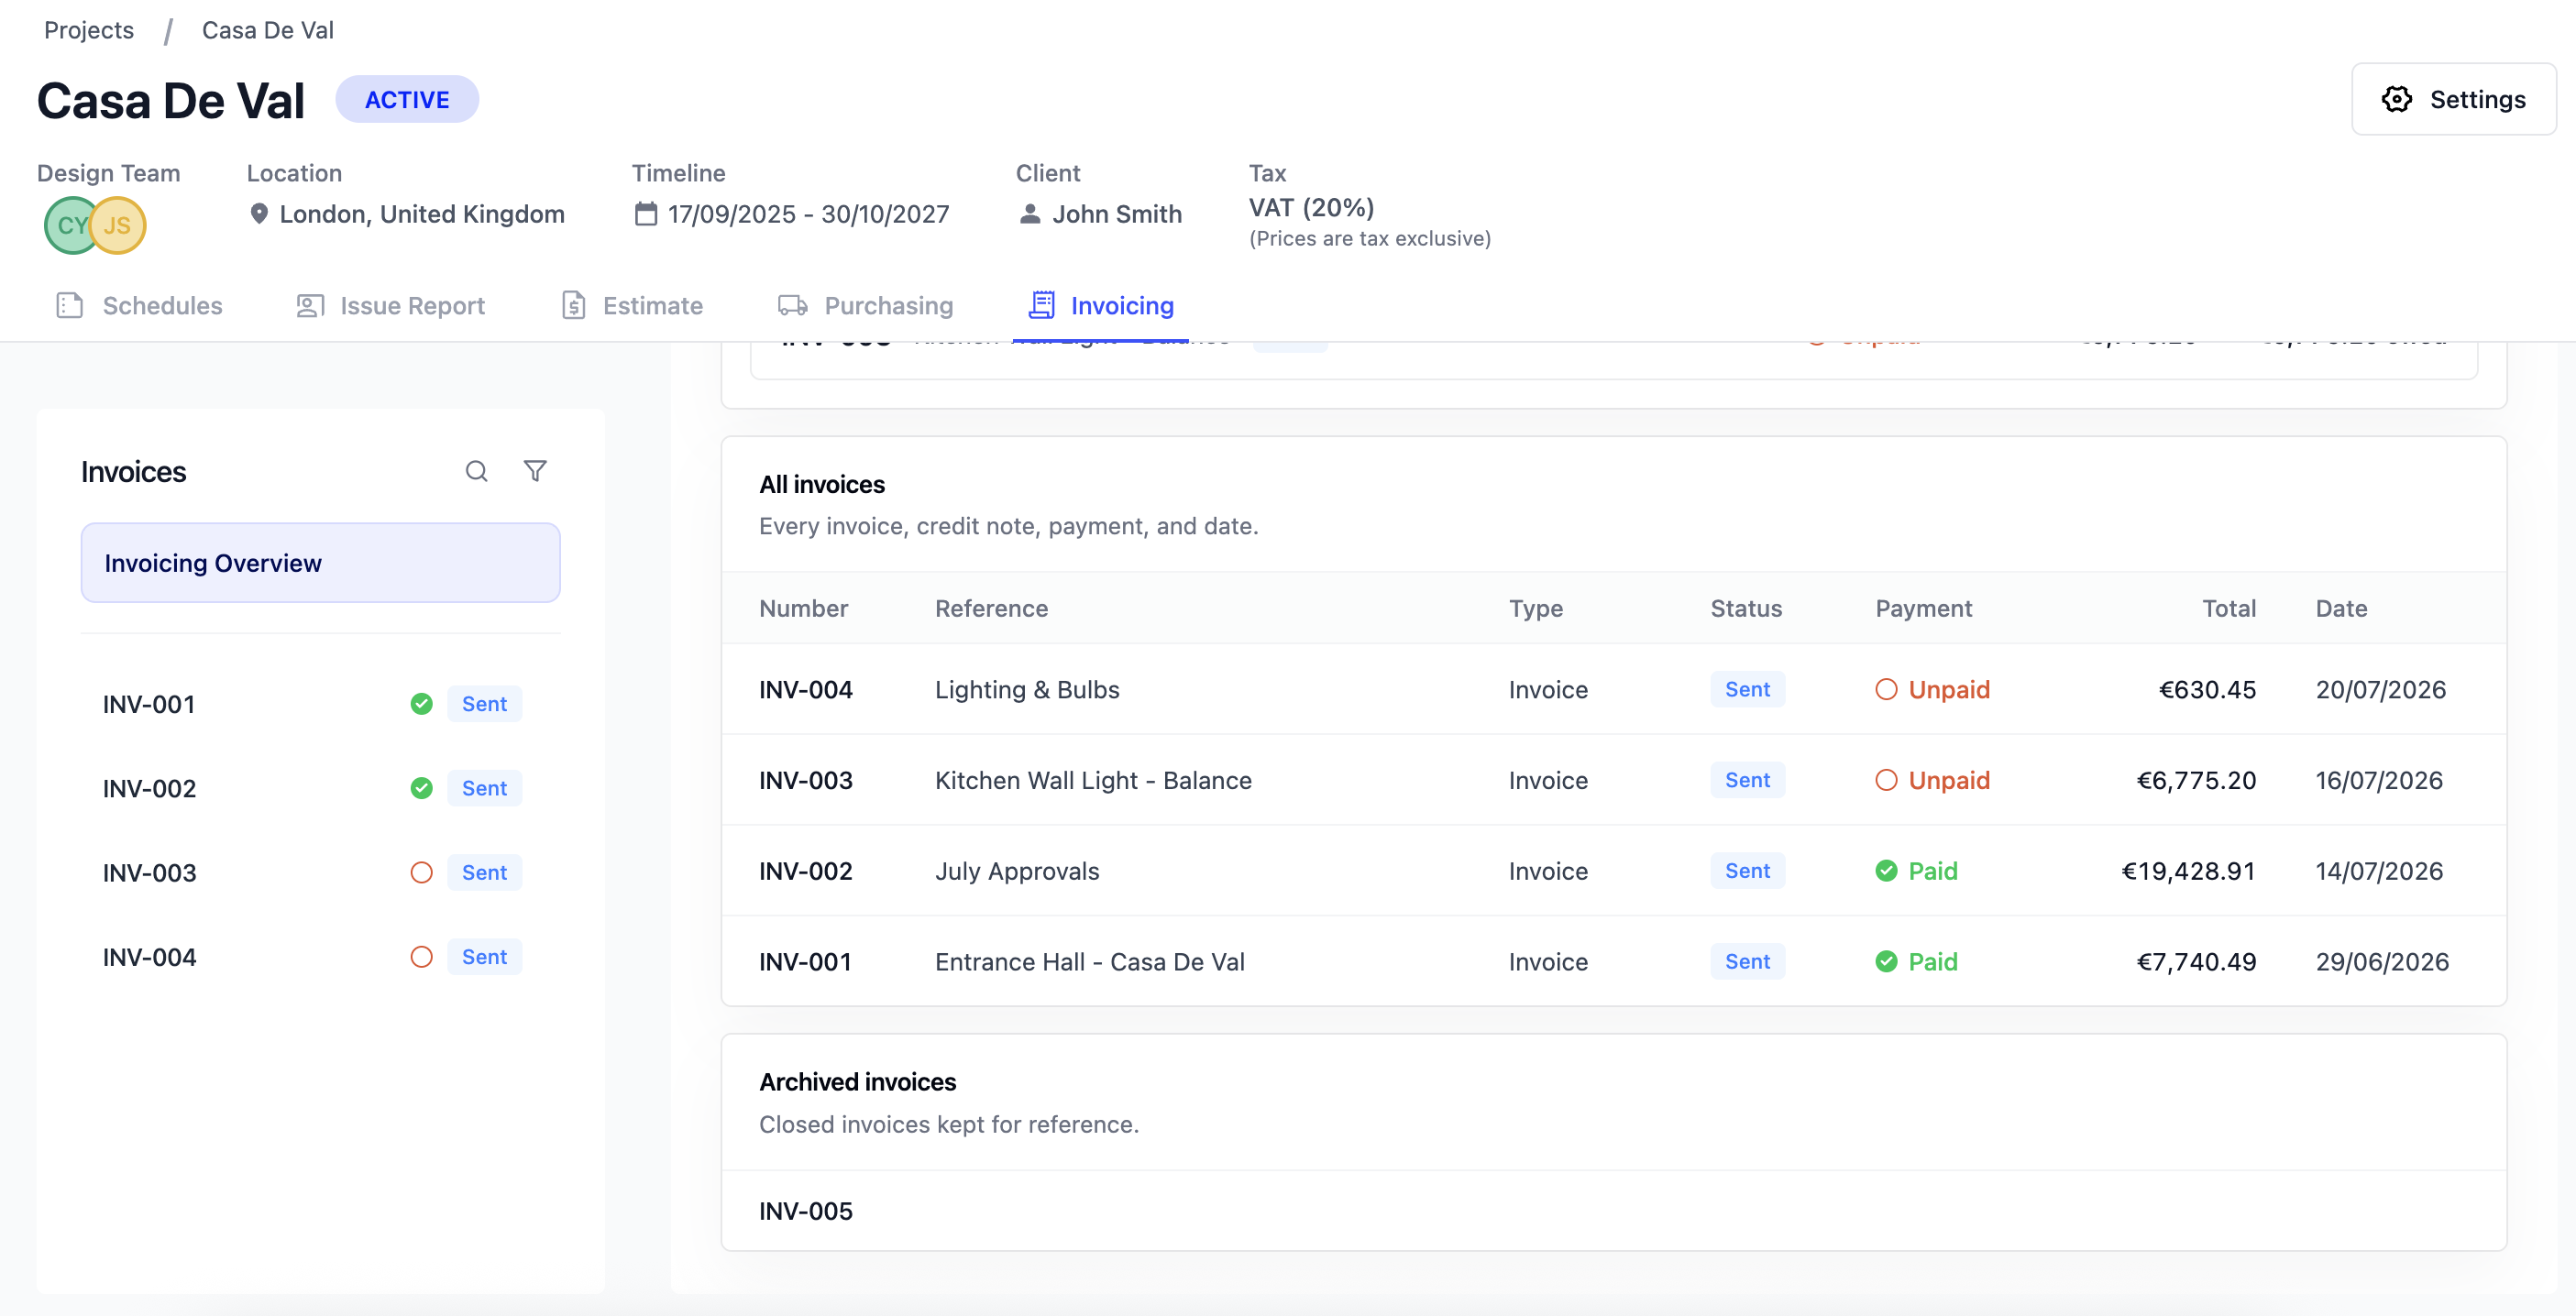
Further down the Invoicing Overview page, you'll see a table with all active invoices for that project, where at a glance, you can review statuses and key dates associated with each. To download a copy of each active invoice, click Download All.
Beneath there you will also see any archived invoices, keep for reference and reconciliation purposes. To learn more about archiving invoices, click here.
Invoicing side bar
The sidebar on the left of your Invoicing tab lists all your invoices in numerical order, making it easy to find and manage invoices at a glance. Click into any invoice to manage the items, grouping, track payment, or send to clients.
If you have a lot of invoices, you may prefer to browse by filtering to condense the list size, click the filter button in the top right of the sidebar to apply payment or invoice status.
Invoicing reports and exports
To download a summary of your invoicing overview, click the Invoicing Report button.
Creating an itemised invoice
There are two ways to raise an itemised invoice against your client estimate.
- Directly from the invoice tab
- Directly from the selected line item on your estimate
Creating an invoice from the Invoice tab is a useful preparation step - for example, if you want to set up and number an invoice in advance before any line items are ready to be added. Once the invoice exists, line items can be assigned to it from your estimate at any time.
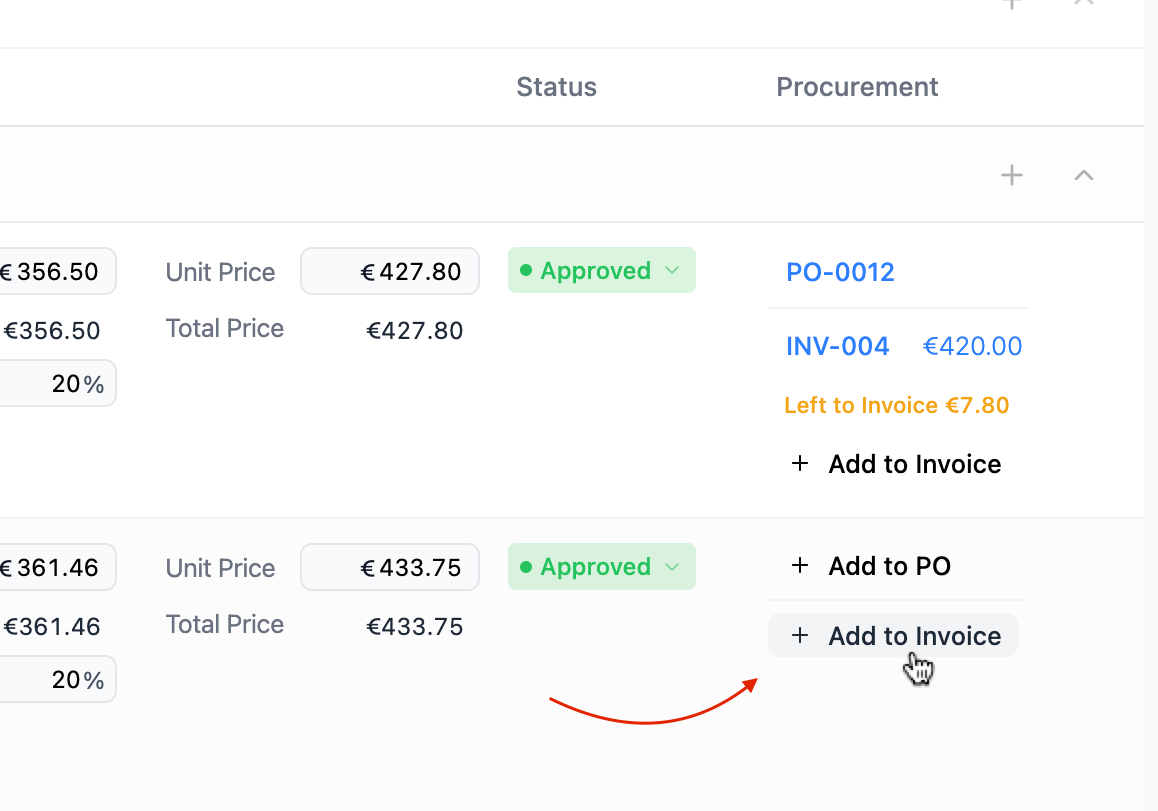
Raising an invoice from the estimate is the most common workflow. You can add a single line item to an invoice using the + Add to Invoice button in the Procurement column, or select multiple line items at once using the checkboxes and add them all in one go.
Raising itemised invoices from your estimate line items
Line items can be added to an itemised invoice directly from the Procurement column of your client estimate by clicking + Add to Invoice.
- + Add to Invoice - Navigate to the line item you want to invoice for, and click + Add to Invoice in the procurement column.
- Amount to Invoice - Enter a fixed amount, add the full remaining balance of the line item, or apply a percentage - useful if you're invoicing in stages or instalments.
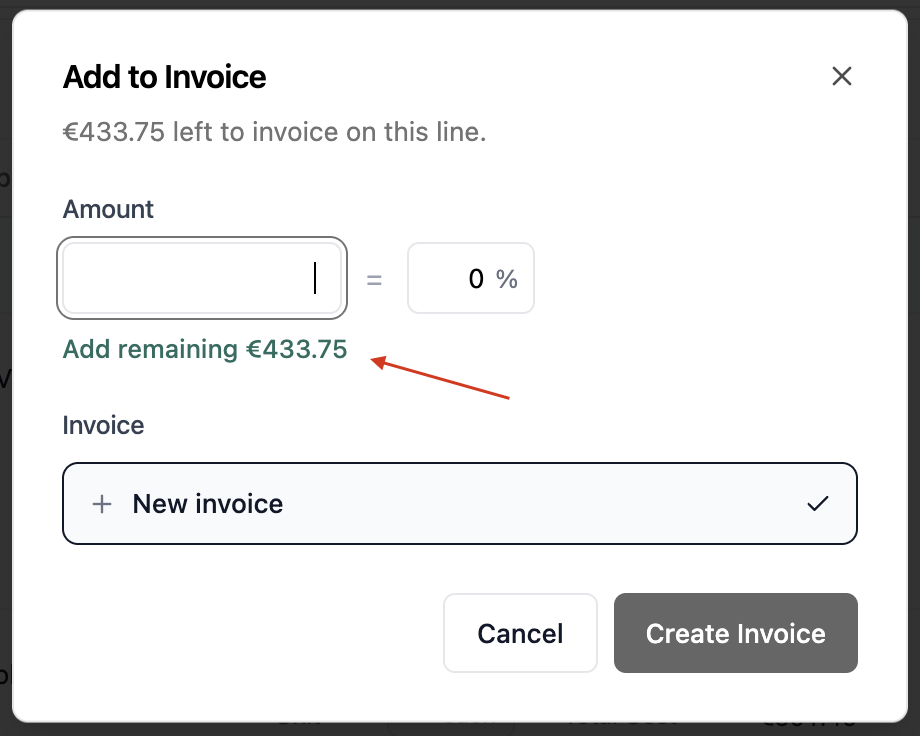
- Select Invoice - Create a new invoice, or select an existing open invoice to add this line item to. You can add as many line items as you like to an open itemised invoice.
- Review Invoice - Navigate to the invoice by clicking on any of the procurement column quick navigation links to review and send to your client. To learn more about quick nav links, click here.
Bulk adding line items to an invoice
To add multiple line items to an invoice at once, use the checkbox to the left of each line item - or click the segment heading checkbox to select all items within a segment. Once you've made your selection, choose Add to Invoice from the action bar at the bottom of your screen.
When adding in bulk, you can apply either the full remaining balance or a consistent percentage across all selected items - for example, a 50% instalment on everything selected.
If you need to invoice different amounts for individual items - such as one item in full and another at 50% - you'll need to add each line item to the invoice separately.
Grouping items on itemised invoices
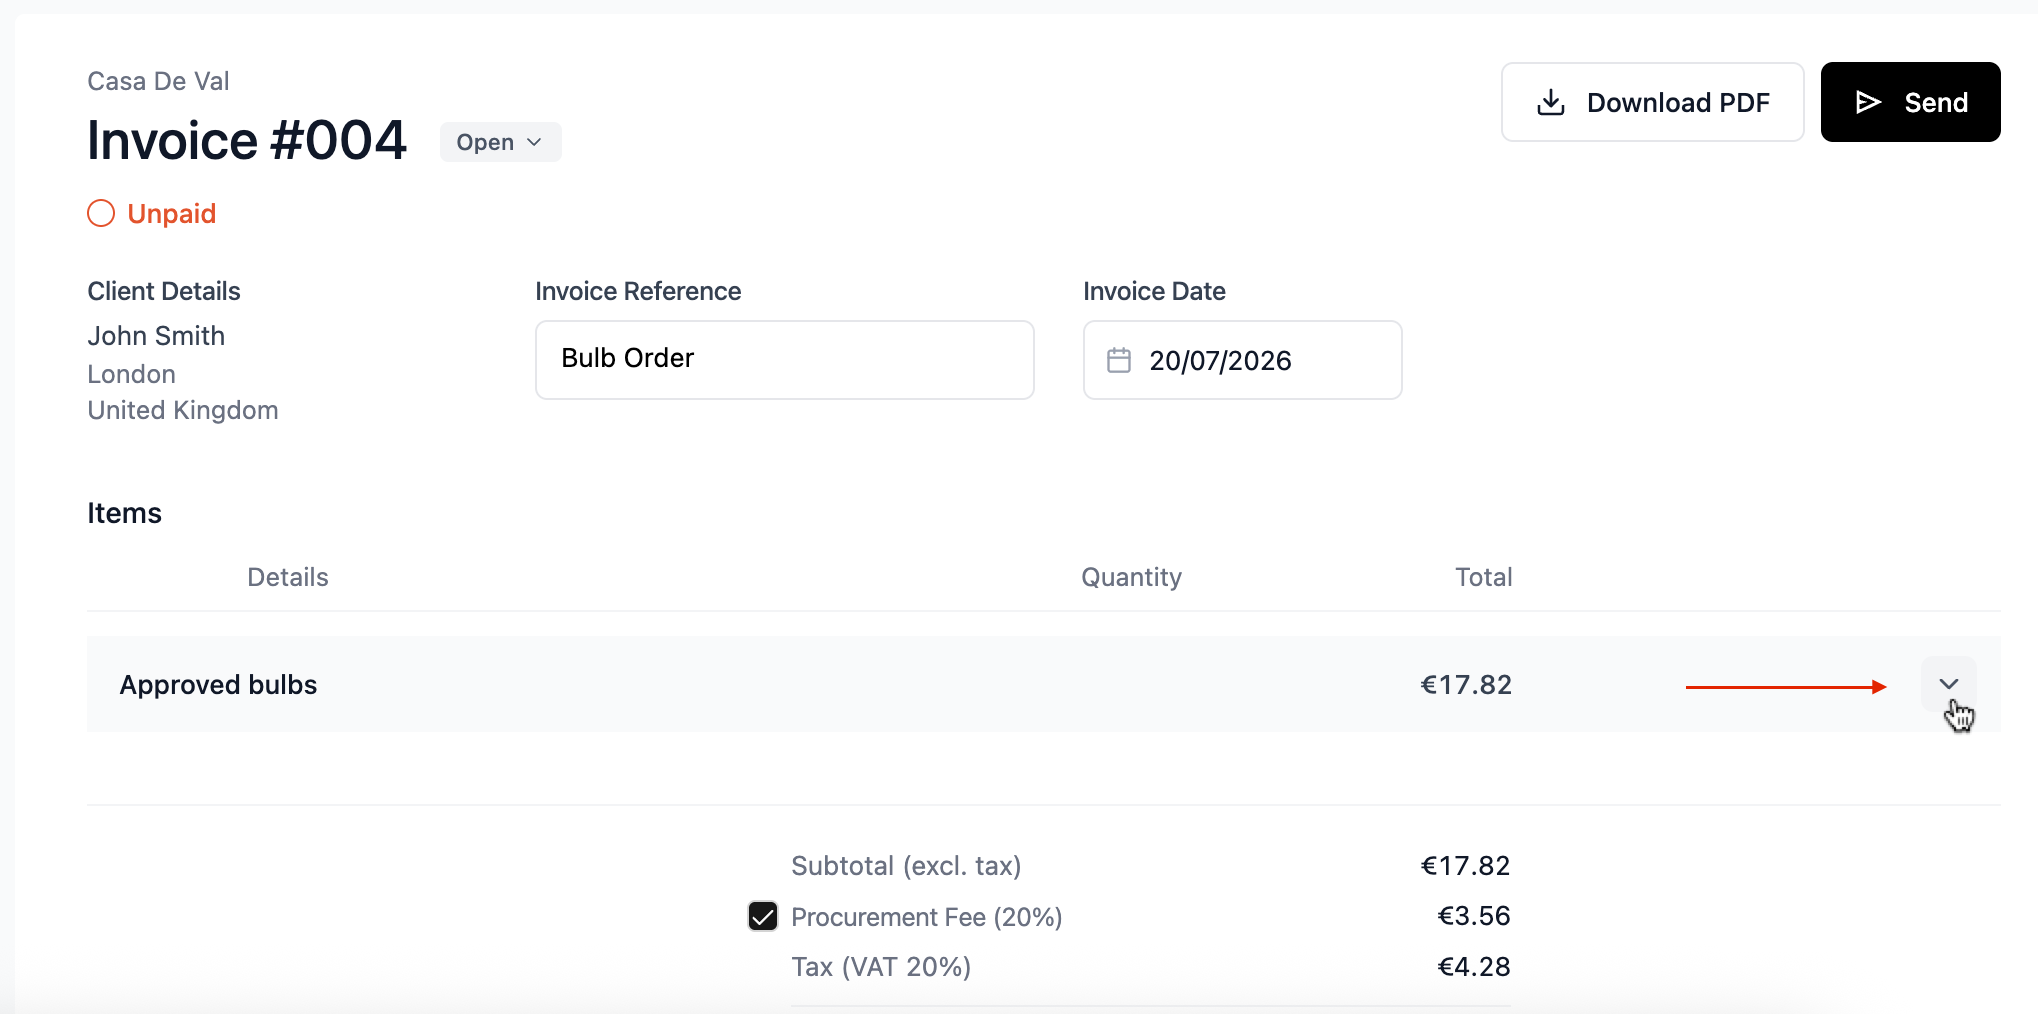
If you prefer to work with itemised invoices, but don't want your client to see each individual line, it's possible to group items together and hide specific details by using the checkbox to the left of the line on the invoice.
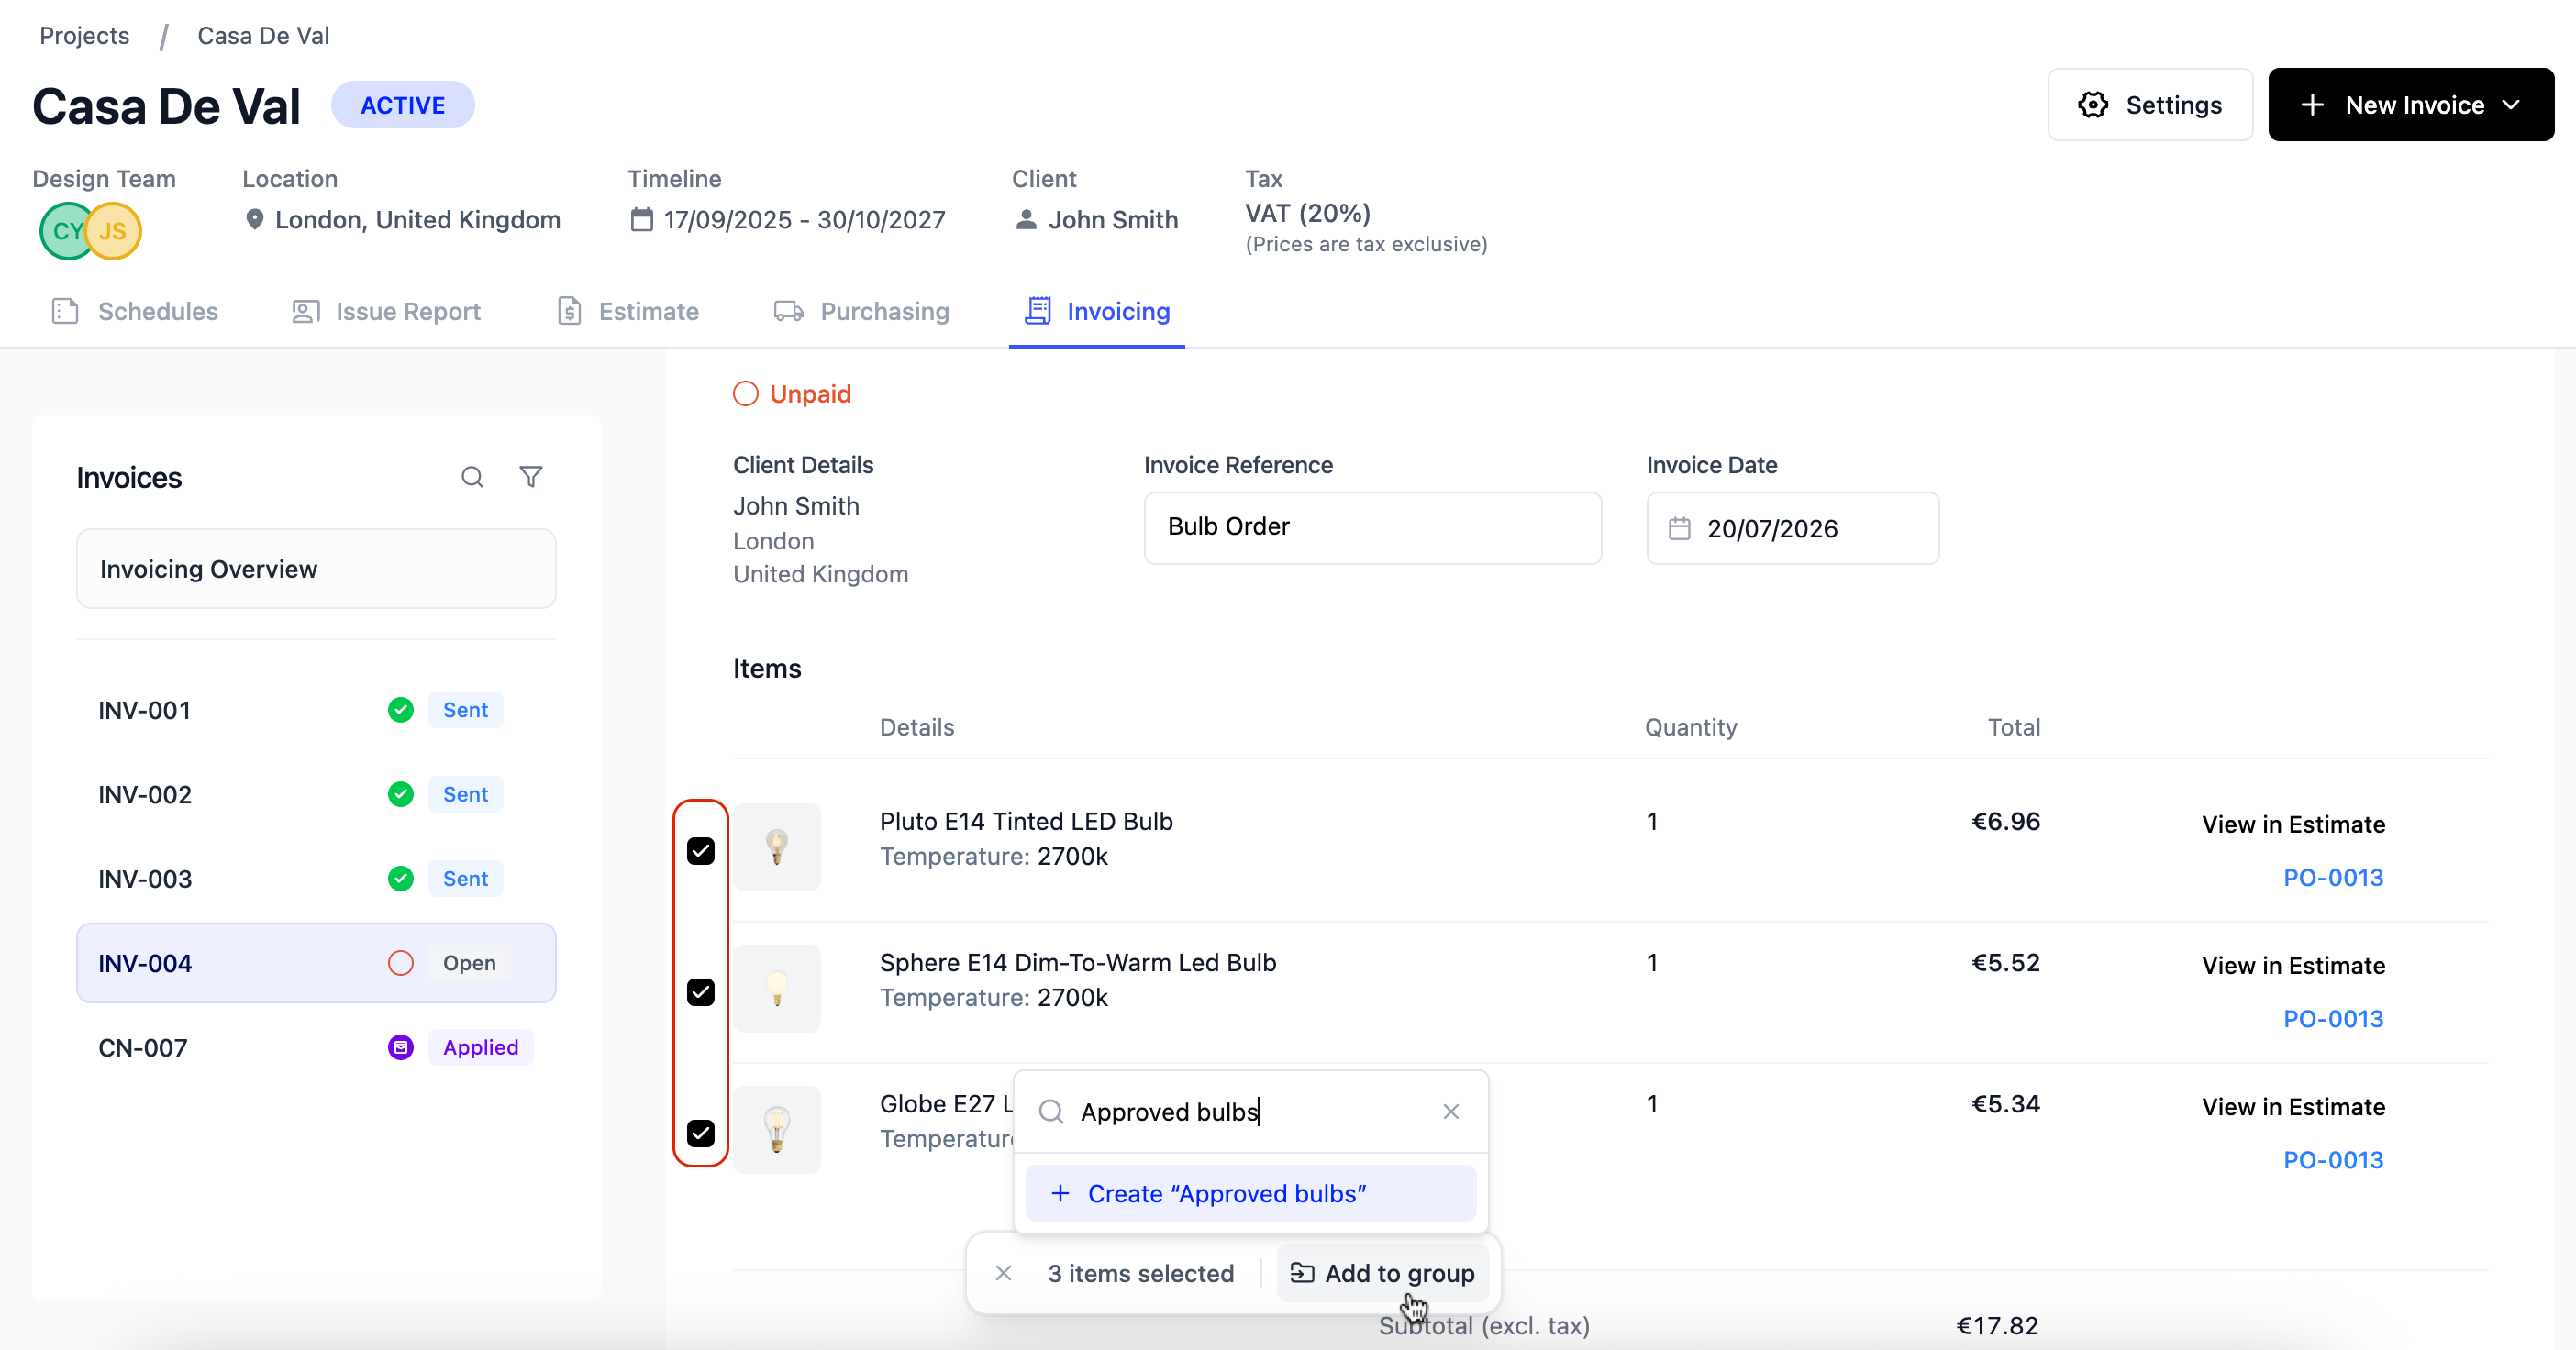
Once a group is created, you can expand the group to view those itemised lines, but your client will only see the name of the group on their invoice followed by the combined total price of all items within it.
Removing lines from itemised invoices
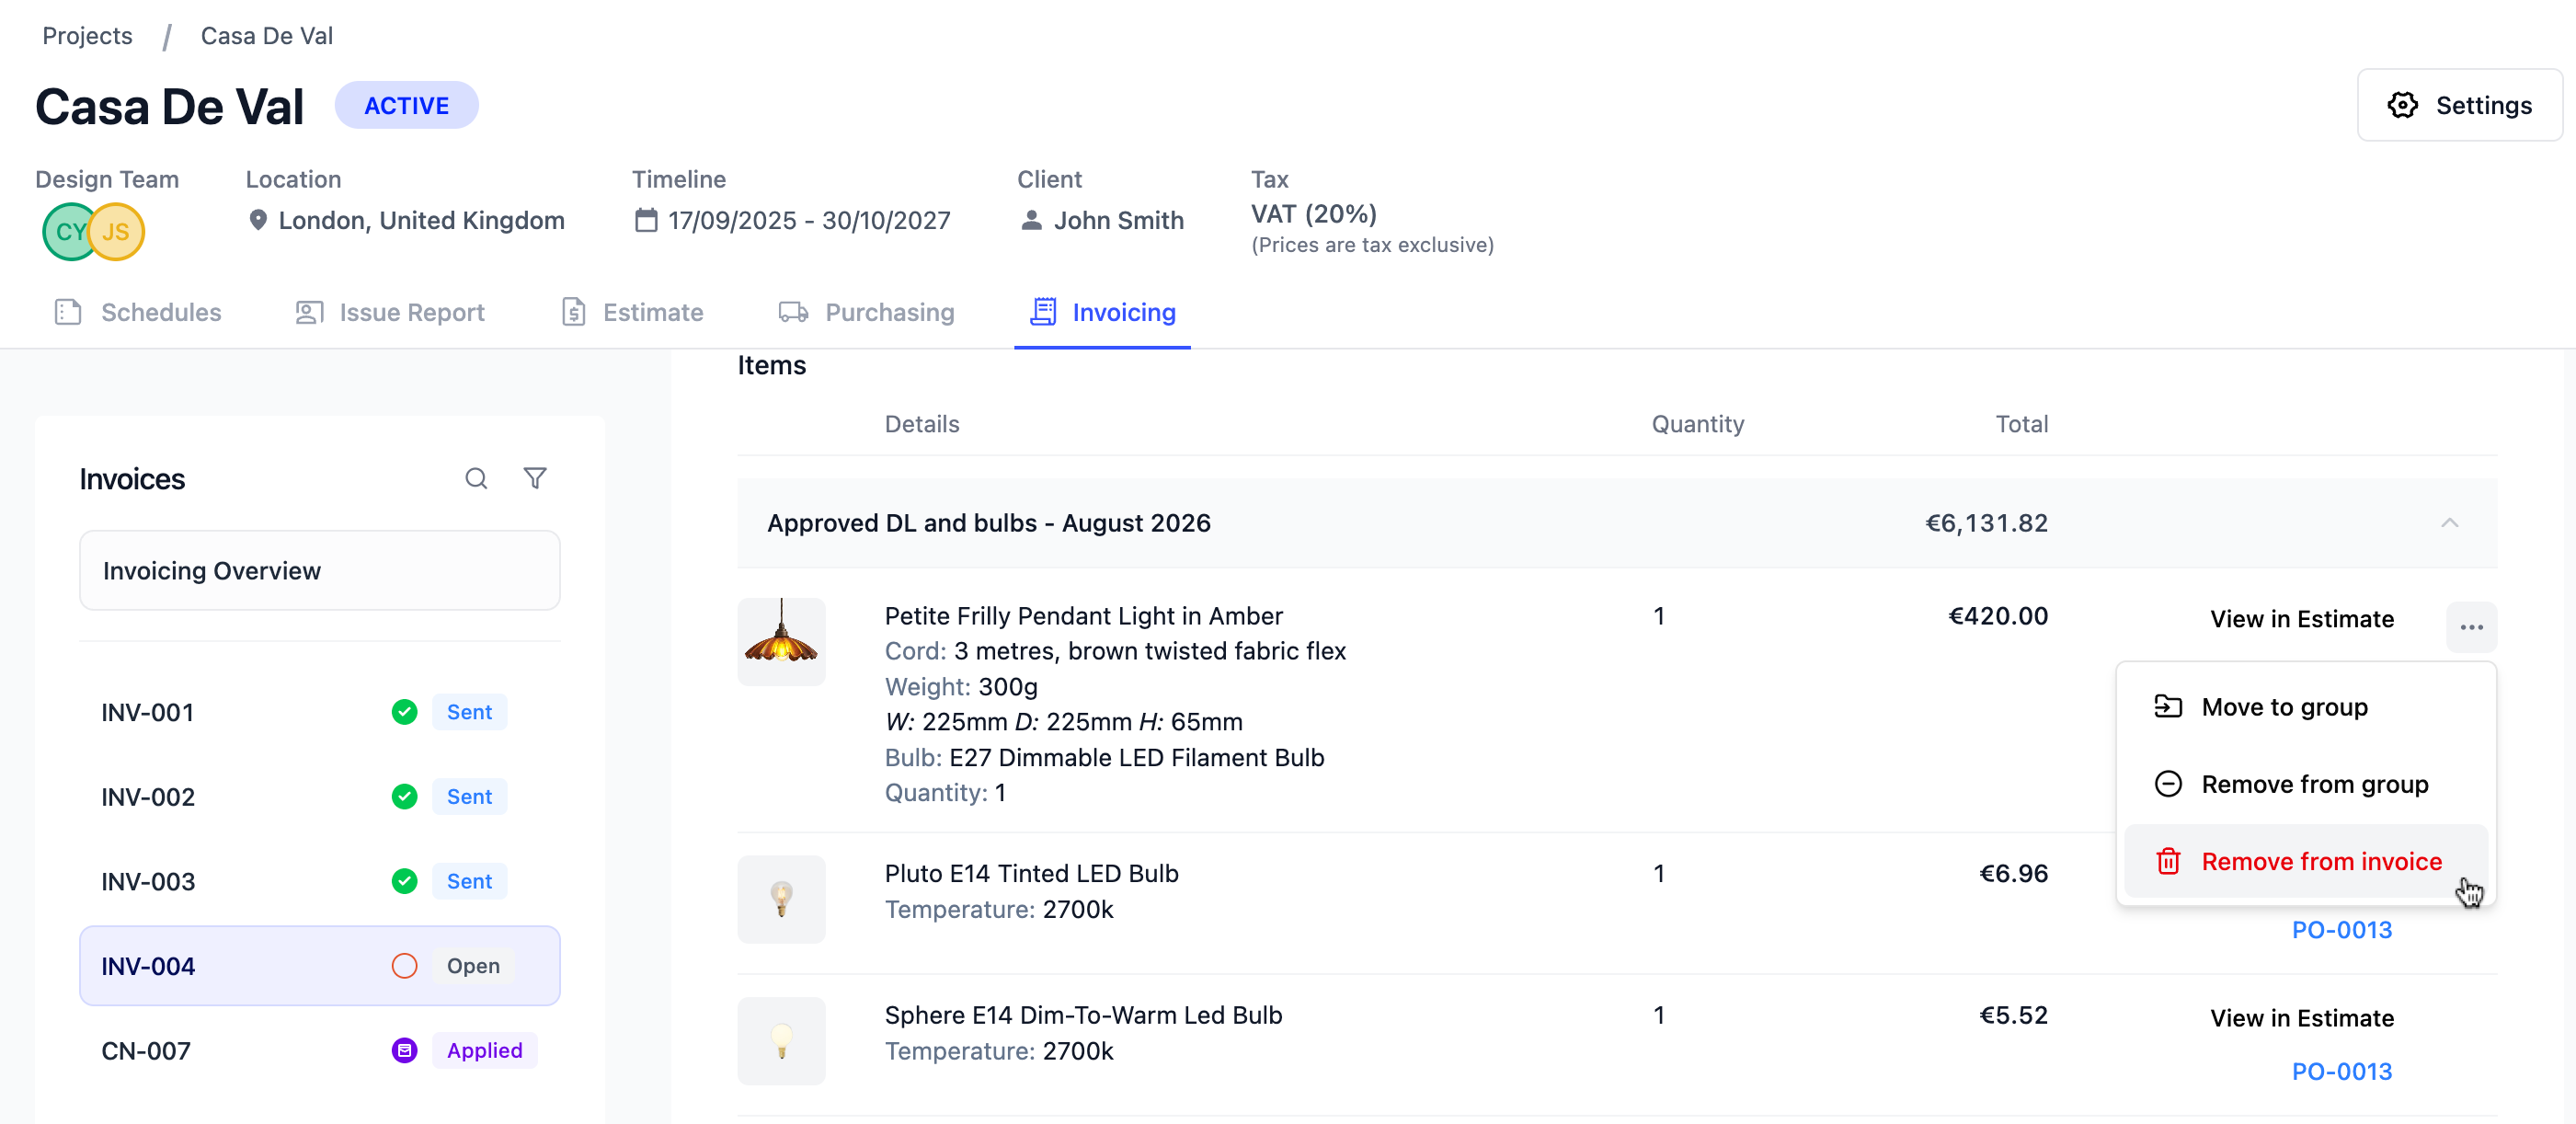
If you add a line to an itemised invoice by mistake, or you want to remove a line for some other reason, first set the Invoice Status back to Open if it's not already, which will allow you to edit your invoice.
Click the 3 Dots to the right of the line item you want to remove, and choose remove from invoice.
Note: Editing Paid Invoices
Manually reverting a paid invoice back to open will reverse any recorded payment activity. In most cases, we recommend raising a credit note instead - this preserves a clear financial record and maintains the integrity of your invoicing history.
Creating an instalment invoice
An instalment invoice allows you to bill your client a fixed amount or percentage of the total estimate, rather than invoicing for specific line items. These invoices are raised directly from the Invoice tab.
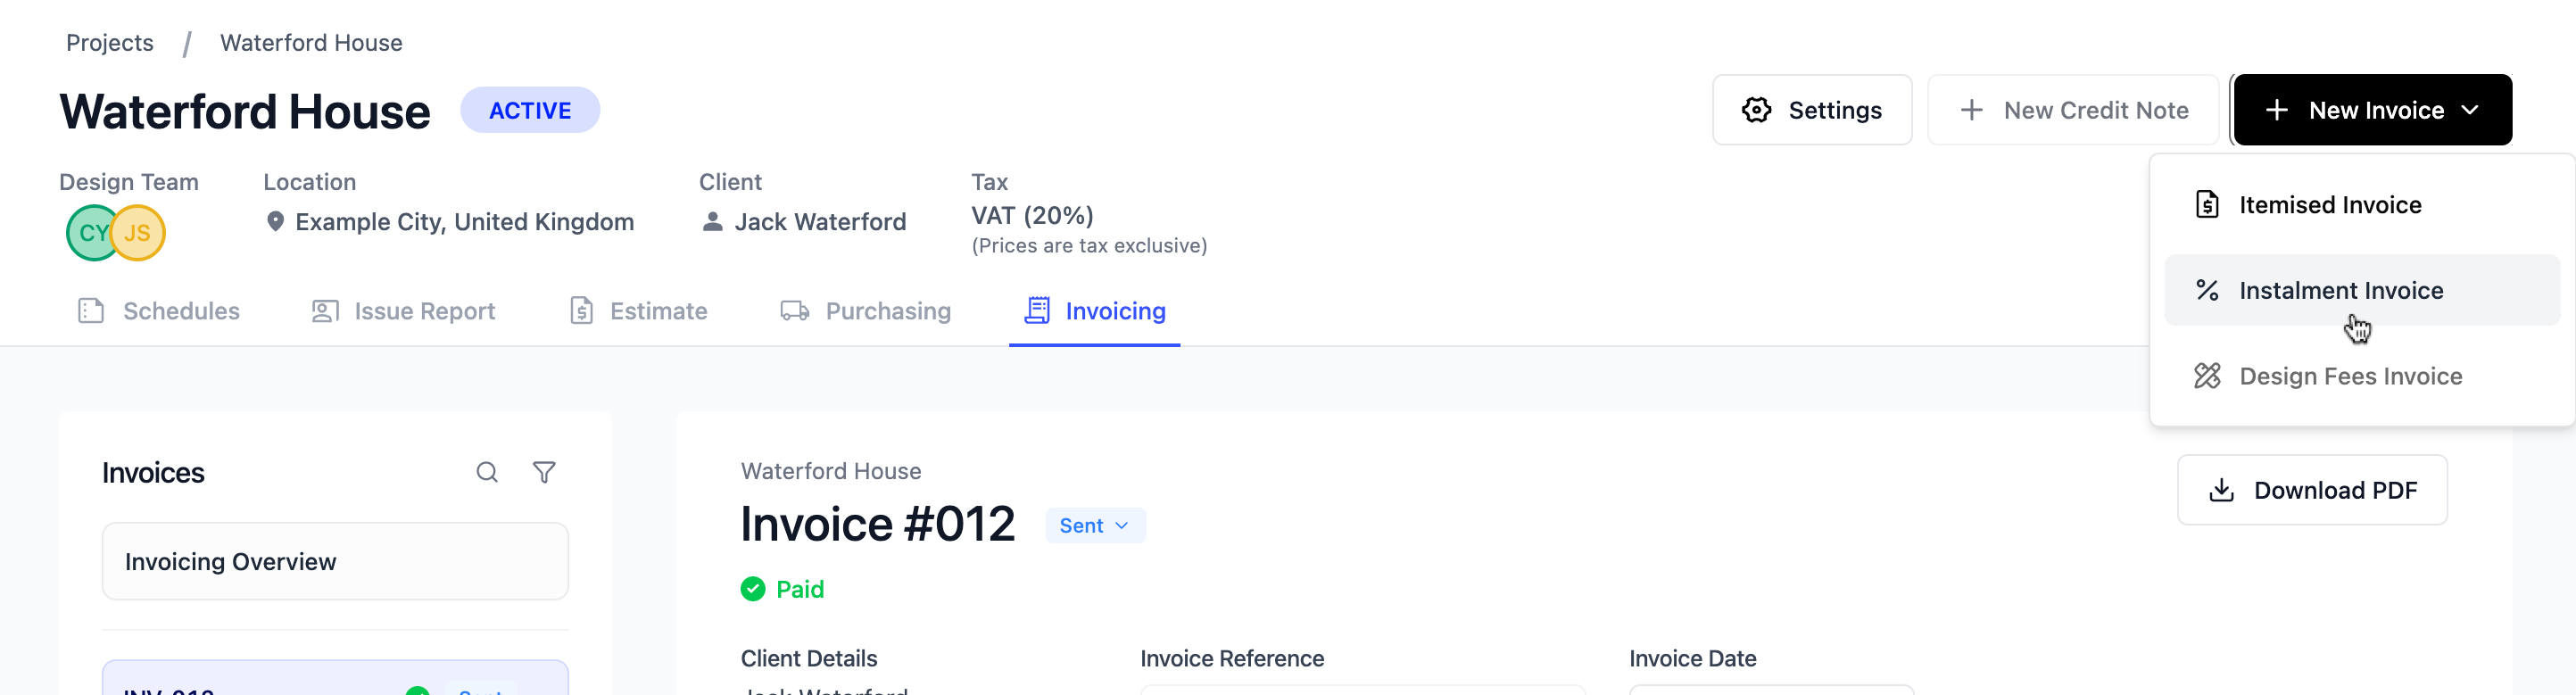
Instalment invoices are useful in a number of situations, for example:
- Deposit invoices - Charging the client a percentage upfront before any orders are placed.
- Stage billing - Invoicing at agreed project milestones, such as 50% at the start of procurement and 50% on delivery.
- Retainer or fee invoices - Billing for studio fees or services that aren't tied to a specific product or line item.
Unlike an itemised invoice, an instalment invoice isn't linked to individual line items on your estimate — it's a standalone charge based on an amount or percentage you define. This makes it a flexible option for studios that agree staged payment schedules with their clients at the start of a project.
Invoice statuses
As an invoice moves from an open draft right the way through to being marked as paid, its status updates to reflect where things stand. Statuses update automatically, unless you manually send your invoices to clients outside of the Inspec platform. To learn more about sending invoices to your clients, click here.
- Open - The invoice is active and can still be edited.
- Sent - The invoice has been sent to your client and is now locked for editing.
- Archived - The invoice has been voided. Note this status option is only available in the dropdown once all items on the invoice have been cleared. Active invoices cannot be archived. To learn more about removing items from an itemised invoice, click here.
Archiving an invoice
While we don't always encourage invoice archiving, sometimes invoices are raised by mistake and are never sent to the client, in which case you can archive the invoice number to keep your active invoice summary organised.
Invoices must be clear of any items before they are able to be archived. If you have marked the invoice as paid, you will need to manually "reverse" the payment activity before you can then open the invoice back up and remove lines. Hover over the payment activity at the bottom of your invoice to undo the action.

- Undo Payment Activity - Before you archive an invoice, you need to undo any payment activity that may have been recorded.
- Manually adjust status - Set your invoice status to open which will allow you to make edits to the invoice.
- Remove all line items - You will need to remove the items from your invoice, this will also remove the quick nav link to the invoice from your estimate and related purchase orders. Learn about removing items from an invoice here.
- Archive invoice - Once your invoice is clear of items, the archive status will automatically appear in the list of status options.
Applying project fees to invoices
Project fees allow you to apply a blanket percentage charge to each invoice generated for a project, which is separate from the line items in your client estimate. These are typically fees agreed with the client upfront, such as a procurement or admin fee, that sit outside of the individual product and supply costs.
For example, setting a 20% Procurement Fee means that percentage is automatically factored into every invoice sent to the client. Once paid, the fee amount is recorded as profit for your studio.
- Open settings - Go to your project settings and navigate to the procurement tab
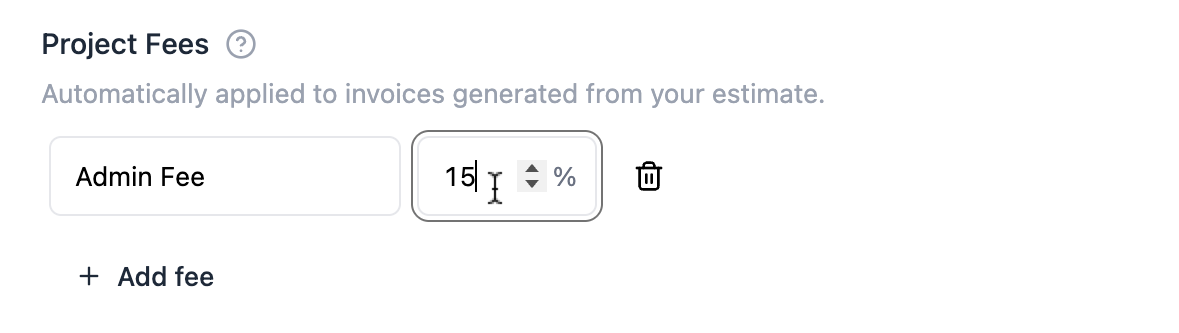
- Set Project Fee - Scroll to find where you can add project fees, and click + Add Fee
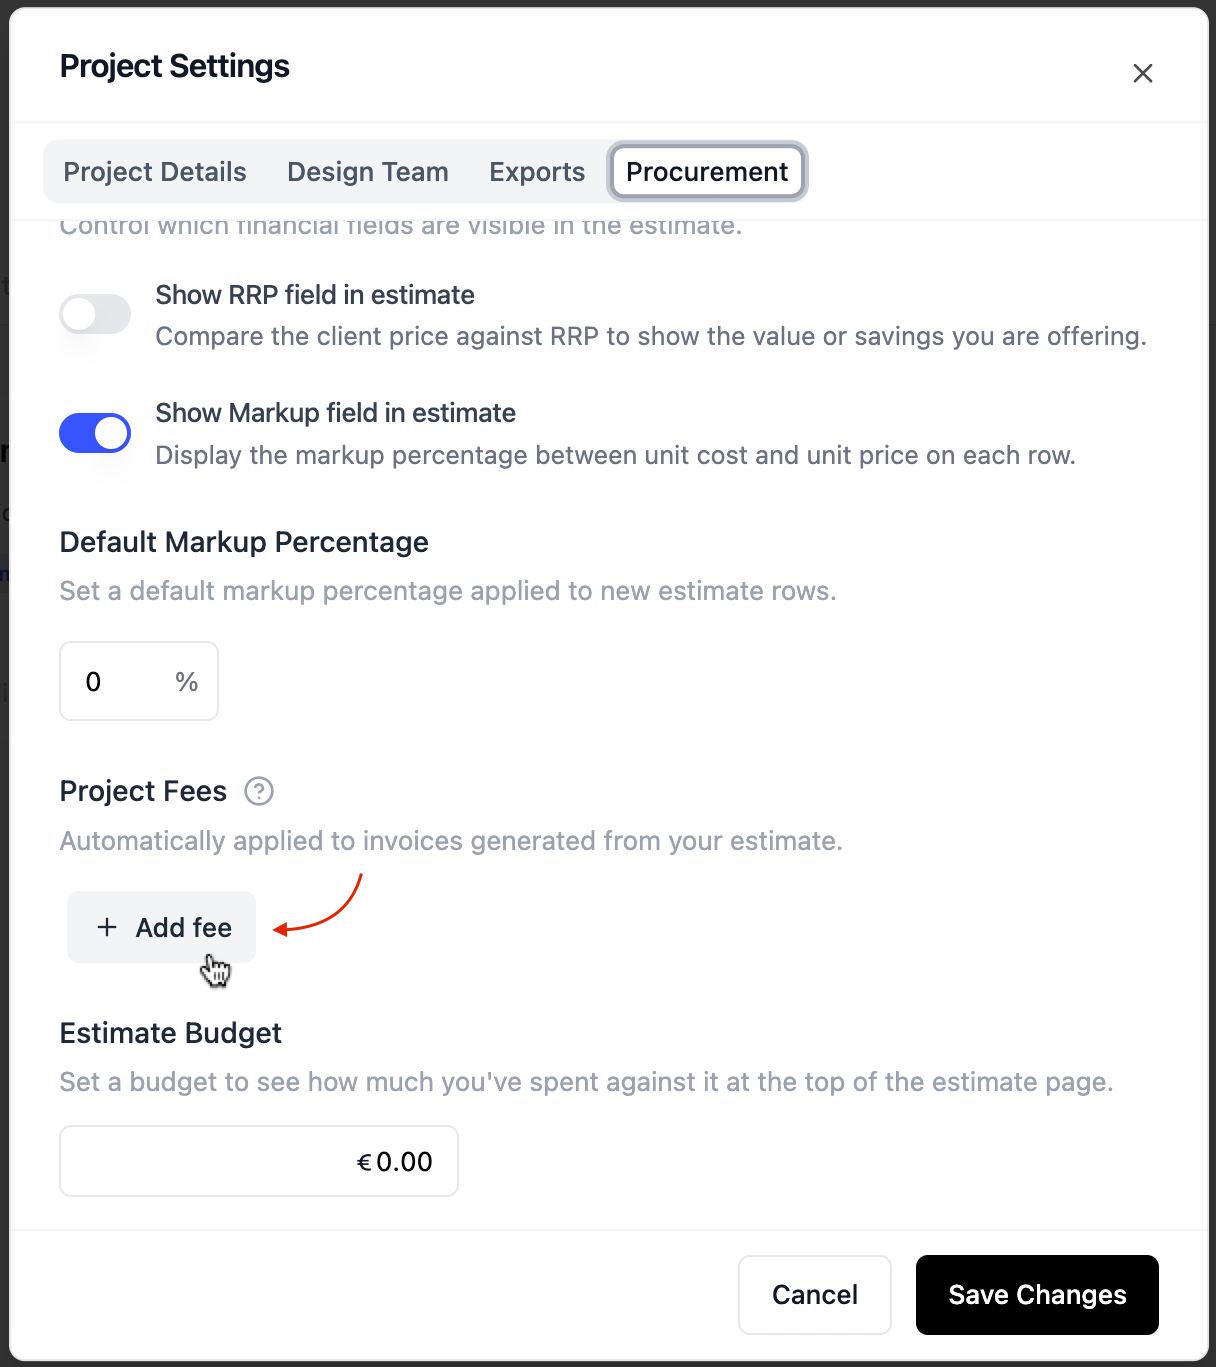
- Save changes - Once you've set your fee(s), remember to save your changes.
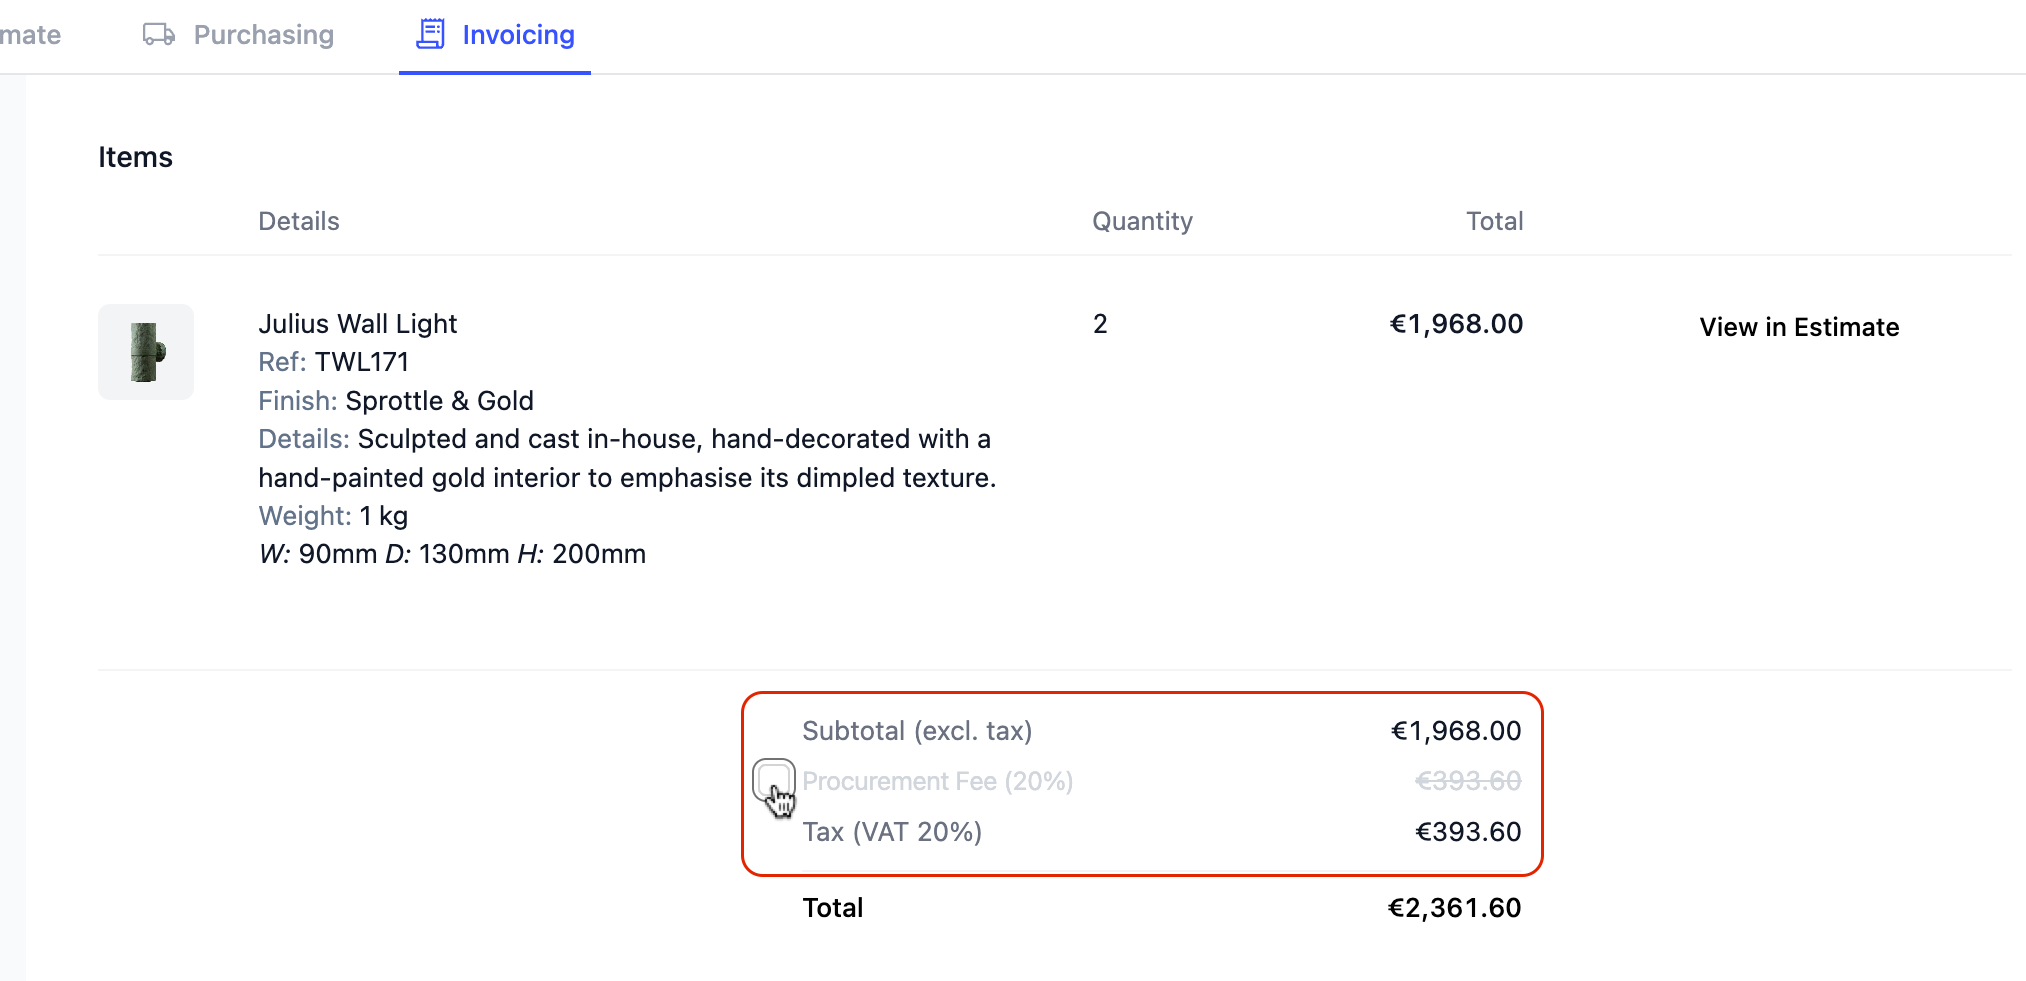
In some cases, you may not want to charge your fee on certain invoices. You can remove the fee by unchecking the box as shown below.
Modifying prices after invoicing
When you raise an instalment invoice or itemised invoice based on a percentage, the amount that you invoice is fixed, not the percentage. This makes everything manageable if your prices or quantities subsequently change.
For example, if you have a project and with an estimate total of £50,000 and you raise an instalment invoice for 50%. The £25,000 invoice amount is fixed, so if the total price to the client subsequently rises to £55,000, there will still be £30,000 remaining to be invoiced.
The same goes for lines in itemised invoices. If you invoice a £2,000 priced line at 50% and the price subsequently rises to £2,500, there will still be £1,500 remaining to be invoiced for that line.
Creating itemised credit notes
If your client has changed their mind, quantities have changed or you need to cancel the order and respecify, you can raise an itemised credit note and either apply that to your client's account or return the money to the client through your preferred channels.
If you have a purchase order against this line, it's best to have checked with your supplier that it's possible to cancel the order and then process the refund for that item prior to issuing a credit note to your client. You will see the amount you need to refund to your client shown as an overcharged amount in the procurement column of your estimate.
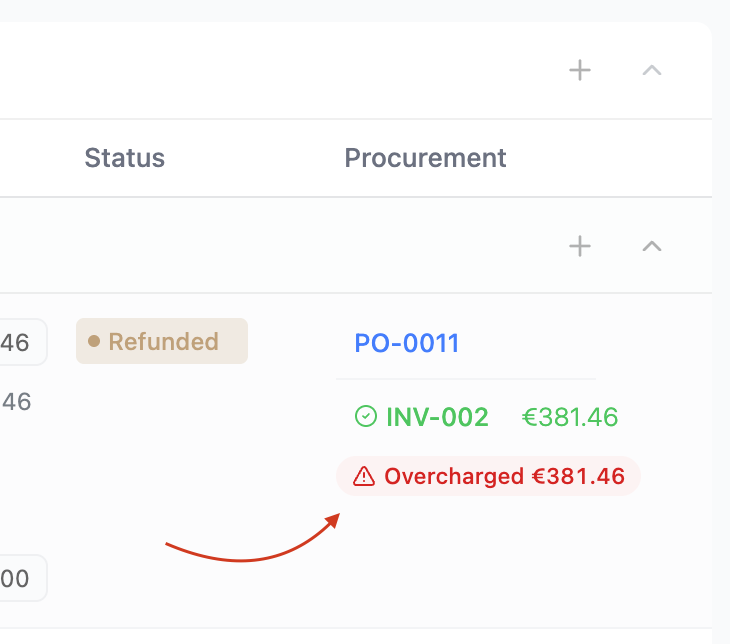
To learn more about processing a supplier credit note, click here.
- Add to Credit Note - Select the grip icon to the left of your line item and choose add to credit note from the dropdown menu.
- Apply Amount - Confirm the amount you want to apply to the credit note. If you have any charges applied, you will see a breakdown of the costs. In the below example, if you didn't want to credit the delivery charge, you would simply zero out that cost.
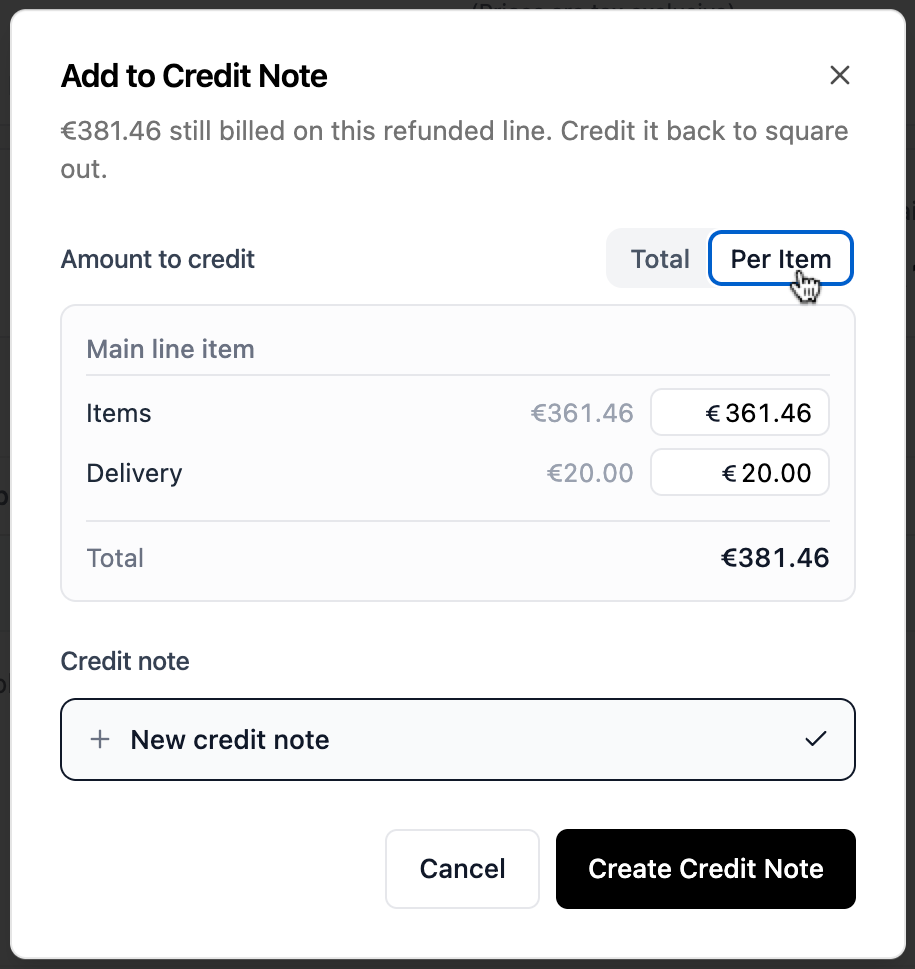
- Select Credit Note - Create a new credit note or apply to an open credit note if you have one, then click create credit note.
- Review - Go to your invoicing tab to review the credit note before sending it to your client. Either credit the amount to the clients account or refund the money to them using your preferred channels outside of Inspec.
To learn more about applying credit to your client's account click here.
Creating instalment credit notes
If the total client estimate price is reduced, and you've raised instalment invoices for more than the new total price, you'll need to issue a credit to your client.
You can check if you've overcharged your clients, by viewing the balance at the top of your estimate page. If the figure is a negative amount, then you have invoiced your client for more than the total estimate price.

To raise an instalment credit note:
- Go to Invoicing - Navigate to the invoicing tab for that project
- + Add Credit Note - At the top right corner of your screen, click the + Add Credit Note button which will automatically calculate the balance to be credited.
- Review amount - Review the amount to credit, and click Create Credit Note
- Send to client - Once the credit note has been generated, you can send this to the client. You decide if you'd like to apply the amount to the client's account, or refund the money to the client through your preferred channels.
Sending invoices to clients
The invoice status will change automatically from Open to Sent when you click the Send button. This is intended to indicate that the invoice has been sent to the client.

Clicking the Download PDF button to generate a printable file won't automatically update your invoice status to Sent. If you prefer to send your invoices outside of the Inspec platform, you can manually set the invoice status at any time by clicking on the status indicator beside the invoice number.
Marking invoices as paid

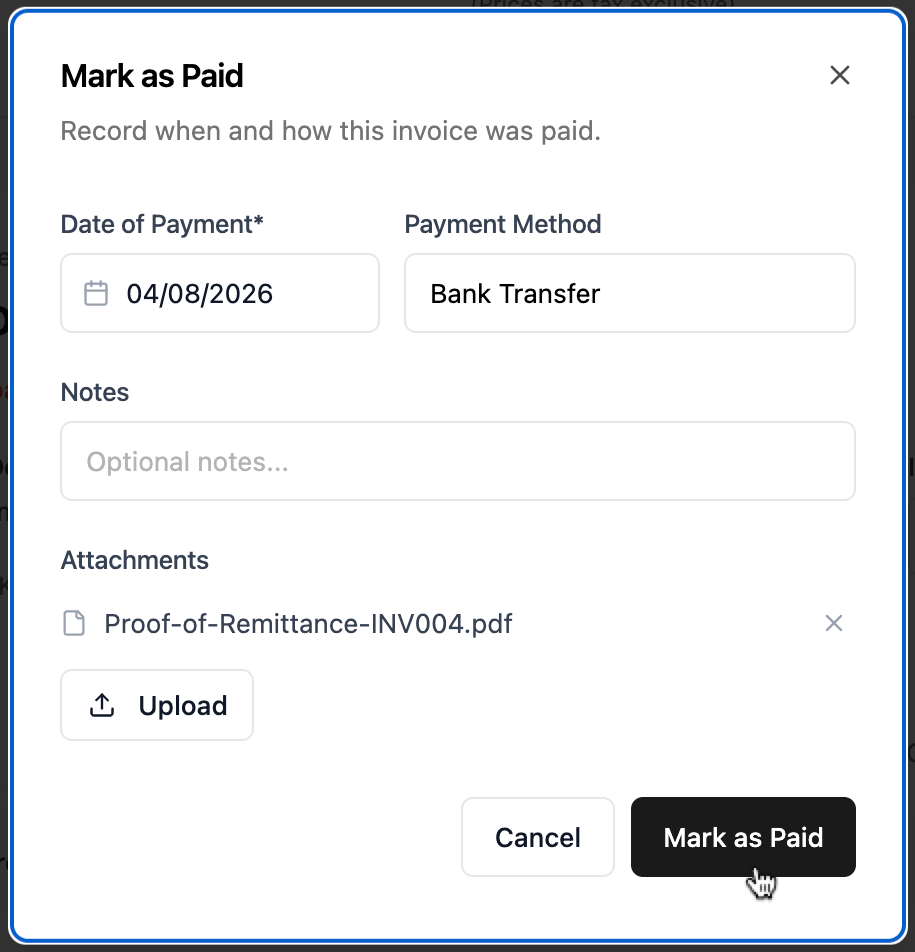
When you receive payment from your client, you can then mark the invoice as paid, taking note of any important details and attaching proof of the remittance for future reference and reconcillation purposes.
Note: Inspec does not process payments
All of Inspec's procurement tools are designed to help you track and manage cash flow throughout a project - but we don't handle payments directly through the platform. This means no transaction fees, no hidden charges, and no unexpected costs passed on to you or your clients. Payments between your studio and suppliers, or between you and your clients, are made through your own preferred channels.
Applying credit to your clients account
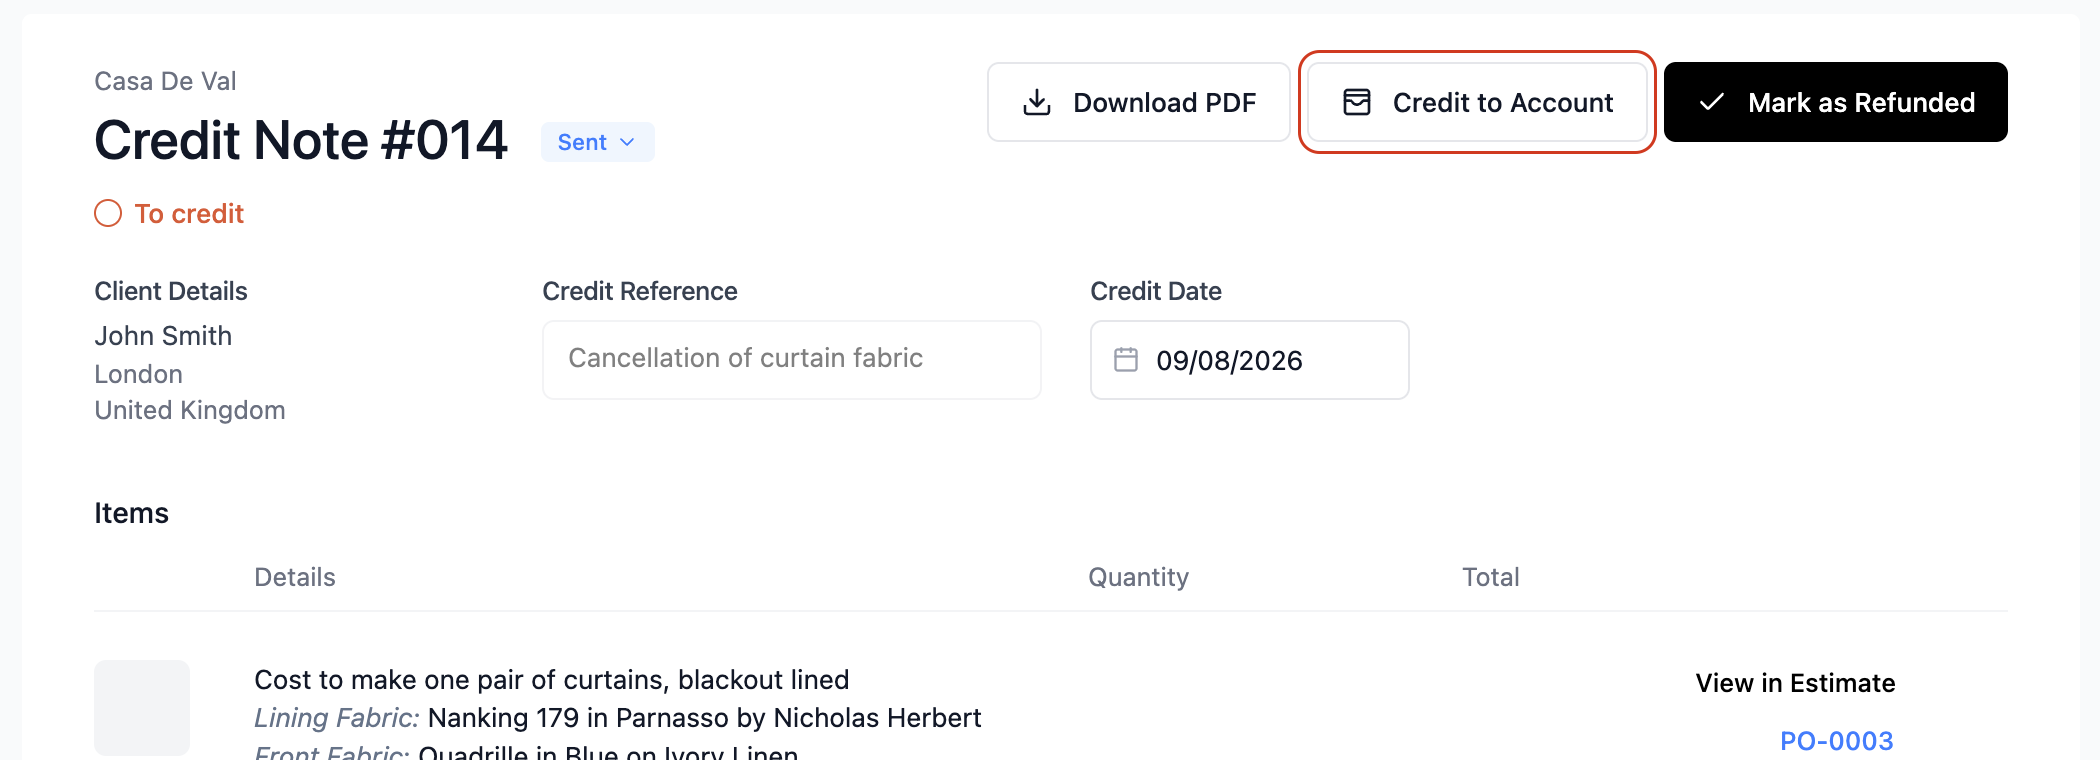
When a credit note is issued to a client, the funds don't have to be refunded immediately - they can be held on the client's account and applied to a future invoice instead.
When raising a new invoice, if a credit balance exists on the client's account, you'll see a Credit on File checkbox in the totals section. Checking this will automatically apply the available credit to the invoice.
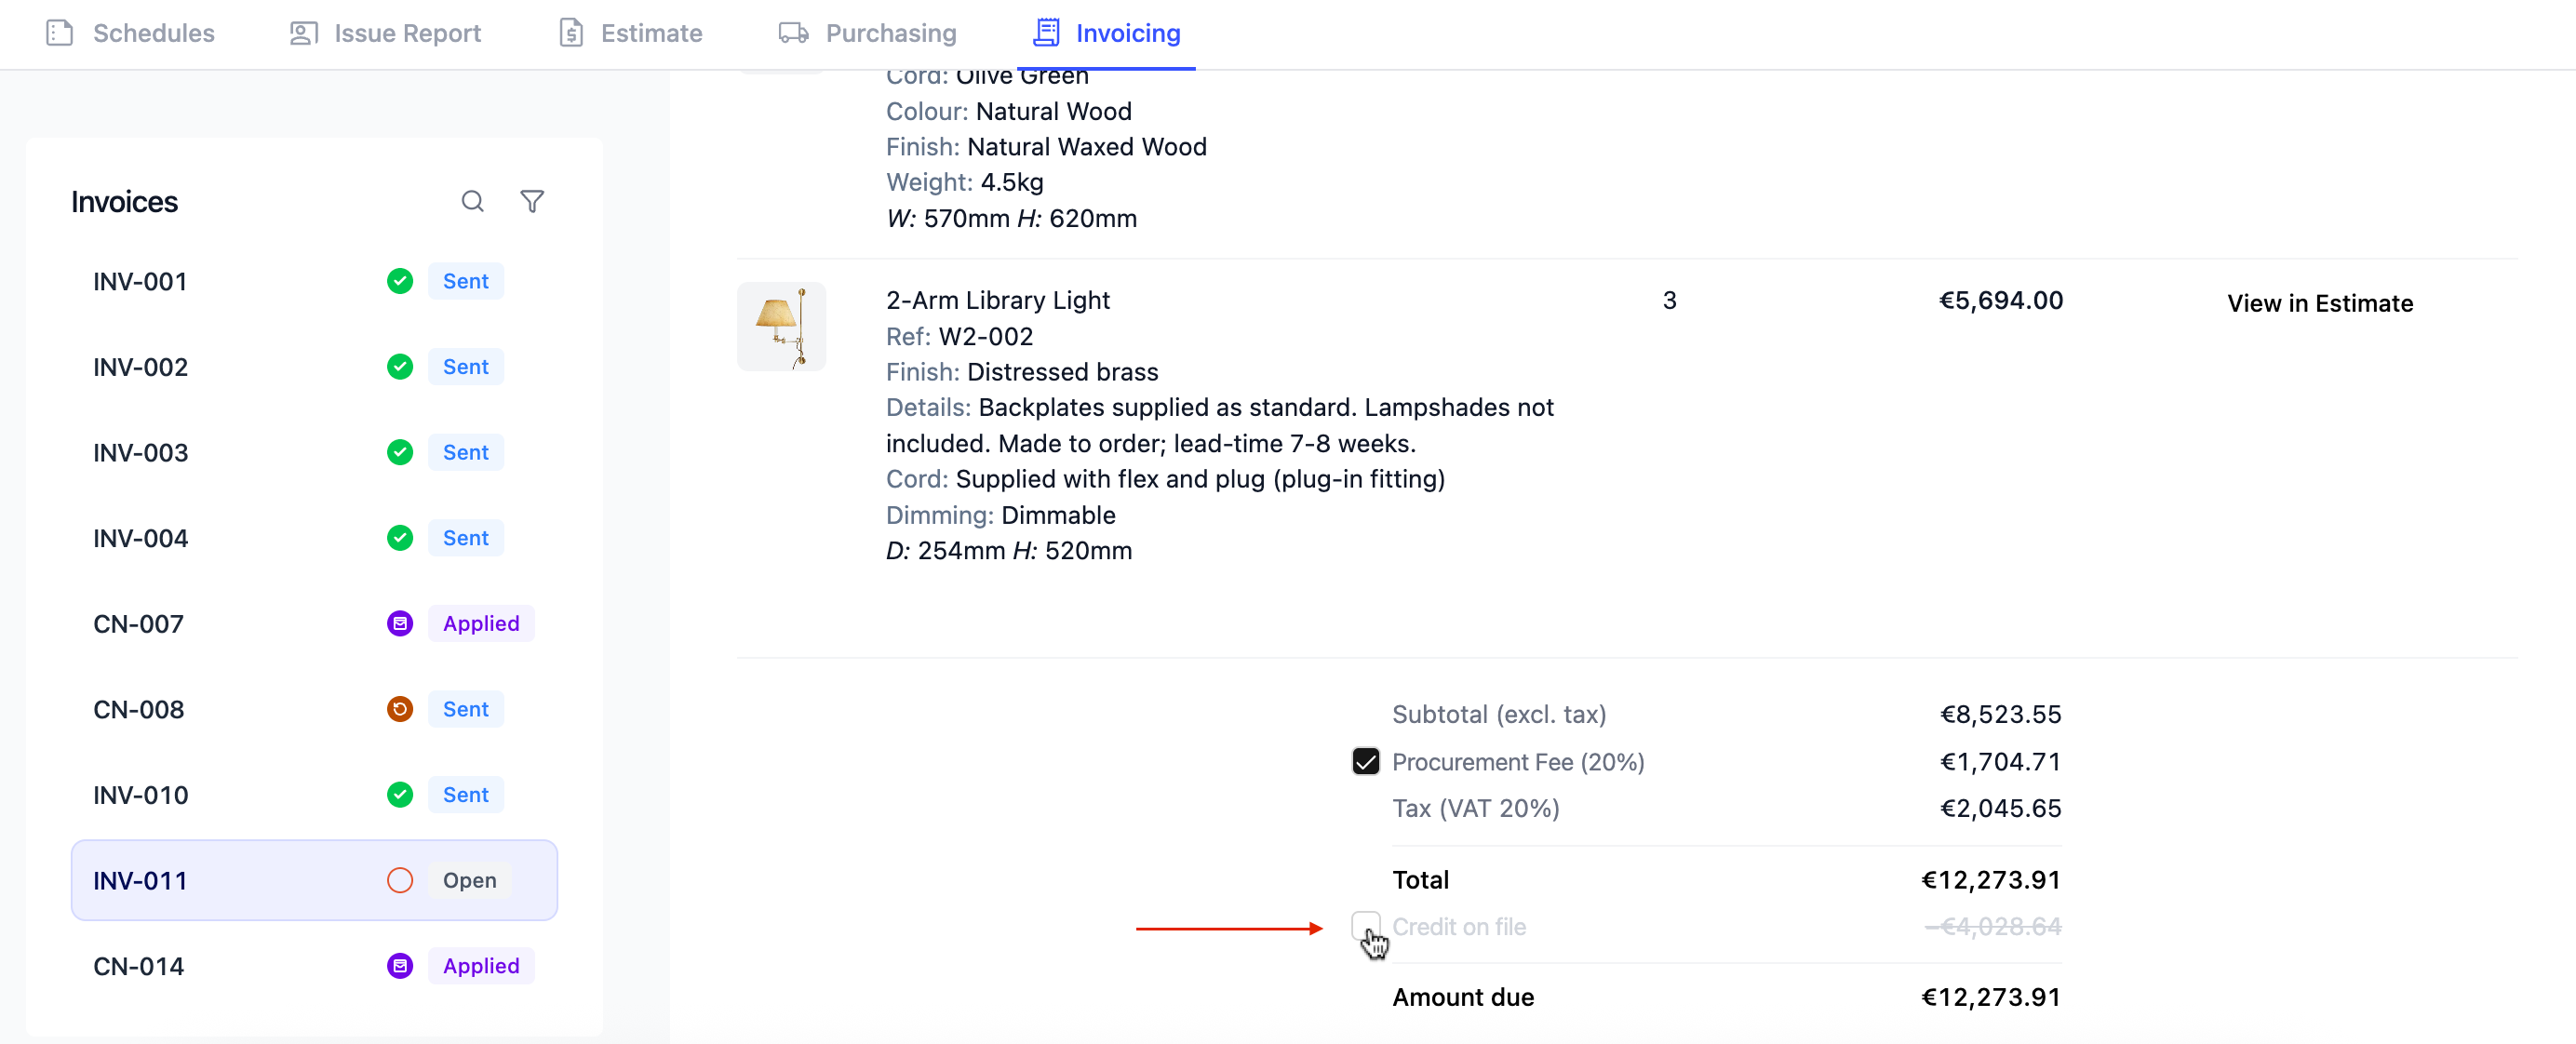
If the credit amount is less than the total invoice value, the client will only be charged the remaining balance.
You can check the funds on account any time in the Invoicing Overview page. If there is no credit on file, the total bucket will not appear.